A unique and viable approach to establishing local food self-reliance and building stronger communities.

Friday, January 31, 2025

Onions - Growing From Seed - deep pots

There are literally hundreds of varieties of onions grown in this world, but unless you grow your own you usually have access to only a handful of varieties from the grocery store.  If you rely on growing onions from ‘sets’, (the little onions available from nurseries with about a hundred per bag) your options are often still quite limited.  Growing from 'sets' has other disadvantages too; often they will produce a significant number of ‘doubles’ (meaning smaller onions at harvest-time) or they go to seed, 
which makes them tough and unpalatable.   
Here is a guide you can follow that will ensure your success at growing onions from seed.

Onions going to seed.
Here in the Willamette Valley of Oregon (USDA Zone 7b - Link to finding what zone you are in), we do best to grow what are called ‘long day’ varieties which include Cipollini (chip-o-leenie) both red and yellow varieties, Southport White Globe,  or White and Yellow Sweet Spanish. There are many more varieties to choose from; check your seed catalogs or go online to see a greater selection. (Be aware that, if you wish to save your own seed, you must choose Heirloom/Open Pollinated non-hybrid seeds. Those listed above are all Heirloom varieties.)

You will need:
  • Sifted potting mix
  • Sand (optional)
  • Pots: 4"-wide x 6"-deep (1 pot per 25 seeds)
  • Seeds; start with fresh seeds each year; onion seeds lose viability within one or two years.
  • Greenhouse or grow-lights, or the ability to bring seedlings indoors if in danger of frost.
  • Plant-mister  
When to start: About eight-to-ten weeks from the time you wish to transplant them into your garden. We always get the seeds started around the middle of February. By late April the seedlings will be ready to set out into the garden.  They are ready when you can see a clearly defined "bulb", 1/8" to 1/4" pushing above the soil-surface in the pot. At this stage, the sooner they get into the ground the larger your onion bulbs will be at harvest time.  It’s always a good idea to have a bed in mind that you’ve prepared during the previous fall since it’s difficult to prepare beds in the spring if you have a long rainy season like we often experience here in Oregon. The seedlings can handle a touch of frost at this stage but its no fun transplanting them in really muddy garden beds. Some people wait until early or mid-March to start seeds and still have plenty of time for the onions to ripen.

Pots: We've found that starting the seeds in pots that are 4" - 6" deep is best. Any shallower and the seedlings become root-bound before it's time to transplant them.

Soil/Sand: Start with a good organic seed-starting mix.  It doesn’t need to be a premium potting blend, in fact, if you start with too rich of a soil blend you can experience a condition referred to as ‘damping off’ which looks like mold growing on the surface and which causes the young seedlings to rot as they emerge from the soil.  One way to help eliminate this condition is to sprinkle a thin layer of sand over the seeds.  By keeping the soil damp but not too wet and having good ventilation you shouldn’t have this problem. 

Onion seeds can be started in a variety of containers.
Fill the pots with a sifted soil to about 1/2" from the top (tiny seeds find it difficult to germinate in soil with large chunks of material). Level out the soil, tamping them down with the bottom of another pot to create a level surface so that all of the seeds will be sewn at the same depth (otherwise they germinate unevenly). 

Seeds: You may want to actually count out the seeds the first time so that you can have an idea of what 25 - 35 seeds looks like because that is about how many would be optimal to sew in 4" pots.  You can adjust up or down depending on the size container you choose.  The idea is to not have an overcrowded condition that would produce weak and unhealthy seedlings.  Place the seeds in the palm of your hand and pinch out a few at a time. Gently drop them on the surface of the soil, distributing them as evenly as you can without becoming too concerned about accuracy.  It’s OK if some seeds are touching each other. Sprinkle a sifted layer of starting mix or sand over the seeds at a depth of about an eighth to a quarter inch.  Tamp it down again and water gently (a planter mist-er works great at this stage). 

Watering:  Keep the soil moist using either a small spray bottle or water them from below by putting water in trays and setting pots in them. Tiny seeds, until established can be washed away with more aggressive watering techniques. Make sure you label them with the name of the variety and the date you started them.  Then it’s time to be patient, and let Nature do her work.

The seeds will not require sunlight until they have emerged from the soil, usually about two weeks from the time they are sewn, so you can keep them indoors where they will not freeze, on a window sill or in a greenhouse if you have one. Once the greens are up, they will require full sun. If you don't have grow-lights or a greenhouse, be sure to bring them inside at night if it looks like you may have freezing temps.

Teasing onion-roots apart before trimming.
Transplanting: Each pot of seedlings must be teased apart. You will need to trim back both the tops and the roots before trying to stick these tiny seedlings into the ground. You trim the roots so they're easier to slip into the holes and you trim the tops so that the pruned roots can support the greens above.

First, dump the whole pot into the palm of your hand.  Next, separate the clump into several sections (maybe 10-12 seedlings in each clump).  Hold one clump by its 'greens' and gently tap the root ball until most of the soil has fallen away.  Tease the seedlings apart and lay them back in your hand so that the small bulbs are in a line (see picture below). Using a scissors or hand pruner, cut away all but about 2 inches of the roots.  Trim the tops to about the same length as the roots. Now set the clump into another shallow container with a little water in the bottom to keep them from drying out while you prepare the rest for transplanting.  Prepare only as many as you are able to set out in one session.

Trim roots and greens to same length.
In the bed that you’ve already prepared you open up small holes about 4-5 inches apart. Our onions are usually planted in beds two to three feet wide, with several rows in each bed.  

Make holes: To make the holes you can fashion a planting stick called a ‘dibble’ from a smooth branch or a ¾ in dowel with a point, or, just use a ‘Sharpie pen’ to make the hole.  Make a number of holes and then go back and drop a single onion in each hole.  Gently press the roots into the hole and pinch the soil around each one, making sure the part that was under the soil in the pot is covered when you transplant leaving only the green top showing.  You’ll get the hang of it after a few and will be able to transplant hundreds in no time at all!

Onions in a wide bed.
Now the focus becomes keeping the bed weed-free and well watered.  Once the plants have become established and the warmer, sunny weather settles in you’ll be amazed at how fast everything grows.  Feel free to thin out your onions when they are immature and be sure to use the whole thing, greens and all. 

If you have planted non-hybrid seeds, hold back a few onions to replant next spring to save seed. Onions are biennial meaning they don't produce seed till their second year. By collecting your own seeds you can begin the process all over again, and saving seeds, dear friends, is one big step toward greater food security!

Link to another post we wrote about onion-growing.
The Sharing Gardens is a registered non-profit and tax-exempt organization. We exist primarily through donations. If you have found benefit from our project or our site, please consider making a small donation through PayPal. (Click button below.)


Thursday, January 30, 2025

Onions - Growing from Seed - Using heat mats and shallow pots

Note: This article explains how to start onion seeds using a heat mat and shallow pots. To read about how to start seeds in deep pots, without heat mats, CLICK HERE).

There are literally hundreds of varieties of onions grown in this world, but unless you grow your own you usually have access to only a handful of varieties from the grocery store.  If you rely on growing onions from ‘sets’, (the little onions, about the size of a large grape) your options are often still quite limited.  Growing from 'sets' has other disadvantages too; often they will produce a significant number of ‘doubles’ (meaning smaller onions at harvest-time) or they bolt and go to seed, which makes them tough and unpalatable.
   
Here is a guide you can follow that will increase your chances of success at growing onions from seed.

Onions going to seed.
Here in the Willamette Valley of Oregon (USDA Zone 7b - Link to finding what zone you are in), we do best to grow what are called ‘long day’ varieties which include Cipollini (chip-o-leenie) both red and yellow varieties, Southport White Globe,  or White and Yellow Sweet Spanish. (Choosing Onions-Long or Short Day?) There are many more varieties to choose from; check your seed catalogs or go online to see a greater selection. (Be aware that, if you wish to save your own seed, you must choose Heirloom/Open Pollinated non-hybrid seeds. Those listed above are all Heirloom varieties.)

You will need:
  • Sifted potting mix
  • Sand (optional)
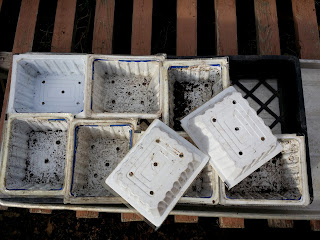
  • Pots: We used to use rather large pots (4" x 6" deep - 25 seeds per pot) but have shifted to using tofu containers with holes drilled in the bottom (see picture below), or jumbo six-packs. These use less soil for the same amount of seeds.
  • Seeds: start with fresh seeds each year; onion seeds lose viability within one or two years. If you wish to save seed, choose Heirloom/Open Pollinated varieties. Choose a variety appropriate to the length of your summer days.
  • Greenhouse or grow-lights
  • Heat mat (seeds will germinate better with a little bottom heat).
  • Plant-mister  
When to start: About eight-to-ten weeks from the time you wish to transplant them into your garden. Usually we get the seeds started around the middle of February but, if we have extra seed, sometimes we experiment with starting a little earlier (this would only work using a heat mat for bottom heat). By late April the seedlings will be ready to set out into the garden.  They are ready when you can see a clearly defined "bulb", 1/8" to 1/4" pushing above the soil-surface in the pot. At this stage, the sooner they get into the ground the larger your onion bulbs will be at harvest time.  It’s always a good idea to have a bed in mind that you’ve prepared during the previous fall since it’s difficult to prepare beds in the spring if you have a long rainy season like we often experience here in Oregon. The seedlings can handle a touch of frost at this stage but its no fun transplanting them in really muddy garden beds. Some people wait until early or mid-March to start seeds and still have plenty of time for the onions to ripen.
 
Another option, if you have raised beds in your grow-tunnel/greenhouse, is to transplant the 'starts' there - instead of outside). Onions are easy to use to fill in spaces between larger plants, maximizing your raised-bed use. But they need full sun so don't plant them where they'll get a lot of shade later in the season as other plants mature.
 
When planning ahead for planting, consider also the practice of companion planting as some plants are more or less compatible with onions (LINK).

Pots: If you will need to wait more than 8-10 weeks, to transplant the seedlings into their permanent growing space, follow this guide for planting in 4"x 6" pots. This way you won't run the risk of the onions becoming root-bound before you transplant them.
 
In recent years, because we have increased space in the raised beds of our greenhouses, we've shifted to using re-purposed tofu-containers with holes drilled in the bottom - (see picture below - approx. 3"x 5"x 2" deep) (we eat a lot of tofu! - if you're local to us and need some of these containers for seed-starting, let us know!). Jumbo six-packs work too.
Tofu containers for seed-starting. We've used them as 'six-packs' too. Though the roots of the 'starts' grow together, it's easy to tear them apart without damaging them. The tofu containers, 3"x 5"x 2" deep, use less soil than jumbo six-packs so we save on potting mix.

Soil/Sand:
Start with a good organic seed-starting mix.  It doesn’t need to be a premium potting blend, in fact, if you start with too rich of a soil blend you can experience a condition referred to as ‘damping off’ which looks like algae or mold growing on the surface and which causes the young seedlings to rot as they emerge from the soil.  One way to help eliminate this condition is to sprinkle a thin layer of sand over the seeds.  By keeping the soil damp but not too wet and having good ventilation you shouldn’t have this problem. 


Onion seeds can be started in a variety of containers.
Fill the pots with a sifted soil to about 1/2" from the top (tiny seeds find it difficult to germinate in soil with large chunks of material). Level out the soil, tamping it down with the bottom of another pot to create a level surface so that all of the seeds will be sewn at the same depth (otherwise they germinate unevenly). Label each pot with the name of the variety and the date you started them. 

Seeds: You may want to actually count out the seeds the first time so that you can have an idea of what 25 - 35 seeds looks like because that is about how many would be optimal to sew in the tofu-containers or six-packs.  You can adjust up or down depending on the size container you choose.  The idea is to not have an overcrowded condition that would produce weak and unhealthy seedlings.  Place the seeds in the palm of your hand and pinch out a few at a time. Gently drop them on the surface of the soil, distributing them as evenly as you can without becoming too concerned about accuracy.  It’s OK if some seeds are touching each other. Sprinkle a sifted layer of starting mix or sand over the seeds at a depth of about an eighth to a quarter inch.  Tamp it down again and water gently (a planter mister works great at this stage). 

Watering:  Keep the soil moist using either a small spray bottle or water them from below by putting water in trays and setting pots in them (light watering minimizes 'damping off' too). Tiny seeds, until established can be washed away with more aggressive watering techniques. Do not over-water! Soil should be damp but seedlings should never be in standing water. 
 
Heat mat: A heat mat is helpful for germinating seeds if you are doing so in an unheated greenhouse and nights still are getting cold. Heat mats can cause soil to dry out more quickly than ambient air so cover the seedlings with something to keep warmth and moisture contained.
 
Then it’s time to be patient, and let Nature do her work.

The seeds will not require sunlight until they have emerged from the soil, usually about two weeks from the time they are sewn, so you can keep them indoors where they will not freeze, on a window sill or in a greenhouse if you have one. Once the greens are up, they will require full sun. If you don't have grow-lights or a greenhouse, be sure to bring them inside at night if it looks like you may have freezing temps.
 
You will know it is time to transplant when the greens are stout and well-established and you can see a tiny bulb pushing up from the surface of the soil.

Teasing onion-roots apart before trimming.
Transplanting: Each pot of seedlings must be teased apart. You will need to trim back both the tops and the roots before trying to stick these tiny seedlings into the ground. You trim the roots so they're easier to slip into the holes and you trim the tops so that the pruned roots can support the greens above. Don't be too aggressive with your pruning however or it can shock the plants and make it hard to recover.

First, dump the whole pot into the palm of your hand.  Next, separate the clump into several sections (maybe 10-12 seedlings in each clump).  Hold one clump by its 'greens' and gently tap the root ball until most of the soil has fallen away.  Tease the seedlings apart and lay them back in your hand so that the small bulbs are in a line (see picture below). Using a scissors or hand pruner, cut away the tips of the roots, so they'll easily slip into the soil.  Trim the tops to about the same length as the roots. Now set the clump into another shallow container with a little water in the bottom to keep them from drying out while you prepare the rest for transplanting.  Prepare only as many as you are able to transplant in one session. If you end up with extras, surround their roots with some moist soil and keep them in the shade until you have time to get them in the ground.

Trim roots and greens to same length.
If you are going to plant them in rows, open up small holes about 4-5 inches apart. When we plant our onions this way, our beds are 2'-3' wide, with several rows in each bed. 
 
In recent years we have planted rows on the south edges of the raised beds in our greenhouses and in and amongst other crops that won't shade the onions later in the season (for example, on the south side of tomatoes or peppers), or we plant them among crops that will be harvested before the onions are mature, leaving the onions in full sun (like among lettuce plants).

Make holes: To make the holes you can fashion a planting stick called a ‘dibble’ from a smooth branch or a ¾ in dowel with a point or, just use a ‘Sharpie pen’, or even your finger to make the hole.  Be systematic: make  5-10 holes and then go back and drop a single onion in each hole.  Gently press the roots into the hole and pinch the soil around each one, making sure the part that was under the soil in the pot is covered when you transplant, leaving only the green top and a tiny bit of the bulb showing.  Be sure that all the roots go in the hole and don't "J-root": with bits of the roots poking out from the soil; this will dry out the plant and force it to use extra energy in turning its roots back down into the soil. You’ll get the hang of it after a few tries and be able to transplant hundreds in no time at all!

Onions in a wide bed.
Now the focus becomes keeping the bed weed-free and well watered.  Mulching between the onions with fresh grass-clippings keeps moisture in the soil and fertilizes the plants each time you water through the clippings. Just don't bury the seedlings! Once the plants have become established and the warmer, sunny weather settles in you’ll be amazed at how fast everything grows.  Feel free to thin out your onions when they are immature and be sure to use the whole thing, greens and all. 

If you have planted non-hybrid seeds, hold back a few onions to replant next spring to save seed. Onions are biennial meaning they don't produce seed till their second year. By collecting your own seeds you can begin the process all over again, and saving seeds, dear friends, is one big step toward greater food security!

Link to another post we wrote about onion-growing.
 

Tuesday, January 28, 2025

Kale again in the "Dirty Dozen" - 2024

Each year, the Environmental Working Group (EWG) analyses the data from thousands of samples of fruits and vegetables tested by the United States Department of Agriculture for traces of pesticides (The 2024 guide includes data from over 45,000 samples of 46 fruits and vegetables). From this they publish a report of the Dirty Dozen and the Clean Fifteen (the most contaminated and the least...).

Once again, strawberries top the Dirty Dozen list and kale is in the top three. Blueberries and green beans have been added to the list for the first time. The Dirty Dozen are fruits and vegetables that you should be especially careful to buy organically grown, or better yet, grow your own!

Here is a LINK to another site's excellent summary of what you need to know about the Dirty Dozen with tips on the foods least likely to have high concentrations of pesticides.

Here is a CNN article that summarizes EWG's work and contains other relevant links. LINK

Here is a link to the Sharing garden's post on "Why we eat and grow organic food".

And tips on growing kale in your own garden

Kale seeds, we saved ourselves...ready for planting!

Bella loves kale!

Monday, January 27, 2025

No-Fail Kale: The Powerful Health-Benefits of Kale and How to Grow It

"The King of Vegetables; 'Kale' to the Chief!"

Cathy, Danielle and Llyn with "bouquets" of Red Russian kale to share at the Food Pantry.
Early spring in the Pacific NW is a time of joyful anticipation of the coming growing season. We already have hundreds of seedlings started in our greenhouses and, in a few short weeks we'll be able to transplant many early-season crops outdoors. But one of the great culinary pleasures of this time of year is the kale that wintered over from last season. Kale is one of those plants that when touched by a kiss of frost, becomes more sweet and tender than when growing at the height of summer.

Eat your kale for healthy skin, hair, bones and teeth!
There are many articles on-line about the nutritional benefits of kale and recipes for its preparation.  You will not find as many articles on-line about growing kale, using it as a cover crop, or saving your own seed which is what this article is focused on. (See also our post: Kale joins the "Dirty-Dozen' list: and How to Grow Your Own Kale)

But, before we get into growing kale and saving seeds, in researching this post I discovered two important facts: Kale has the densest concentration of nutrients, per calorie, of a wide range of foods tested. (PDF of 72 tested foods) (explanation of chart).

And secondly, it is extremely important that, the source of the kale you eat is organically grown.
"The health benefits of kale greatly depend on the source you buy it from. Whenever you shop for kale, make sure to get organic kale, as it’s one of the most heavily pesticide-sprayed crops. Two-thirds of produce sampled in recent evaluations were poisoned with pesticides and non-organic kale ranks among the world’s most heavily polluted crops."(source)

How to grow it: Kale won't grow well in the tropics or arid regions but it's perfectly suited to a moist, temperate climate such as the Willamette Valley of Oregon where we live. There are several varieties available. The main two we grow are Toscana (or dinosaur) kale, with its greyish-green leaves (without many frilly edges) and mild-flavored tenderness, Toscana is perfectly suited to make roasted kale chips (recipe below).


Toscana (or dinosaur) kale
But for ease of growing and hardiness through the winter, our favorite kale is Winter Red/Russian kale. This kale actually has the nickname 'hungry gap', after the period in winter in traditional agriculture when little else can be harvested. We've had stands of it survive, outside and unsheltered through the winter - through all but the most sustained snow and cold.

Toscana kale is darker green and its leaves are less frilly (far left). Red Winter kale, hardier and more vigorous (easier to grow through the winter) is on the right.
Sign, we put with kale at the Food Pantry as many people were unfamiliar with eating it.
Typically we grow two main crops of kale per year. The first we start in early/mid-February.  We either start them in pots/six packs and transplant them outside (late March/early April) or we start them directly in beds in the greenhouse. We pick from both these plantings all the way until mid-July when a) the leaves become bigger and less tender and b) there is so much else coming ripe that we prefer to eat! In the heat of summer they often also become infested with aphids and become inedible for this reason. This is then the perfect time to sow the second crop of the season (more on this below).

We start seeds in plastic tofu-containers with holes drilled in the bottom. We fill the containers mostly full of soil and press the soil down evenly with the bottom of another container. After sowing seeds, cover with scant, even layer of soil. Keep moist but don't over-water. These seedlings above are lettuce plants (to show spacing of seeds).
Once seedlings are large enough to handle easily and they have well-developed roots, but before they are root-bound, gently dump out the batch of seedlings and tease them apart, placing one in each cell of a six-pack.
In a few weeks, seedlings will grow and their roots fill the six-pack cells. They are then ready to transplant into garden-beds (18" apart). (Red Russian kale seedlings shown)
We have also sowed the seed loosely over a whole greenhouse bed in February (ideally the seeds are about 2" apart) and cover them lightly with topsoil. The kale comes up thickly filling the whole bed and grows rapidly in the protected climate of the greenhouse. It is easy to harvest whole clumps at a time with a sharp knife or scissors and, as long as you don't cut below where the leaves generate from, the kale will keep growing back all spring until a) you want to use the bed for something else or b) the greenhouse gets too warm for the cool-loving kale and it succumbs to aphids, or mold or gets too tough to enjoy.
Here, Chris is harvesting kale that was sown directly in a greenhouse bed. Using a sharp knife, he cuts off whole handfuls of kale leaving the node where new leaves sprout untouched for future harvests. The leaves will continue to re-grow for many, many months.
The second main crop of kale (for fall and winter eating) is sown in late July. It can be done in pots and transplanted, or loosely scattered as a thick crop (either inside or outside a greenhouse). It's counter-intuitive that you start these 'winter crops' in the peak of the summer heat but the seeds need enough time to germinate, and the leaves need long enough days to gain some height and volume as they will not gain much in size once the day-length shortens after autumn-equinox (Sept. 21 or so). We usually find it challenging to have enough room in our greenhouses at the peak of summer to grow a large kale crop indoors but, since kale does well outside, except in all but the harshest winters, we've had good luck with growing it outside.

Kale as a cover-crop: Below are some pictures of an experiment we did one year with kale as a cover crop. We sowed it thickly along with fava beans (tried to space plants about 2" apart). This was done by scattering the two varieties of seed and very lightly tilling them in with tiller at shallowest depth-setting. The kale did very well and lasted all through the winter. The fava beans succumbed to a sustained hard-frost and didn't survive till spring. After eating kale all winter-long, we tilled the rest in as a source for 'green manure'. This worked fine but we are now moving away from using the roto-tiller in the spring as it really compacts our clay-dense soil but, if you're still tilling in cover-crops and have a lot of kale-seed, it's a great way to go!

Kale and fava beans as a cover crop (planted in Sept., pictured in late October). Kale survived the winter; favas did not (froze). We ate kale all winter and tilled the kale into the soil in the spring as a 'green manure' (for fertility).
The same field of kale in February. OSU students harvesting a tub-full to take home and enjoy!
Springtime bonus: Kale 'raab'
Though there are some annual varieties of kale, most are biennial and set seed in their second season, after wintering over. If you have some kale that has survived the winter, look for the start of flowers forming. The best time to catch them is before the flowers begin to open (below). These kale flowers, called 'raab' (pronounced 'rob') are very tender and have a slight 'sweet' taste. They are loaded with vitamins and minerals.

Kale 'raab' (pronounced 'rob') is the flowers of the plant before they fully open. Tender, sweet and densely nutritious; a springtime treat! (pictured: Red Russian kale-raab) Note: Pick some leaves and stems along with the flowers; they'll still be tender at this time of year.
Here's Llyn picking raab off a Toscana kale plant in March or April.
Bella loves kale, raw from the garden! We prefer to steam it for about 7-min. and eat it with apple-cider vinegar or a splash of lemon-juice.
Delicious and nutritious, spring "greens": Toscana and Red Russian kale flanked by "Red Sails" lettuce.
Kale is easy to prepare and eat. We mainly use it steamed with a little apple-cider vinegar or lemon juice sprinkled on top, or a little butter but it it also good in smoothies (recipes), fresh in a tossed salad (recipe) or baked into chips (recipe). There are many great recipes on line. Always rinse well before using.

In the spring, when plants are small, the ribs will be tender and can be chopped right in with the rest of the leaves. As the plants mature, the ribs become more woody so best to slice them out and compost them.

Kale is incredibly nutritious. A 3.5 oz. serving (100g) gives you 7% of an adult's protein needs for the day as well as 5%- 15% of several vitamins and minerals. It is also very high in fiber.

(LINK: Health Benefits of Kale)

This 'ANDI' chart (below) lists 72 foods, rating them by their concentration of nutrients per calorie. Kale is #1! They're not suggesting that you rule out the foods that are higher in calories and less dense in nutrients (healthy bodies need high-quality fats, carbohydrates and protein) but most of us are deficient in the micro-nutrients (vitamins, minerals etc) and fiber, that are essential for all our metabolic processes and optimal health. (LINK: Aggregate Nutritional Density Index - note, kale is #1) (LINK to one-page, printable ANDI chart).

'Rob' with kale 'raab'
Here's another post we wrote about the health benefits of Kale:
 

Sunday, January 26, 2025

Growing Kale and Saving and Storing Kale Seed

Kale is a powerhouse of nutrition and in climates like the Pacific NW, where we live, it's very easy to grow. (See: No-Fail Kale: The Powerful Health-Benefits of Kale and How to Grow It).  It is also relatively easy to save seed from too. Here is a post about the methods we use to save kale seed.

One of the pleasures of growing your own food from seeds is to begin to save your own seeds. With most varieties, it's not difficult and the seeds you save yourself will naturally select/adapt to be more perfectly suited to your local climate and conditions. Saving seeds also contributes to having a greater sense of local food-security in case there ever comes a time when seeds are not distributed over long distances, or there is a seed-crop failure in another part of the country.

Eat your kale for healthy skin, hair, bones and teeth!

We typically grow two crops of kale per year: the first one we start in February - either in pots, or directly sown into our greenhouse raised-beds. LINK: Starting Seedlings Directly in Greenhouse Raised Beds

The second batch gets started in early July and transplanted to outside beds once the seedlings are big enough; or we scatter the seed over a whole outside bed, creating a lush mat that we can eat from through all but the harshest of winters and then roto-till in, in the spring as a cover crop (after harvesting the spring flowers/raab).

Starting seeds: We often start seeds in plastic tofu-containers with holes drilled in the bottom. We like re-purposing plastic so it isn't just sent to the landfill. Being vegetarian, we eat a lot of tofu (!) and so generate a lot of these containers. Be sure to drill 1/4" holes for drainage! They will last for many seasons.

To use this method, fill the containers mostly full of soil and press the soil down evenly with the bottom of another container. After sowing seeds, cover with scant, even layer of soil. Keep moist but don't over-water.

The white containers above are tofu-containers we have re-purposed for seed-starting. These seedlings pictured above are lettuce plants (to show spacing of seeds).   

Once the seedlings are about an inch tall, re-pot them into jumbo six-packs, or (we use) the same tofu-containers, with six seedlings per container. The tofu-containers use less soil than the six-packs and it's very easy to break apart the roots of the six plants when it's time to plant them in the ground.

Choose a location that gets plenty of sun and has well-drained fertile soil. Since the part of the plant you are harvesting to eat is the green leaves, this is a big clue that kale loves nitrogen. But don't over-fertilize. This will make the plants grow too fast, have weak cell-walls and be more susceptible to diseases and insects (such as aphids).

Plant them 18" - 24" apart. If slugs are a big issue in your area, sprinkle iron phosphate granules around the plants and replenish if it's been consumed or gets very wet (brand-name "Sluggo").

If you have lots of seed, you can broadcast it over a whole row and harvest the leaves in bunches, cut with a knife (see pics below)

Here, Chris is harvesting kale that was sown directly in a greenhouse bed. Using a sharp knife, he cuts off whole handfuls of kale leaving the node where new leaves sprout untouched for future harvests. The leaves will continue to re-grow for many, many months.

Kale and fava beans as a cover crop (planted in Sept., pictured in late October). Kale survived the winter; favas did not (froze). We ate kale all winter and tilled the kale into the soil in the spring as a 'green manure' (for fertility).

Saving seed: The best time to save seed is in the spring, from plants that have wintered-over but we've also saved viable seed from the plants started in February. That latter seed ripens in the late summer.

Though we're not aware of hybrid-varieties of kale (which would mean that the seed you saved wouldn't grow "true") be sure that there are no other plants from the brassica family flowering near by, at the same time. These include (but are not limited to) broccoli, cabbage, mustard and other varieties of kale. If other brassicas are flowering at the same time, your seed may become cross-pollinated and your plants may not grow 'true'.

Broccoli is in the same family as kale (brassicas) and, if flowering at the same time, their seeds may cross.

Here is a broccoli plant going to seed. It looks almost identical to kale at this stage. You will want to stake or put a cage around your plants before they become so laden with seed that they will be in danger of toppling over. Note the little, red onion bag we tied on the plant early on to designate it as a seed-plant so no one harvested leaves from it. (Note: broccoli seed is often sold in large quantities to grow sprouts - highly nutritious.)

In order to create seed, kale will send up several flower-stalks per plant. Before they open, when they look little mini-loose broccoli heads, they are called 'raab' (pronounced 'rob'). They are tasty and highly nutritious (the flowers will be particularly 'sweet' from plants that have over-wintered as the cold causes them to 'sugar-up'). We love them lightly steamed and drizzled with olive oil, vinegar and a touch of salt. Enjoy the bounty, as soon the plants will become determined to set seed and the whole plant will become more bitter and tougher in texture. Just don't pick any raab from the plants you're going to save seed from.
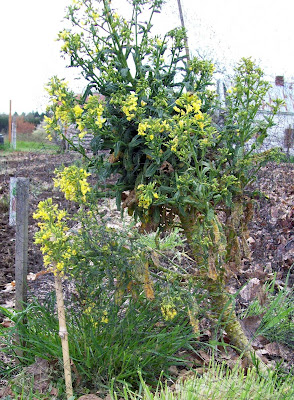
If left to mature, the raab opens up into yellow flowers. Once the flowers open, the plants become more woody and less pleasant to eat (but the bees love them!).

Spring kale flowers (raab), harvested and ready for steaming. Spring raab is tender and slightly sweet and full of nutrients!

To save seed, select a plant (or plants) and don't pick off the flowers. Don't pick any more leaves to eat either. You may want to put a cage around the plant, or tie it to a stake as the flower stalks become quite heavy once they're loaded with seed. Also, if multiple people harvest from your garden, designate the plant as a seed crop with a sign, or flag. We use small, red mesh bags that onions come in and everyone who shares our gardens knows not to harvest where they see these red 'flags'.

The flowers will blossom, die back and a seed pod will form in their place. Kale gets pollinated primarily by insects so hopefully you'll see lots of them visiting the flowers.

The flowers are pollinated and become seed-pods. Each plant can produce thousands of seeds! Wait to harvest the seed-pods till they are mostly turning purplish/tan and the pods are drying out (see above).

It's important to find the right time to harvest seed. You want to be sure the seeds are ripe enough that they are fully black and pop easily out of the pods, but don't wait so long that the birds eat your seed, or the pods shatter and spread the seed onto the ground below. Regardless of your best intentions, there are always some seeds that shatter out of the pods so you can anticipate 'volunteer' seedlings to germinate in places you've let kale plants go-to-seed.  We have one place in a greenhouse that has germinated kale plants for a third season in a row since we last let plants go to seed in that spot. That's what we call a 'high-quality problem'!

When ripe, the pods will easily open by rubbing them between your fingers yielding multiple seeds in each.

Mature kale seeds. Each plant is capable of producing thousands of seeds. This is just a small fraction of those saved from one plant.
You need to have some way of catching the seeds as the pods dry and open. After clipping the ripe seed-stalks, slip them gently in a paper-sack and hang in a dry place where birds and other animals can't reach them until the pods are all dry. You can also put them upside-down in a plastic tub or bucket. We have hung them from the rafters of our garden-shed, or on a shelf above our wood-stove, or put them in the greenhouse in a tub, on a shelf, covered by screens (to keep animals from eating them).

Seeds are ready for winnowing (separating seeds and chaff) when the pods are crisp and dry and crush easily by rubbing them between your hands. If it isn't in a tub already, carefully place the stalks of seed-heads into a tub and rub the pods between your hands to shatter them and release the seeds. As each stalk is cleaned, remove it from the tub. In the end you will have a mixture of seeds and dried leaves/pods (chaff). Winnowing is described in the caption below.
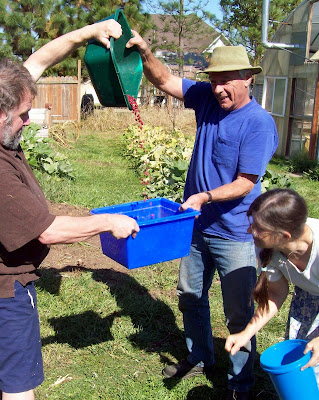
Here, Chris is giving a demonstration to Rook and Cindy of winnowing bean seeds (separating the seeds from the chaff). On a lightly breezy day, or in front of an electric fan, slowly pour seeds from one container into the other so the breeze blows the chaff away and the seeds fall into the lower container. Repeat until clean.

Storing seeds: Often, after winnowing, we continue to dry the seeds on a shelf above our woodstove. It is very important that they be totally dry or they can develop mold during storage. Heat can also destroy seeds so don't dry them using intense heat conditions. Check the plastic bags, jars or bottles a week or two after you store them to check there's no mold growing. We've lost a few batches due to mold which is always a sad thing when you go to check your seeds at the beginning of the next growing season. Store seeds in a cool, dark place (or in your freezer, in an airtight container if you have the room).

Here's a LINK listing all our other posts about saving your own seed.

Delicious and nutritious, spring "greens": Toscana and Red Russian kale flanked by "Red Sails" lettuce.