A unique and viable approach to establishing local food self-reliance and building stronger communities.

Tuesday, July 4, 2023

Season's Turning...High Summer, to Winter Crops

This is a quickie-post with a few seasonally relevant links particularly for people who have their own gardens (Starting Fall and Winter Crops, and Saving Tomato Seeds). But, even if you’re not a gardener I've included a link to a post about Interdependence Day. Enjoy!

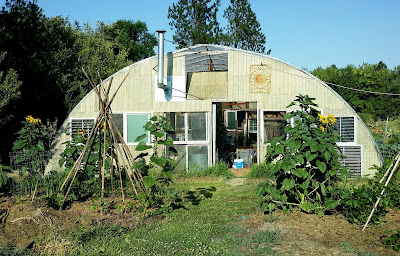
Our biggest greenhouse, the Sunship (30'x50') on July 3, 2023

Read an inspiring essay about celebrating Inter-dependence day. What if we celebrated Interdependence Day instead?

The Sharing Gardens are growing exponentially these days. We dug our first potatoes last week (an experiment at growing them in the raised beds of our greenhouse, which seems to have worked beautifully!); our corn and sorghum plants are knee-high; the cucumber, winter squash and bean plants are all flowering and all our amaranth and ornamental flowers are in the ground and growing strong.

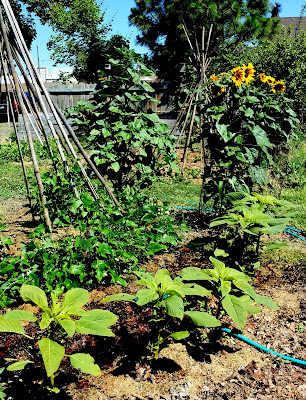
Golden Amaranth (foreground) is a grain crop which we'll harvest, dry, winnow and grind to add to our hot-cereal mix. Scarlet Runner beans are climbing the tipi, behind. The sunflower (top, right) volunteered from seeds dropped last year! (LINK: Why growing sunflowers is great for bees... July 2, 2023

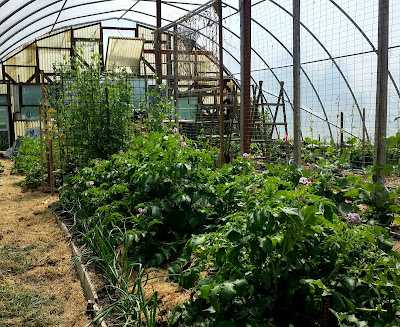
We had a whole bunch of sprouting potatoes in late winter, and it was still too cold and wet to plant them outside so we experimented with growing potatoes in our greenhouses. (LINK: Sprouting potatoes? What to do. ) The potatoes are the plants in the middle of the frame, with purple blossoms. Started in early March - as I recall...they were probably about12-14 weeks old in this picture. May 29, 2023
 
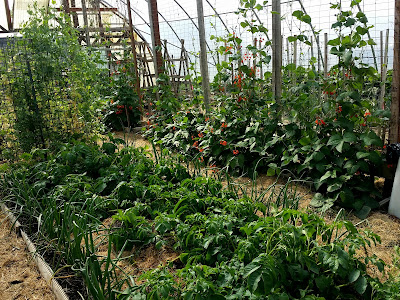
This pic, taken in mid-June, shows how the potato plants have begun to flatten with their own weight. The potatoes were rapidly growing below. June 14, 2023.
 
This pic was taken one month after the first and shows the potato plants beginning to die back which means that the potatoes are almost ready for harvest. We ended up with about 30 pounds from this row. June 28, 2023

Maddie, digging potatoes, July 3.

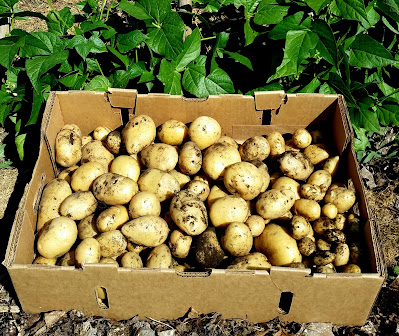
Here's a 20 pound harvest from a different row in the same greenhouse. This experiment was definitely a success. Every year, last season's potatoes begin sprouting before outside conditions permit us to plant. At the same time, we have plenty of space in our greenhouses. I'm guessing we'll do this again. (pic: June 29, 2023)

Saving Tomato Seeds: We picked our first ripe tomatoes on June 30. The variety was Stupice (left), an heirloom/open-pollinated tomato, known for its early ripening, delicious flavor, and long season (they are also usually the last variety we’re still harvesting in the fall!). We’ve saved seed from the first fruits that ripened, to encourage this trait in our seed collection. To read about how you can save seeds from your tomato plants, CLICK HERE. (Note: you can only save seeds from heirloom, or open-pollinated varieties. Seeds saved from hybrid, or F1 types while not breed “true” and next year’s plants will/may revert back to the characteristics of one of the parent-plants they were bred from). 

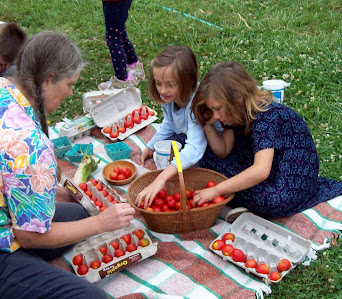
Stupice tomatoes grow in such abundance that we pack them in egg cartons for safe transport home with our volunteers. Here, Llyn getting help from Adri and Jazmyn a few years ago.

Striped German tomato: To learn how to save seeds from tomatoes, CLICK HERE.

Starting Fall and Winter crops: Though it may seem counter-intuitive, now is the time to start your fall and winter crops from seed (late June/early July- Zone 7B, Pacific NW - USA). They need 8-10 weeks to gain some size before day-length begins to seriously shorten around the fall equinox (I know…it’s sad to think that we’re already headed back to winter’s short days after having passed the summer solstice!).  

Now is the time to start any brassicas (cabbage, kale, collards etc.) and other ‘greens’ such as chard. If you have room in your garden, there’s still time to plant a second crop of cucumbers or summer squash; these will carry you through till first-frost and you'll have plenty of these summer delights when your neighbor’s patches have ceased to produce. 

We’re starting a second batch of basil too as our first batch is already trying to go to seed. We’re taking a chance in starting more lettuce too. It may be too hot for it but we’ll plant it in places where it’s partially shaded and hope for the best. Also, because we’ve been harvesting lots of beets and carrots, we have lots more room (and time enough) to start succession crops of both these excellent winter-storage crops.

Time to start fall and wintering-over crops! Here are cabbage plants getting moved to larger pots. For a full post on planting fall and winter crops, CLICK HERE.

...and finally, a few strategies to help your cool-loving crops through the hottest part of summer:

See those new, little lettuce plants to the left of the tomatoes and behind the flowering nasturtiums in the front?...

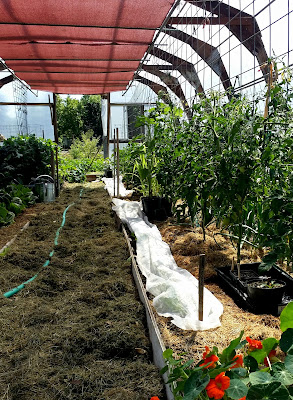
...Those same lettuce plants are covered with a polyester 'row cover' in this picture. You can find these row-covers from nursery-stores (or, if you have a free-cycle program in your neighborhood, see if you can find some without having to buy it new!). It lets some light through but provides a micro-climate that's less harsh for tender seedlings, and you can even water through it. We'll remove it once the plants are more established. This picture also shows the red, shade-cloth (above) that we have in our Ark greenhouse to provide diffused light and a slightly cooler space. In the path to the left of the lettuce are heavily applied grass-clippings which keep moisture in, stabilize the ground temperature, are comfortable to crawl on and will turn into next year's compost and potting mix. (LINK: How we grow...Veganic Community-based gardening)


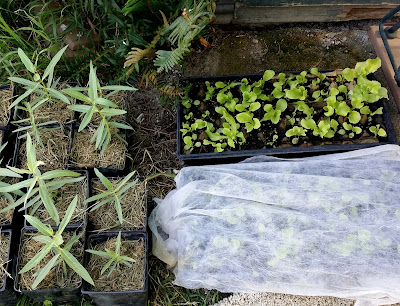
Here's another use for row-cover (opaque, polyester cloth): after potting up seedlings into seed-trays, we put them in the shade, with the cloth so they won't be too shocked while their roots get established. (Lettuce seedlings: right, milkweed plants: left).

If you're local and want to learn more about planting fall and over-wintering crops, here's a free workshop: 

SAT, JULY 29 (10 am – 1 pm) PUBLIC SEED LIBRARY POP-UP VEGETABLE GARDEN PLANT CLINIC: Bring your vegetable gardening questions and get advice from a Benton County Master Gardener! Now’s the time to plant cool season crops for fall and over wintering: Come learn how to extend your vegetable garden harvest through the winter, look for seeds of interest on the free seed rack, and find vegetable garden educational materials and links you can access anytime.
At Corvallis-Benton County Public Library, 645 NW Monroe St., in the historic Belluschi Wing (home of the Public Seed Library)
Contact: CorvallisPublicSeedLibrary@gmail.com
Sponsors: Corvallis Sustainability Coalition Food Action Team, OSU Extension Service/Benton County Master Gardeners, and Corvallis-Benton County Public Library

Inter-dependence...another name for sharing...

Monday, July 3, 2023

Planting a fall and winter garden

(Note: This is a re-publishing of a post we wrote in June of 2013. There are a few things we're doing differently now but the essence of the information is the same. We hope you find it helpful in starting crops for the Fall and Winter seasons.) 

Here we are, in the Willamette valley of Oregon, halfway through June, having just finished planting our gardens for summer and fall harvests, and it's already time to begin starting some seeds for our fall and winter harvests, as well as our overwintered veggies that will feed us early next spring.  For those who are fairly new to gardening it probably seems counter-intuitive to plant fall and winter crops during the heat of summer, but when you consider that it will take months to mature crops planted now, it begins to make sense.

So, here's how we do it at the Sharing Gardens.  We start broccoli, cabbage, kale, lettuce and chard  around the 3rd week of June and into early July.  We carefully drop two seeds into each cell of a jumbo six-pack or a suitable smallish pot using a complete organic planting mix with good water retention capability.  Black Gold is a great brand if you don't have access to your own blend of compost, leaf mold and weed free garden soil.  Any brand of 'Organic" potting mix should do just fine.  The important thing is that it be able to hold moisture throughout hot summer days and that there be no other weed-seeds that could germinate. Once your seeds germinate, thin them to one plant per cell or pot.

For starting seed this time of the year we set up a table on saw horses outside the greenhouse.  A mist head sprinkler is set up on a timer to come on at 10:00 AM and then again at around 5:00 PM. This should be adequate to insure that the soil doesn't dry out.  Keep an eye on your starts and make adjustments or include an extra hand watering as needed.  You also will find it helpful to set your six-packs in shallow trays on a level surface to hold water for supplying moisture over longer periods throughout the hot days.  However you do it the key is to maintain constant moisture. 

Another thing to be aware of is that some birds LOVE tender young greens and will actually dig out young seedlings as they begin to emerge.  This problem can be averted by purchasing some floating row cover which will allow water and light to get through but will thwart the birds.  The brand we use is called 'Remay' and is available by the foot or in small rolls at local garden supply stores and nurseries.  It can be reused for years if it is kept away from nesting rodents when being stored.  Another more permanent solution is to build frames covered with window screen to put over your starts.

In planning your year round garden you'll want to get used to the idea of earmarking the places where your fall and winter plantings will go.  After your early plantings of greens are harvested, be ready to add compost and other soil amendments a couple of weeks ahead of your later planting to give the soil a chance to reestablish healthy populations of worms and other soil organisms before setting out your later crops.  With practice and experience you will begin to establish a pattern and rhythm and the process will become familiar to you.

When your starts are about 4-6 weeks along, it's time to transplant them into the garden, into the beds you've previously prepared to receive them.  Just open up holes large enough to drop them in place and gently press them into the soil. Be sure to give them the proper spacing apart from each other.  Crowded plants don't produce as well as ones with plenty of room to expand.

The internet is a wonderful resource!   We went online and did a search, 'vegetable planting guide for Willamette Valley Oregon'  and found a printable guide compiled by Oregon Tilth,  which helps to take the guess work out of garden planning.  You can do a similar search if you are not in our general area.  There are a variety of other vegetables you can probably grow aside from the ones I've mentioned here.  We want you to know that the harvest doesn't have to end with the first fall frosts.  You can enjoy eating fresh vegies pretty much year 'round in many parts of the world.  This article only touches on some of the techniques for fall and winter gardening.  We hope that you will look into the subject further and be well on your way to greater food security for yourself, your immediate family and your community of friends.  Be well!!!!


June 2023: Aside from the crops mentioned above, we are starting a second batch of basil. The first plants we have in one of our greenhouses are already trying to go-to-seed. There's time to grow more and it's always nice to make a bunch of pesto to freeze and enjoy through the winter.

We are also starting a second crop of cucumbers. Though they'll overlap with the two-dozen plants we already have in the ground, they will also extend a month or more beyond when our first crop is no longer producing. This gives us plenty to make a vegetable juice that we 'can' and to have lots to share when everyone else's plants are dying back.

Saturday, July 1, 2023

Saving Tomato Seeds

Striped German - Heirloom tomato
One of the missions of the Sharing Gardens is to educate people about the importance of seed-saving and to offer techniques to demystify this process. Today's blog covers the practical steps necessary for saving one of the home-gardener's favorite fruits: the tomato! If you're new to seed-saving tomatoes are good to start with because of their relative simplicity.

In order to save seeds that will "grow true" and produce fruit similar to the one you saved seeds from, you must start with an "heirloom" or "open-pollinated" (OP) variety (not hybrid). Hybrid seeds are artificially created by seed companies to produce plants with unique qualities (early ripening, bug resistance etc). The problem is that they don't "breed true". If you save seed from hybrids, next year's plants may or may not be what you want. If you wish to save seeds, choose seeds or starts that say "open pollinated", OP, heirloom or non-hybrid.
 
"Heirloom" tomatoes come in all types: here are large paste-tomatoes called "Long Toms"
 
OK, so lets say you have grown some beautiful heirloom tomatoes and you're ready to save seeds. If you have more than one plant to pick from, choose the plant that is healthiest, most robust, earliest to ripen and with the largest and/or best-tasting fruit. Then, pick one or two fruits that are the best examples of these same qualities. If you've grown out several plants of the same variety, save seeds from multiple plants to keep  genetic diversity.
 
If there are other people who harvest from your garden
, put a twist-tie, or in some other way mark the fruit so no one picks it prematurely. We often use onion or citrus bags (plastic, stretchy netting - Left) so we can actually cover the fruit, making it clear that it's not to be picked. Let the fruit come to fullest maturity possible. It's OK even if it starts to rot a little.

Black Krim (below) and Striped German
Here are two heirloom tomato varieties we saved for seed this year (right). We saved them as beautiful examples of color, juiciness and size. That's a Black Krim on the bottom and a Striped German on the top.

In saving seed, you wish to mimic nature's process. Have you ever noticed what happens to the tomatoes left in the garden after the first frost? They turn to a slimy mush, with the fruit eventually dissolving away from the seed. In the following year, robust little volunteers emerge from where the tomato rotted. The way we mimic this process: Remove the stem from your chosen tomato and put it in the blender with enough water to fill a quart jar. Whiz it in the blender, at a low speed, just long enough to separate seeds from fruit. Don't worry about the seeds. They have a protective gel that keeps the blades from harming them. Pour them into a wide-mouth glass jar. Be sure to swirl the blender as you pour the last liquid out so no seeds are left in the bottom. If you're processing more than one tomato variety in a row, rinse the blender well so you don't mix seed varieties. Label the jar so you remember the variety of seeds you're saving.

The next step is to leave them to "rot". To minimize fruit-flies secure a piece of cheese cloth over the opening with a rubber-band or canning-jar ring. Leave them in the open jar for 4-7 days. When it's warm outside, the process will go faster. Stir them once or twice a day with a chopstick to help separate the seed from the pulp. The pulp and non-viable seeds will form a layer at the top. The healthy seeds will sink to the bottom. Look for a nice scum to form on the top. Mold is OK. The picture on the left is of two varieties of tomato seeds in process. The ones on the right were just blended so no layers have formed. The ones on the left have been sitting a few days. The other picture shows the quality of the scum that has formed on the tomatoes once they are ready for the next step. Notice the bubbles which indicate a mild fermentation process.


The last step is to dry the seeds. Spoon out the scum and pour off most of the water. The viable seeds will have sunk to the bottom but be careful not to pour them out with the pulp/water. Add more water, allow to settle and continue to pour off excess flesh. Repeat this process till you've removed the majority of the flesh. 
 
Then pour the seeds through a fine-mesh strainer and rinse them in the strainer. Let them drip-dry and then tap them onto a piece of tin-foil, a jar-lid or other non-porous surface. We find that the lid to a plastic tub (like a yogurt container) works best as it's flexible and we can "pop" off the seeds after they've dried. Seeds will stick to paper towel or napkins. 
 
Transfer your label to the drying seeds and leave them to dry for a week or so. Be sure they are thoroughly dry before storage so they don't mold in the bag, envelope or jar.

Each seed-saver has his or her preference for containers to store seeds in. We use clean, small plastic bags or recycled plastic pill-bottles or other small jars. The most important thing is to keep your whole seed collection in a dry, dark environment with moderate temperatures, in air-tight containers. Avoid freezing or excessive heat. Stored well, tomato seeds can remain viable for many years.

Tomato seeds drying.