A unique and viable approach to establishing local food self-reliance and building stronger communities.

Monday, February 27, 2023

How to help the Monarch Butterflies

Monarch, ready to be released. Image credit.

Note:  This post was originally posted in 2021, a year that the numbers of Monarch butterflies counted in the southern California populations plummeted!  (only 2,000 counted in southern California nesting sites in January of 2021). LINK-Western Monarch populations

But the last two years have shown substantial increases in the winter count:
Feb 19, 2023 LINK: "...Over 130,000 butterflies were reported in Santa Barbara and San Luis  Obispo Counties alone. The San Francisco Bay Area also witnessed a comeback from last year with more than 8,000 butterflies reported in surrounding counties.

This season’s results are a welcome reprieve from the dismal total of less than 2,000 individuals counted in 2020—and larger than the 250,000 counted last year.

335,479 is squarely back into what was considered “normal” in 2000-2017." 

Pic credit: https://earthwiseradio.org/2015/07/monarch-butterflies-2/
Perhaps the public's concern for their plight has actually made a difference! Here at the Sharing Gardens, we've been starting Showy Milkweed plants from seed for several years. We've been successful to the point that the plants are now reseeding themselves in various places on our land.
 
This post is about our experience growing milkweed at the Sharing Gardens with tips on how you can do it too. At the end of the post are many other resources to help you, help the Monarchs (and other beautiful and necessary pollinators)!
 
Adri's instructions
Last spring (2020), when grade schools were first shut down in Oregon during the pandemic, our dear little friend Adri (who's been coming to the Sharing Gardens since she was a baby in a back-pack) arrived at our weekly volunteer-time with a small packet of showy-milkweed seeds and instructions for planting them that she'd carefully hand-copied from her teacher's instructions. She was wondering if we'd be willing to grow some out in our gardens as she doesn't have a sunny enough yard at home. We said, "Sure!". 
Showy Milkweed in bloom
We've been growing "showy" milkweed (Asclepias speciosa) since 2018. To begin with, someone gave us a few "starts" and a hand-full of seeds to experiment with. The variety we grow is native to the Pacific NW - where we live - and well- suited to our site (full sun, moist soil). (If you live elsewhere, you might wish to research what varieties will do well for you). Also, whatever variety you decide to plant, there seems to be some evidence that butterflies prefer native species to their hybrid cousins, so choose accordingly (LINK).
 
We had tried several different ways to germinate the seeds but they were only moderately successful. We did establish a patch of about a dozen plants that wintered over and began producing flowers themselves (summer 2020) but the method Adri brought to us has been the most successful so far. Here's what to do: Wrap the seeds in a damp paper-towel (squeeze it out thoroughly so it's just lightly moist), secure the seeds in a sealed freezer bag and put them in your refrigerator for 30 days. This simulates a cold, wet winter that the seeds need to break from dormancy. Plant in soil (about 1/4" deep) being very careful not to damage the tiny emerging root. Place in a sunny window, or greenhouse and water from below. They should emerge from the soil in about ten days.
 
This is what seedlings should look like after placing the seeds in a damp paper-towel inside a zipper bag and refrigerating for thirty days.

To grow seedlings bigger, arrange in potting soil...

...and cover with about 1/4" soil. Be very careful with their fragile roots.

Seedlings after several more weeks...
Though theoretically, you could transplant the seedlings into the ground at this point, they will have a much better chance of surviving if you pot them into larger pots and plant them into the ground once they have bigger root systems. With Adri's seedlings, we re-potted them two times through the summer until they were in half-gallon pots. These, we wintered-over by clustering the potted plants in a sunny spot in our yard, protected from cold, north winds under a blanket of fall leaves.

Adri and Kaylynn with milkweed plants at about 120 days from putting seeds in fridge. Two plants per pot.

Milkweed plants wintered over two years in pots. Ready to get into the ground!

This coming spring, we'll transplant them into a sunny spot. Aside from propagating from seeds, the roots also send out runners and start new plants. We have a patch of milkweeds that grew as volunteers from underneath the pots we'd wintered-over in a previous season!

Milkweed is a perennial plant. Under the right conditions, it returns year, after year. But plants don't begin flowering till their second or third year so be patient!
 
The showy milkweed is well-named as it has beautiful, pink flowers but its real contribution to a perennial garden is its rich fragrance. Very much like an Asian lily! Though we've yet to see any monarchs on our plants, during their blooming season last year, our plants were covered in many kinds of other pollinators including bees, both wild and "honey" bees.

Life-cycle of the monarch butterfly (by Adri Kitchen).
Milkweed is a "host" plant to the monarch because adults enjoy the nectar produced by its flowers (though they seem to enjoy other nectar plants too LINK). But, as far as is known, they only lay their eggs on milkweed plants as these are what the larvae eat. Milkweed has a mild toxin in it which builds up in the bodies of the larvae and makes them bitter for their predators to eat. This toxin remains in the bodies of the adult butterflies too also giving them protection from predators.

People who raise cattle have tried to eradicate milkweed because it can be toxic to their livestock. Since we're vegetarians and have no grazing animals on our land, we're happy to provide this host plant for the monarchs and other beneficial insects who enjoy its nectar.

Studies show that a mixed stand of wildflowers seems to be beneficial to monarchs (and probably to other pollinators too). In other words, it's not ideal to grow milkweed alone. Llyn with crocosmia (red) and tansy (yellow - a volunteer "weed" that, though reviled by horse-owners is beloved of bees! Super fragrant too!).
Recent studies suggest that monarchs have a higher reproduction success-rate if the milkweeds are growing in a stand of mixed wildflowers LINK. We didn't know this when we established our first plot so they are growing alone. But this next spring, when we plant Adri's plants, we will grow some other wildflowers amongst them. That should be really beautiful!
 
Be sure to plant at least a dozen plants in a patch. If the larvae emerge from their eggs and begin munching their way through the leaves of the plant and should fall off for some-reason, they need to have multiple options for plants to climb back up on. Also, adult monarchs are far more likely to find a large patch of milkweeds than a small one. 

Plant at least a dozen milkweed plants together. This will help monarchs find them.

Milkweed seeds, ready for harvest.
The cycle of planting milkweed is complete when they begin producing flowers and seeds (in their second or third year). We have some extra seeds if you're interested in growing some milkweed in your yard. Just let us know (shareinjoyATgmail.com).

Honey bee on tansy.
Here are some other links with info you may find helpful and inspiring as you begin your butterfly garden:
 
Ways you can help right now:
 
1. Plant native milkweed: In Willamette Valley, that's showy milkweed (Asclepias speciosa) and narrow leafed milkweed (Asclepias fasciculatis)
2. Provide nectar
3. Don't use broad spectrum pesticides (https://monarchjointventure.org/monarch-biology/threats/pesticides)
4. Reduce your lawn size
5. Support local efforts by educating others, advocating for different practices in your community, or become a citizen scientist
 
From the National Wildlife Federation: on how to benefit butterflies. When you're planning your garden this coming spring, think of the monarchs!
 
 Check out Xerces Society and Monarch Joint Venture for more information on national efforts and ways you can help. Monarch Watch and Journey North are two citizen science groups that record monarch  and milkweed sightings. For an interactive map that tracks seasonal migration, try Journey North There are monarch butterflies in the Willamette Valley, but we need more citizen science reporters!
 
These findings suggest that the efforts of individual gardeners to plant milkweed, either wild-type native plants or native cultivars, can be helpful in supporting the declining populations of both monarch butterflies and other insects. 
"For example, the diversity of plants in a garden, the specific plants that are used and their arrangement — all of those things matter for how the butterflies are able to locate the hosts and move from one to the next."
 
 
Finally, some good news! Conservationists have successfully reintroduced previously extinct large blue butterflies to the UK, with the creatures populating parts of the country for the first time in 150 years. 
 
Image credit: Llyn Peabody - 2020

 Rewilding at the Sharing Gardens...Here's a post about our efforts to create more wildlife habitat on our 3 and 1/2 acres.

Thursday, February 16, 2023

Grapes, Onions and Peas, oh my!

 Light is returning! Slowly, slowly, the days are getting longer, smells of spring are in the air and the garden tasks shift from winter's rest to a quickening into pruning and mulching our orchards, managing our willow patch and starting seeds for another season of flowers for the pollinators and bounteous veggie harvests. 

Here are links to seasonally relevant posts:
Here are two posts about starting onions from seed:
And here's the best video tutorial we've found on Pruning Table Grapes
 
Finally, a photo gallery of current garden projects:

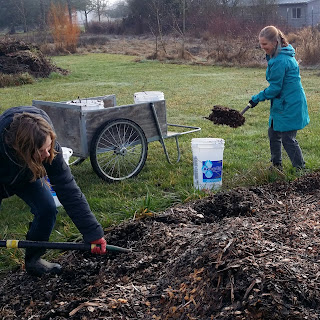
We've spent the winter in preparing greenhouse raised beds for planting...

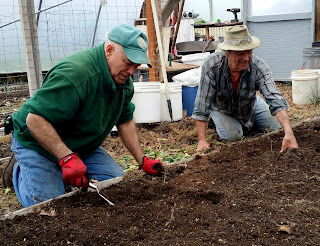
Donn and Chris mix compost, ashes and coffee grounds into our raised beds; ready for spring planting.

 and deep-cleaning and organizing our garden-sheds...

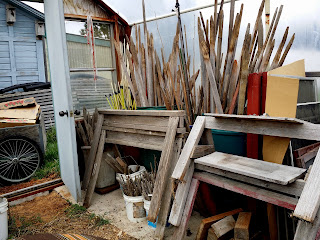
"A place for everything, and everything in its place...". Here are tomato stakes and sawhorses just waiting to be put back into service.
Our neighbors have brought us their extra leaves which we will use for mulch and to create next year's soil...

This is about 1/3 of the leaves we've had donated this year. Thank you to the Crosby's and the Dillards who send their leaf-bounty to us each year, and to Chuey (their landscape guy) for collecting all those leaves and bringing them to us!

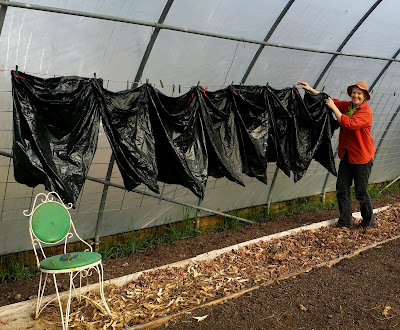
Many neighbors bring us their leaves in plastic bags which we hang to dry and bundle in rolls of 5 or 6 bags. These are offered back to our neighbors for free, for re-use.

Now, we're shifting our focus to pruning and mulching our perennial and orchard plants:

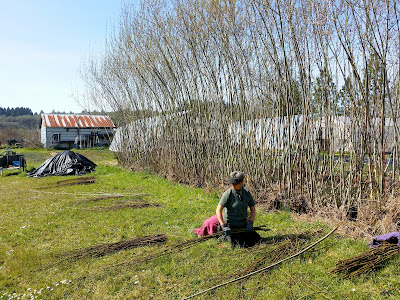
Our willow hedge is in serious need of pruning! This picture was taken in 2021 and many of the shoots that weren't removed then have doubled in diameter!

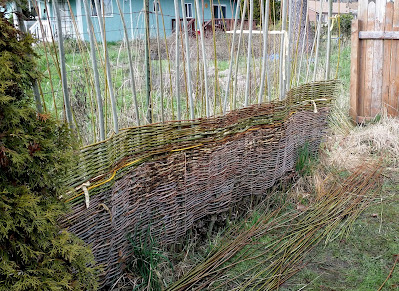
We use the smaller willow shoots in building this living-willow-wattle fence. Every year, we have enough smaller willow to raise this fence up another foot or so.
Now's the time to mulch all our hazelnut and fruit trees. Our wood chip pile is almost all gone.
A high-school intern and Stefani loading wood chips for distribution.

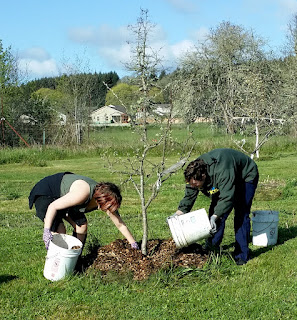
The mulch helps keep moisture in the ground, blocks weeds and protects the trees from the mower getting too close. It also provides a slow-release fertilizer as it breaks down.
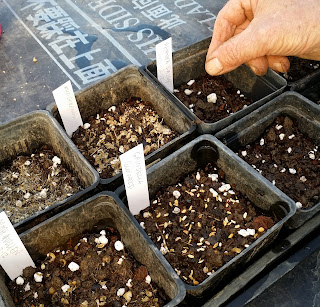
Seed-starting has begun: Lettuce, onions, peas, Fava beans, carrots, beets, cabbage and kale!

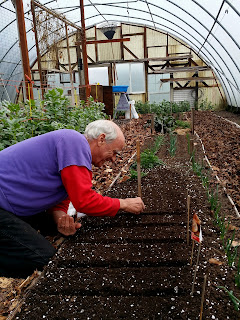
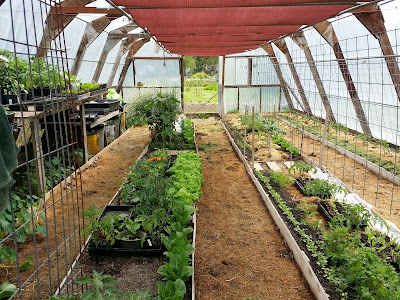
Chris continues to start seedlings directly in our greenhouse raised beds...

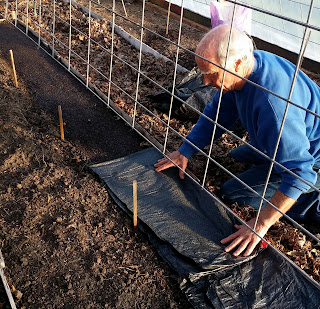
He's also begun direct-seeding beets, carrots and spinach in the greenhouses. Here he is putting a black lawn/leaf bag over the newly seeded carrot bed. The plastic keeps the bed from drying out too fast and its dark color heats the soil below when the sun shines on it, hastening germination.

Llyn has been starting perennial, native flower seeds. Many seeds of this type need a cold-spell to break dormancy, and an extended time to germinate (10-12 weeks). Here's an excellent article on Autumn and Winter Seed Sowing in Six Easy Steps from the Wild Seed Project.

 It won't be long before we are starting our heat-loving seeds and before you know it our greenhouses will be filled with delicious, nutritious food!

Our 'Ark' greenhouse, May 24, 2022. Yum!

Tuesday, February 7, 2023

Best Video on Pruning Table Grapes!

Here is the best video I've found on pruning table grapes (and I've watched a lot!). I was able to watch this video and head straight for our vineyard of 36 plants and confidently prune them for what I hope will be our most productive year yet while preparing them to be productive for next year as well.

 Grape Vine Pruning Made Easy! (Table Grapes) Using The Double Guyot Method

Sunday, February 5, 2023

Valentines Day - Time for Pea Planting!

Healthy pea seedlings.
Garden tips for Peas: In our region (Zone 8a - Last frost-date zone map - USA), its ideal to plant peas around Valentine's Day. This gives them the best head start for blooming in time for the longest possible harvest season. The problem is that, here in Alpine/Monroe, Oregon, the soil is often very wet and cold this time of year and, even if you get a good start sowing seeds directly in the soil, the March and April rains can significantly retard their growth, the seedlings can rot off at soil-level, or slugs can decimate your starts.

If you have raised beds, direct sowing shouldn't be an issue but if, like us, you don't have that luxury, here's a method we've used successfully for several years  to deal with these challenges:

You'll need:
  • Seeds (link to article on saving your own pea-seeds)
  • Soil
  • 4" pots (4"-6" deep) - deeper pots give more time before plants become root-bound.
Fill pots to within a half-inch of the top. Gently tamp down soil so it doesn't settle too far when you water it.

Poke two seeds, in opposite corners, about the depth of one knuckle (3/4" or so). That's two seeds per pot. This gives each plant enough soil to germinate and grow to several inches in height before you transplant. Cover the seeds with soil so they're not exposed to sun. Water them gently. Do not over-water. Seedlings can rot if soil is too damp.
Note: Since having written this article, we have now shifted to planting two seeds per pot but do not have photos to reflect this.
If you're planting earlier than mid-February, you'll need a greenhouse to protect them and keep soil in pots warm enough for germination. If you wait until mid-February, pots can often be outside in a sunny place, protected from north winds.

When the plants are at least 6", and no longer than 12", you can put them in your garden, or greenhouse beds. Best to wait until their root-systems are quite dense in the pots -- almost "root-bound". They will be easier to transplant without damaging the plants. On the other-hand, if you wait until the stems are too long, you risk breaking stems during transplanting so it's a matter of finding the right balance.

Pea-seedlings in pots.
Transplanting: Put up your trellis first, so as not to disturb the roots of your transplants. We typically attach bamboo poles to a wire run taut between two fencing posts (see pic below). Be sure your trellis is well anchored because, once full of pea-vines it can become a "sail" in the wind and blow over if not tightly secured. Space your poles about 8"- 10" apart and be sure they are tall enough to accommodate the variety of peas you're growing. Pea tendrils need a smallish diameter pole or trellis to attach to (1/2" or less). If the diameter of the poles are too big, the tendrils can't attach (unlike bean vines that spiral around the pole and can climb much thicker poles). 
 
Pea-plants are not typically transplanted but sowed directly in place. They are very susceptible to shock so be gentle with the roots and stems. Dig a hole that's about the size of your 4" pot. Gently tap the whole pot of soil, with its two plants into the palm of your hand, flip it back upright and lower it into the pre-dug hole. Tamp it down lightly to secure good root-contact with the surrounding soil but don't press too hard.
 
If slugs, bunnies or birds are a big issue in your area (they all love to nibble pea-seedlings!), planting them in milk-carton collars can make a big difference (Link to post on Re-Purposing Things - including milk-cartons as collars). We also typically sprinkle about a teaspoon of iron-phosphate ("Sluggo") around each bunch of plants. This is an organically-approved way of dealing with slug/snail infestations in your garden. (LINK to article about iron phosphate).

Good idea to have trellis in place before you transplant peas (so you're less likely to damage roots).
The plants will go through a little stress from transplanting but once they acclimatize to their new environment they'll be well along the way to yielding a bounteous and long-term harvest!

Chris and Jesse transplanting in the Alpine Garden - 2010.
Pea-vines headed for the compost pile. Peas, being legumes are able to add nitrogen to your soil through a symbiotic relationship with organisms that grow on their roots. This will help improve your soil, particularly if you leave the roots in the ground when you cut down the "greens" to add to your compost pile.

Other relevant posts for early-spring gardening:


Sprouting potatoes? What to do.

Onions - Growing From Seed