One of the pleasures of growing your own food from seeds is to begin to save your own seeds. With most varieties, it's not difficult and the seeds you save yourself will naturally select/adapt to be more perfectly suited to your local climate and conditions. Saving seeds also contributes to having a greater sense of local food-security in case there ever comes a time when seeds are not distributed over long distances, or there is a seed-crop failure in another part of the country.
 |
| Eat your kale for healthy skin, hair, bones and teeth! |
We typically grow two crops of kale per year: the first one we start in February - either in pots, or directly sown into our greenhouse raised-beds. LINK: Starting Seedlings Directly in Greenhouse Raised Beds
The second batch gets started in early July and transplanted to outside beds once the seedlings are big enough; or we scatter the seed over a whole outside bed, creating a lush mat that we can eat from through all but the harshest of winters and then roto-till in, in the spring as a cover crop (after harvesting the spring flowers/raab).
Starting seeds: We often start seeds in plastic tofu-containers with holes drilled in the bottom. We like re-purposing plastic so it isn't just sent to the landfill. Being vegetarian, we eat a lot of tofu (!) and so generate a lot of these containers. Be sure to drill 1/4" holes for drainage! They will last for many seasons.
To use this method, fill the containers mostly full of soil and press the soil down evenly with the bottom of another container. After sowing seeds, cover with scant, even layer of soil. Keep moist but don't over-water.
 | |
| The white containers above are tofu-containers we have re-purposed for seed-starting. These seedlings pictured above are lettuce plants (to show spacing of seeds). |
Once the seedlings are about an inch tall, re-pot them into jumbo six-packs, or (we use) the same tofu-containers, with six seedlings per container. The tofu-containers use less soil than the six-packs and it's very easy to break apart the roots of the six plants when it's time to plant them in the ground.
Choose a location that gets plenty of sun and has well-drained fertile soil. Since the part of the plant you are harvesting to eat is the green leaves, this is a big clue that kale loves nitrogen. But don't over-fertilize. This will make the plants grow too fast, have weak cell-walls and be more susceptible to diseases and insects (such as aphids).
Plant them 18" - 24" apart. If slugs are a big issue in your area, sprinkle iron phosphate granules around the plants and replenish if it's been consumed or gets very wet (brand-name "Sluggo").
If you have lots of seed, you can broadcast it over a whole row and harvest the leaves in bunches, cut with a knife (see pics below)
Saving seed: The best time to save seed is in the spring, from plants that have wintered-over but we've also saved viable seed from the plants started in February. That latter seed ripens in the late summer.
Though we're not aware of hybrid-varieties of kale (which would mean that the seed you saved wouldn't grow "true") be sure that there are no other plants from the brassica family flowering near by, at the same time. These include (but are not limited to) broccoli, cabbage, mustard and other varieties of kale. If other brassicas are flowering at the same time, your seed may become cross-pollinated and your plants may not grow 'true'.
 |
| Broccoli is in the same family as kale (brassicas) and, if flowering at the same time, their seeds may cross. |
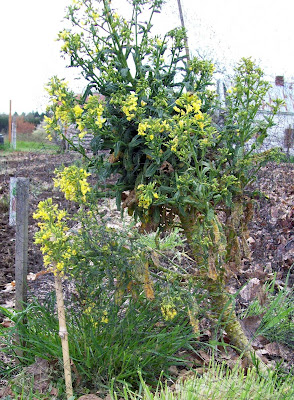
In order to create seed, kale will send up several flower-stalks per plant. Before they open, when they look little mini-loose broccoli heads, they are called 'raab' (pronounced 'rob'). They are tasty and highly nutritious (the flowers will be particularly 'sweet' from plants that have over-wintered as the cold causes them to 'sugar-up'). We love them lightly steamed and drizzled with olive oil, vinegar and a touch of salt. Enjoy the bounty, as soon the plants will become determined to set seed and the whole plant will become more bitter and tougher in texture. Just don't pick any raab from the plants you're going to save seed from.
 |
| If left to mature, the raab opens up into yellow flowers. Once the flowers open, the plants become more woody and less pleasant to eat (but the bees love them!). |
 |
| Spring kale flowers (raab), harvested and ready for steaming. Spring raab is tender and slightly sweet and full of nutrients! |
To save seed, select a plant (or plants) and don't pick off the flowers. Don't pick any more leaves to eat either. You may want to put a cage around the plant, or tie it to a stake as the flower stalks become quite heavy once they're loaded with seed. Also, if multiple people harvest from your garden, designate the plant as a seed crop with a sign, or flag. We use small, red mesh bags that onions come in and everyone who shares our gardens knows not to harvest where they see these red 'flags'.
The flowers will blossom, die back and a seed pod will form in their place. Kale gets pollinated primarily by insects so hopefully you'll see lots of them visiting the flowers.
It's important to find the right time to harvest seed. You want to be sure the seeds are ripe enough that they are fully black and pop easily out of the pods, but don't wait so long that the birds eat your seed, or the pods shatter and spread the seed onto the ground below. Regardless of your best intentions, there are always some seeds that shatter out of the pods so you can anticipate 'volunteer' seedlings to germinate in places you've let kale plants go-to-seed. We have one place in a greenhouse that has germinated kale plants for a third season in a row since we last let plants go to seed in that spot. That's what we call a 'high-quality problem'!
 |
| When ripe, the pods will easily open by rubbing them between your fingers yielding multiple seeds in each. |
 |
| Mature kale seeds. Each plant is capable of producing thousands of seeds. This is just a small fraction of those saved from one plant. |
 | ||||
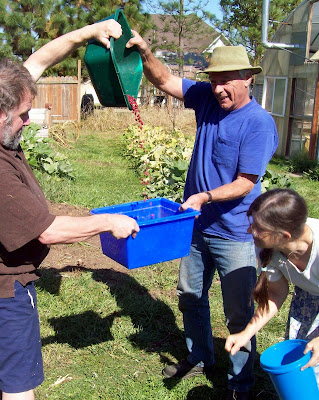
| Here, Chris is giving a demonstration to Rook and Cindy of winnowing bean seeds (separating the seeds from the chaff).
On a lightly breezy day, or in front of an electric fan, slowly pour
seeds from one container into the other so the breeze blows the chaff
away and the seeds fall into the lower container. Repeat until clean. Storing seeds: Often, after winnowing, we continue to dry the seeds on a shelf above our woodstove. It is very important that they be totally
dry or they can develop mold during storage. Heat can also destroy
seeds so don't dry them using intense heat conditions. Check the plastic bags,
jars or bottles a week or two after you store them to check there's no
mold growing. We've lost a few batches due to mold which is always a sad
thing when you go to check your seeds at the beginning of the next
growing season. Store seeds in a
cool, dark place (or in your freezer, in an airtight container if you
have the room).
Here's a LINK listing all our other posts about saving your own seed.
|


No comments:
Post a Comment
Thank you for taking the time to leave a comment. We welcome your reflections and questions.