A unique and viable approach to establishing local food self-reliance and building stronger communities.

Monday, April 7, 2025

Shifting Times

Greetings from the Sharing Gardens! We certainly are in 'shifting times'! Some areas of our amazing planet are receiving unprecedented flooding while others can't seem to break out of a drought cycle. Far more people fall into financial hardship each year and the natural world continues to face threats from all sides. So, how do we respond? We believe each of us has a unique role to play and that ours at the Sharing Gardens is to continue to demonstrate the power of generosity and mutual aid. Read below about the local challenges we are facing and how we are rising to meet them.

Service Learning student

The Sharing Gardens are a unique style of community garden. Instead of separate plots that people rent from the owners of the land, we all garden together, for free! This has great benefits: it makes watering more efficient, one is able to grow pure seed, pest management is simplified, all while growing more food in the same amount of space. Overview and Benefits of the Sharing Gardens. 


Our 'sharegivers' (volunteers) join us through all parts of the food-growing cycle, including: planting, mulching, weeding, making compost, harvesting, processing grains and beans by hand and saving seed. Our garden is a school, and a sanctuary for people and the natural world. 

The food that is grown is shared among those who help grow it or contribute in other ways.The surplus is donated to food charities.

Sharegivers (volunteers) sharing in the harvest - 2016

Over the last several years, the focus of the Sharing Gardens has shifted. In the beginning (16 years ago!) our main objective was to grow the greatest volume of high-quality vegetables as we could (over 6,000 measured pounds annually, from 2012 - 2015!) and share them all freely (no one charged for the food that is grown). When we started out, we were the only gardeners providing significant amounts of produce to the food charities we served.

Llyn, with less than half of one week's donations to our local Food Pantry - 2017 (cucumbers, tomatoes, carrots, beans, squash, greens). This was before other gardeners in the community began making significant donations.

Gradually, our town's Food Pantry (S. Benton Food Pantry) began benefiting from donations from other sources: Family gardens began contributing significant amounts of summer-fresh produce: tomatoes, peppers, cucumbers etc. In addition, SBFP also began collecting summer produce from the Corvallis Farmer's Market (produce left over at day's end that the farmers couldn't sell) and receiving staple crops such as potatoes from local small-scale farmers who received grants to grow specifically for Food Pantries. All this on top of the commodity crops provided through USDA support (apples, oranges etc).

Our same Pantry's produce tables, Oct. 2025. Our cabbage, cukes and greens are squeezed in amongst the other bounty.

With all this additional support, for the last five years or so, there were many times during the peak summer months of garden production that it was literally impossible to find room on the tables at the pantry for our donations! (Now that's what I call a 'high-quality problem!'). Also, during this time, our volunteer support began to dwindle, so gradually we shifted away from producing significant surplus of these 'summer-ripening' crops that need tending and harvesting throughout their peak season and began focusing more on storage crops like dried beans and grains, winter squash along with cabbage and root vegetables such as potatoes, carrots and beets. But it's hard to grow enough of these crops to make much of a difference at food pantries. We primarily only share them with the people who help us grow the food.

Summertime harvest from our gardens at peak season, 2022.

This was what we planned to do again this year when we heard that massive funding cuts have been announced that will reduce the amount of produce coming from government-funded sources including USDA commodity foods and grants for farmers. This has sent ripples of alarm through the food-charity community and will have significant impacts on their ability to distribute fresh produce.

Sharing Gardens donation of lettuce to Local Aid, Junction City - 2015

It's not too late for the Sharing Gardens to step up and return to producing more of the summer-ripening produce. But this would take much stronger volunteer support than we've received in recent years and at this point we're not sure this is the best focus for our energies and resources. The summer-ripening crops (tomatoes, peppers, cucumbers etc) with their pruning, watering, weeding and weekly, or bi-weekly harvests, take more energy than growing storage crops like winter squash, dried grains and beans which, once planted, mulched and weeded a few times don't need much attention till autumn harvests and, if the past 5-7 years are any indicator, Food Charities (at least the ones we're in regular contact) with receive lots of donations from local gardeners of these summer-ripening crops anyway.

Elisa and Maiya with a donation to the SB Food Pantry: tomatoes, cantaloupe and greens.

It is our strong feeling that we are in a better position to continue developing methods and mentoring others in the areas that are less commonly addressed through regular gardening sites; things like small-scale dried grain and bean production and processing, and seed saving; and to be available to coach others wanting to start sharing-type gardens in their own communities.

That being said, there is still room this season in the Monroe Sharing Gardens for a handful of committed folks who want to learn how to grow food and save seed in a cooperative environment; in a spirit of mutual generosity. If, after reading this info about our volunteer program, you feel like it's a good fit, we hope you'll be in contact with us.

Meanwhile, we are grateful to see that some of this 'mutual generosity' is already showing up. We are heartened that our neighbor Deb Moss has offered to bring her small tractor and till up a bunch of ground that has been invaded by grasses. This will allow us to use our garden space more efficiently, whatever crops we grow. 

Vincent Drew has reached out to us from Linn/Benton Food Share, the warehouse/coordination-center that distributes food to most of the food charities in our area. He has offered to come help in the gardens when we have a particularly large harvest, to pack it up in LBFS totes and take it directly to the warehouse refrigerators for distribution.

Chris and Joey sharing in the autumn apple harvest.
So, while in some ways we feel a sense of nostalgia for the early days of the gardens with its dynamic pace and sheer abundance in productivity, we're also grateful that our program still has relevance to our changing times. We still are growing impressive amounts of food; all shared freely and our role as mentors and educators continues to expand. We are so happy when we hear of other community gardens shifting to the Sharing Gardens model and like to believe that in some small way, we helped to plant and nurture this seed of generosity by what we've demonstrated here.

Volunteers help with all aspects of growing food: shifting mushroom compost for soil-fertility.

Weeding is a lot more fun with company.

When kids help grow food, they're more likely to enjoy eating it!


Friday, April 4, 2025

Sharing and Abundance - a short video

If you've any doubt about the connection between 'sharing' and 'abundance', please enjoy this marvelous, short video by our friend and partner in sharing Nick Routledge:

Our friend Steve Rose with free tomato starts he grew to share at the food pantry.


Sunday, March 30, 2025

Agrarian Sharing Network Propagation Fair

hello garden-friends, on March 15th, Chris and I participated in the Agrarian Sharing Network's Propagation Fair (LINK to their Facebook page). This group, run entirely through volunteers and donations, shares seeds, live plants and fruit tree cuttings/scion with the community. Their philosophy aligns deeply with the Sharing Gardens so we were happy to lend support through our volunteer time as well as seeds we'd grown and saved ourselves and veggie starts.

Chris sat at the table with our starts, our tri-fold poster and info about our project. We gave away about 200 plants, all started back in January in our greenhouses to be ready in time. (That's me smiling next to him).  

Happy seed recipients! Over 80% of the seeds shared that day had been grown and saved by local farmers (including us!) which makes them uniquely adapted to our climate and conditions.

Some of the other plant donations. Volunteer, Hayley, is on the left. Friend, Wendy, is on the right in the foreground and happy recipients are in the background. Wendy made pumpkin squares to feed the volunteers from a squash she grew herself! 

Steve Northway has been growing and saving seeds from pure American Chestnuts for over 20 years. He's trying to generate healthy groves of these trees safe from the blight that wiped out literally billions of these mighty keystone species on the east coast in the late 1800s and early 1900s. When Giants Roamed Appalachia: The Story of the Chestnut

I (Llyn) have successfully grown three young saplings which were planted on my neighbor's land and Steve gave me five more seeds to propagate this year which I hope to plant on our land and share.

In another room, volunteer grafters joined fruit tree cuttings/scion with root stock and taught people how to keep their young trees healthy. There were literally hundreds of these new baby trees created that day!

A beautiful sentiment posted on the wall of the Willamette Community Grange where the event was hosted.

Friday, February 14, 2025

Winter Garden Tips & Inspiration!

Hello dear friends of the Sharing Gardens and welcome to our February Digest with timely "How To" articles on: Growing Peas, Onions, Kale, Milkweeds and other Winter Crops from Seed and Grape Pruning. (Image, left: Llyn Peabody 2020).

And, even if you're not so interested in gardening topics, be sure to scroll to the bottom of this post for links to "An Amazing Synchronicity!" and a short video about the connection between 'sharing' and the 'experience of abundance'. Both are very inspiring and thought-provoking!

The back of our house, workshop, Oz-greenhouse and garden shed.

Here is our latest new post on Starting Early Spring Crops from Seed (lettuce, kale, cabbage etc) (but wait a bit on broccoli and chard because if they're kissed with frost they have a tendency to 'bolt' - got to seed). In it we offer step-by-step instructions using our method of starting seeds in re-purposed tofu-containers with holes drilled in their bottoms (left) inside a grow-tunnel or greenhouse.

We've also been having a lot of success starting seedlings directly in the raised-beds of our greenhouses (left). Read here about our methods.


PEAS:
There's just nothing to compare with the delicious sweetness and crunch of edible-pod peas. Many years ago we discovered a method to get a head-start on pea-planting. Read this post to learn how: Valentines Day - Time for Pea Planting!

ONIONS: Some years we have better success than others in growing onions. With gardening, there are always so many variables so, what works one year, may not work the next! Here are posts that outline the methods that have yielded the best results over many seasons:

Onions - Growing from Seed - Using heat mats and shallow pots

Onions - Growing From Seed - deep pots 

The following article was written in the heart of summer but the first part of the post details onion harvesting and curing so we include it here. Growing Onions from Seed - It takes a Village


Kale is one of the easiest plants to grow in the Pacific NW
; it is hardy through the winter and, if mulched and watered sufficiently can even withstand the hottest parts of the summer. Along with Collards it is the most nutrient-dense food per calorie! Unfortunately, it is also one of the most highly pesticided plants as well. Follow the links below to learn:

Why it is so important to only eat organically grown kale: Kale again in the "Dirty Dozen" - 2024  

Excellent info on the nutritional value of Kale and tips on growing it! "The King of Vegetables; 'Kale' to the Chief!" 

One of the pleasures of growing your own food from seeds is to begin to save your own seeds. With most varieties, it's not difficult and the seeds you save yourself will naturally select/adapt to be more perfectly suited to your local climate and conditions. Saving seeds also contributes to having a greater sense of local food-security in case there ever comes a time when seeds are not distributed over long distances, or there is a seed-crop failure in another part of the country. Read here for more tips on Growing Kale and Saving and Storing Kale Seed.

Cathy, Danielle and Llyn with Red Russian kale - a powerhouse of nutrition!

Another important mission of the Sharing Gardens is to provide habitat for the wild species of flora and fauna that call this land 'home'. Though we are at the very farthest northern reaches of the Western Monarch population we have established three perennial patches of Showy Milkweed, the host plant for the Monarch (and sole diet of the Monarch's caterpillars). We've yet to see a Monarch in our yard but there are plenty of other pollinating insects that just love it's sweet nectar. Here's a How-to post for growing milkweed from seed: How to help the Monarch Butterflies - Starting milkweed from seed

Adri and Kaylyn with Showy Milkweed plants

February is grape-pruning time in our area. Below is a link to two resources we've found to be incredibly helpful in learning the proper ways to prune grapes. The post includes both a video and an article with excellent pictures and descriptions to guarantee your success!

In previous years, we had experimented with different methods of pruning. Our theory was: the more fruit spurs we left behind, the more fruit we'd get from them. It can be a bit anxiety-producing to cut off a lot of plant material and reduce your grapes to just two canes and two renewal spurs (for next year's growth)! In truth, by cutting back the plants so radically, you may get fewer bunches but the ones you get will be larger and more filled out and easier to harvest. Click here for The Best video and article (we've found) on Pruning Grapes.

A fraction of our harvest following the cane method of pruning.

And lastly, we read an inspiring article about a woman who has been living without money for ten years. She said:

“I actually feel more secure than I did when I was earning money, because all through human history, true security has always come from living in community and I have time now to build that ‘social currency’. To help people out, care for sick friends or their children, help in their gardens. That’s one of the big benefits of living without money.” (To read the full article, click here: An Amazing Synchronicity! (and a woman who's lived 'money-free' for ten years!)

And, if you've any doubt about the connection between 'sharing' and 'abundance', please enjoy this marvelous, short video by our friend and partner in sharing Nick Routledge:

(In case this newsletter was forwarded by a friend, or you've just stumbled on our website for the first time and you would like to be added to our list to receive future newsletters, send us an email at the Sharing Gardens: shareinjoy AT gmail.com) "Bee" well!  Chris and Llyn

Sharing Gardens Founders and Stewards: Chris and Llyn

Thursday, February 6, 2025

Best Video on Pruning Table Grapes!

Here is the best video I've found on pruning table grapes (and I've watched a lot!). I was able to watch this video and head straight for our vineyard of 36 plants and confidently prune them for what I hope will be our most productive year yet while preparing them to be productive for next year as well.

Grape Vine Pruning Made Easy! (Table Grapes) Using The Double Guyot Method

And, for an excellent written post on pruning grapes: both cane and spur methods explained, click here: How to Prune Grape Vines – Cane and Spur Pruning Explained (Thank you Deep Green Permaculture!)

Update - February 2025: We followed the method outlined in the video above for our grape vines in 2023 and 2024 with excellent results.

Some of the 36 grape vines we grow...after pruning.
In previous years, we had experimented with different methods of pruning. Our plants looked a lot like his did at the beginning of the video. Our theory was: the more fruit spurs we left behind, the more fruit we'd get from them. It can be a bit anxiety-producing to cut off so much plant material and reduce your grapes to just two canes and two renewal spurs (for next year's growth)! In truth, by cutting back the plants so radically, you may get fewer bunches but the ones you get will be larger and more filled out and easier to harvest.

Just a fraction of our harvest using the pruning technique outlined above.

Monday, February 3, 2025

Starting lettuce from seed *(re-purposing plastic tofu containers)

Red Iceberg Lettuce - a summer rose!
This post gives generic information for starting cool-weather crops (lettuce, cabbage, broccoli, kale etc) from seed.
 
Note: Though this was originally written and posted in 2011, and some of our practices have shifted (for example we no longer use rabbit manure - or any animal by-products - in our garden or soil-mix - LINK: Making Your Own "Veganic" Potting Soil in Your Greenhouse Paths - Using Worms) - the core of the information is still accurate and useful so we have republished with minimal editing...
 
Here at the Sharing Gardens (in the Pacific NW) we have several ways of starting seeds. This post is about starting them in a grow-tunnel or greenhouse using re-purposed tofu containers to get them started. (To read about Starting Seedlings Directly in Greenhouse Raised Beds - click here).

We're vegetarians and end up with a lot of these white, plastic, square tofu containers. We've found they make great tubs to start small seedlings. We drill holes in the bottom for drainage and fill with a finely sifted, moist, organic potting mix.
This method presumes you have a greenhouse though it doesn't need to be very big. Seedlings will need sun and protection from wind and severe cold once they have germinated. In 2010, we started everything we needed for three 50 x 50' garden-beds in an 8'x10' greenhouse (below). We just had to time everything so that the first seedlings that were less cold-sensitive (lettuce, peas, cabbage etc.) could be brought outside in time for the hot-weather crops (tomatoes, peppers, melons etc.) to be started inside.

Of course if you have a much larger greenhouse, you can start many more seedlings!
In 2010 we started everything we needed for three 50 x 50' garden-beds in this cozy, little 8'x10' greenhouse. We just had to time everything so that the first seedlings that were less cold-sensitive (lettuce, peas, cabbage etc.) could be brought outside in time for the hot-weather crops (tomatoes, peppers, melons etc.) to be started inside.

First step - Soil: In the early days of the Sharing Gardens we purchased soil by the trailer-load. We chose an organic soil that didn't have any nutrients added, and added an organic fertilizer. We mixed up batches in a wheelbarrow. Later, once we were more established, we began to make our own potting mix but most people don't have that capacity. Just be sure you use 'organic' potting mix from a reliable source.
 
In the early days, we bought organic soil by the trailer-load and added commercially-made fertilizer. Now, we make our own. Making Your Own "Veganic" Potting Soil in Your Greenhouse Paths - Using Worms

Sifting Soil:
The key here is that, if your potting mix has large chunks of organic matter, your seedlings will struggle to grow. We sift our soil through a nursery flat with tiny holes to remove all large chunks.
We use a nursery-flat to sift our potting mix. This gets rid of larger chunks of material that would make new seedlings struggle to grow.

Be sure your soil is moist, but not wet.
Fill with a good potting mix, using the bottom of another tofu tub to pack the soil firmly and make a flat surface for the seeds. This is important as, if the soil level is uneven you will get varying germination-times for your seedlings. You want them all to come up at once.

Planting seeds: After misting the soil so it is good and damp, we sprinkle the seeds with our finger-tips trying to distribute them evenly and not too thickly. If the are planted too densely, it's hard to tease them apart when you transplant them to larger pots.  
 
Seedlings germinating in re-purposed tofu containers. We try to sprinkle them evenly and not-too densely.
 
Lastly we gently sprinkle a thin lay of cover soil over the seeds and lightly mist to settle the seeds. They must be kept moist but not overly wet or the seeds and starts may rot. Lettuce and brassica seeds germinate best in a cool soil so you shouldn't need to put it on a heat mat or under a lamp to get it to germinate. If you do apply bottom heat, check seedlings frequently so they don't dry out.
 
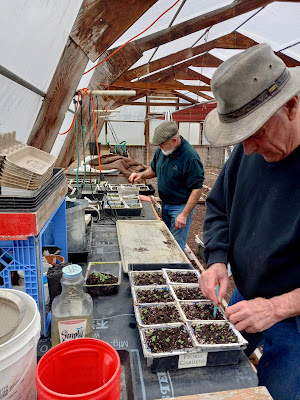
Chris and Donn transplanting seedlings into tofu containers; six to a 'pot'.
When the seedlings are about 1/2" - 1" (2 cm) high, they are ready for transplanting. We put ours in regular or "jumbo" six-packs, or in the same tofu-containers (six to a container). We use a basic, organic potting soil and add our own fertilizer. To each wheelbarrow of soil we add about two cups of all-purpose organic fertilizer and about a half-gallon of sifted rabbit manure. (Note 2025: We now make our own potting mix from the compost 'harvested' in our greenhouse paths, wood-ash and perlite: Making Your Own "Veganic" Potting Soil in Your Greenhouse Paths - Using Worms).

For the Sharing Gardens, where we might grow 1,000 or more lettuce plants per season, transplanting is done in large batches. Being systematic in the nursery will save you time and materials and you will have much better results. Have labels ready so you keep track of the varieties you are transplanting. 
 
Being systematic in the nursery will save you time and materials and you will have much better results.
Fill a flat of six-packs (or tofu containers) with soil and mist them with water. Wet soil is less shocking to transplanted roots than dry. 
 
Adri, filling 6-packs with soil. A fun, relaxing job, at any age!
Using your finger, a stick or some other object, make a generous hole in each of the cells of the six-packs (or whatever you're planting into).
Lettuce seedlings in a tofu container. Using a pen to make holes for transplants.
To remove seedlings for transplanting: Cupping your hand over the whole tofu-tub of seedlings, flip it over and tap the bottom, catching the whole clump of soil and seedlings in your hand. Gently flip it back over and place it on a tray to catch the loose soil as it drops off.
 
From the tray, pull off a clump of seedlings and, holding them by their leaves, tease apart a single plant with its roots. 
 
It is very important that all the roots go down into the soil and are covered. If they stick out from the surface, this is called 'J-rooting' and  will often kill the plants as they dry out too easily. This is why you want to dig a generously-sized hole so the rootlets don't catch on the sides as you lower them in. After pressing the soil in around each seedling, water them in gently to settle the soil. Label the tray and move onto the next.
Transplanting seedlings. Note: Hold seedlings by leaves, not roots or stems.
Depending on warmth and sunlight, and the size of the six-packs you use, your lettuce will be ready to plant in garden beds in six to ten weeks. If you stagger your plantings it will mean your lettuce doesn't all come ripe at once. Ideally you wait until the root ball has filled the six-pack cell enough to hold the soil as you pop it out, without being totally root-bound (roots coming through the bottom of the six-pack).

A variety of seedlings growing in tofu containers; six to a pot.
 A week or two before you transplant into your garden, bring the starts outside and begin "hardening them off". Put them where they will get plenty of sun but not too much wind. They will withstand a light frost but if it is going to get very cold, or doesn't warm up in the day, bring them back into the greenhouse till conditions improve. During this hardening-off period, prepare garden beds so they are ready to receive transplants. In our "deep-mulch/minimal till" gardens, we pull a row of mulch over to the adjacent path (with a pitchfork) and, with a trowel dig a small hole just the size of the lettuce's root-ball. This leaves worm holes intact and lettuce seems to thrive without any roto-tilling needed.
Seedlings "hardening-off".
Here in our area, slugs can be a real problem in the spring. Follow this link for ideas on how to re-use milk cartons or soy-milk containers to thwart off their feasting: Re-Purposing Things. Here is another way to deal with a slug problem: Organic Solution to Slugs - Iron Phosphate
Transplanting peas and lettuce
We don't find that additional fertilizing is necessary for lettuce plants. They receive enough nutrients from the soil. But heavy feeders such as broccoli, cabbage or any of the other 'brassicas' would benefit from added compost or some organic fertilizer mixed in at the site you are planting out your seedlings - just don't use too much or the plants will grow quickly and have thin cell walls making them more susceptible to pests.) 
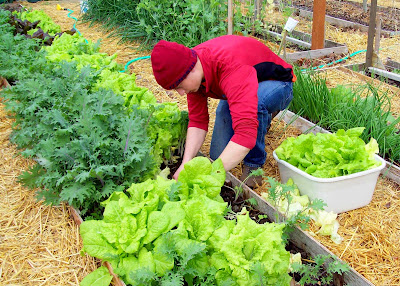
Several weeks after transplanting. Picking individual lettuce leaves for salad.
We hold off on mulching them because we want the sun to warm up and dry out the soil and mulch provides habitat for the slugs. Sometimes, after the lettuce or other seedlings are well established and the soil is warmed up, we mulch with a few inches of grass clippings around our plants. Ideally, let the clippings dry out for a few days on a tarp or in a bin. Fresh clippings, if piled thickly, can heat up considerably and burn your plants.

Chris Burns with beautiful lettuce harvest! 2011
We plant our lettuce spaced about 6" - 8" (12 - 15 cm) apart (brassicas need more room: 18" seems to work well...). We harvest the lettuce intermittently, giving the remaining lettuce room to grow. In the early stages, before the heads are fully formed, we harvest one to three leaves off each plant, rather than clipping whole heads. As the heads become full-size we harvest by cutting them off at the root with a paring knife, leaving the roots in the ground to feed the worms.
 
We hope this post has helped take some of the mystery out of starting spring crops from seed. If you've been interested in learning to save your own seed, lettuce is one of the easier crops to save seeds from. Here's a post we wrote about the process: LINK: How to Save Your Own Lettuce Seed Enjoy!