A unique and viable approach to establishing local food self-reliance and building stronger communities.

Friday, January 9, 2026

Winter Garden Tips & Inspiration!

Hello dear friends of the Sharing Gardens and welcome to our February Digest with timely "How To" articles on: Growing Peas, Onions, Kale, Milkweeds and other Winter Crops from Seed and Grape Pruning. (Image, left: Llyn Peabody 2020).

And, even if you're not so interested in gardening topics, be sure to scroll to the bottom of this post for links to "An Amazing Synchronicity!" and a short video about the connection between 'sharing' and the 'experience of abundance'. Both are very inspiring and thought-provoking!

The back of our house, workshop, Oz-greenhouse and garden shed.

Here is our latest new post on Starting Early Spring Crops from Seed (lettuce, kale, cabbage etc) (but wait a bit on broccoli and chard because if they're kissed with frost they have a tendency to 'bolt' - got to seed). In it we offer step-by-step instructions using our method of starting seeds in re-purposed tofu-containers with holes drilled in their bottoms (left) inside a grow-tunnel or greenhouse.

We've also been having a lot of success starting seedlings directly in the raised-beds of our greenhouses (left). Read here about our methods.


PEAS:
There's just nothing to compare with the delicious sweetness and crunch of edible-pod peas. Many years ago we discovered a method to get a head-start on pea-planting. Read this post to learn how: Valentines Day - Time for Pea Planting!

ONIONS: Some years we have better success than others in growing onions. With gardening, there are always so many variables so, what works one year, may not work the next! Here are posts that outline the methods that have yielded the best results over many seasons:

Onions - Growing from Seed - Using heat mats and shallow pots

Onions - Growing From Seed - deep pots 

The following article was written in the heart of summer but the first part of the post details onion harvesting and curing so we include it here. Growing Onions from Seed - It takes a Village


Kale is one of the easiest plants to grow in the Pacific NW
; it is hardy through the winter and, if mulched and watered sufficiently can even withstand the hottest parts of the summer. Along with Collards it is the most nutrient-dense food per calorie! Unfortunately, it is also one of the most highly pesticided plants as well. Follow the links below to learn:

Why it is so important to only eat organically grown kale: Kale again in the "Dirty Dozen" - 2024  

Excellent info on the nutritional value of Kale and tips on growing it! "The King of Vegetables; 'Kale' to the Chief!" 

One of the pleasures of growing your own food from seeds is to begin to save your own seeds. With most varieties, it's not difficult and the seeds you save yourself will naturally select/adapt to be more perfectly suited to your local climate and conditions. Saving seeds also contributes to having a greater sense of local food-security in case there ever comes a time when seeds are not distributed over long distances, or there is a seed-crop failure in another part of the country. Read here for more tips on Growing Kale and Saving and Storing Kale Seed.

Cathy, Danielle and Llyn with Red Russian kale - a powerhouse of nutrition!

Another important mission of the Sharing Gardens is to provide habitat for the wild species of flora and fauna that call this land 'home'. Though we are at the very farthest northern reaches of the Western Monarch population we have established three perennial patches of Showy Milkweed, the host plant for the Monarch (and sole diet of the Monarch's caterpillars). We've yet to see a Monarch in our yard but there are plenty of other pollinating insects that just love it's sweet nectar. Here's a How-to post for growing milkweed from seed: How to help the Monarch Butterflies - Starting milkweed from seed

Adri and Kaylyn with Showy Milkweed plants

February is grape-pruning time in our area. Below is a link to two resources we've found to be incredibly helpful in learning the proper ways to prune grapes. The post includes both a video and an article with excellent pictures and descriptions to guarantee your success!

In previous years, we had experimented with different methods of pruning. Our theory was: the more fruit spurs we left behind, the more fruit we'd get from them. It can be a bit anxiety-producing to cut off a lot of plant material and reduce your grapes to just two canes and two renewal spurs (for next year's growth)! In truth, by cutting back the plants so radically, you may get fewer bunches but the ones you get will be larger and more filled out and easier to harvest. Click here for The Best video and article (we've found) on Pruning Grapes.

A fraction of our harvest following the cane method of pruning.

And lastly, we read an inspiring article about a woman who has been living without money for ten years. She said:

“I actually feel more secure than I did when I was earning money, because all through human history, true security has always come from living in community and I have time now to build that ‘social currency’. To help people out, care for sick friends or their children, help in their gardens. That’s one of the big benefits of living without money.” (To read the full article, click here: An Amazing Synchronicity! (and a woman who's lived 'money-free' for ten years!)

And, if you've any doubt about the connection between 'sharing' and 'abundance', please enjoy this marvelous, short video by our friend and partner in sharing Nick Routledge:

(In case this newsletter was forwarded by a friend, or you've just stumbled on our website for the first time and you would like to be added to our list to receive future newsletters, send us an email at the Sharing Gardens: shareinjoy AT gmail.com) "Bee" well!  Chris and Llyn

Sharing Gardens Founders and Stewards: Chris and Llyn

Starting Seedlings Directly in Greenhouse Raised Beds

Update: January 2026: We had such good results from this experiment the past three years that we've already started some seeds this year. Every year is different but we hope to have bounteous, early crops to show for our efforts again this spring.

(originally published - May 2023). Last year (2022) we experimented with starting seedlings, to be transplanted to other beds, right in our greenhouse raised beds. This worked quite well for several crops including: lettuce, broccoli, kale, collards, onions and cabbage. They are all plants that transplant easily and will germinate in relatively cool soil. These seedlings were started in rows with seeds planted every 1/2" or so.

Chris starting seeds directly in greenhouse raised beds.

The advantage of this, over starting seeds in tofu-containers (below) (LINK) and "potting them up" to larger six-packs or pots is that it's easier to keep the seedlings uniformly watered and their roots are less likely to get overcrowded. The disadvantage is that, without a bottom-source of heat (electric mats), heat-loving plants like peppers or tomatoes may not germinate in the cooler soil. So, we'll still use heat mats for them.

Seedling starts in tofu containers. We drill holes in the bottom for drainage. This is the way we used to start all our seedlings. These are then potted-up into larger pots.

With our new method, as long as the soil is warm enough, we save time and effort and the roots of the seedlings have much more room to grow than if they were in tofu containers.

Once the seedlings germinated, and grew large enough, we carefully transplanted them into larger pots, or directly into another greenhouse-raised bed.

Lettuce plants started in greenhouse raised beds and transplanted to another raised bed to grow to maturity,

Over the years, our raised bed soil has become a perfect medium for seed-starting. We can use it to fill pots and transplant starts into those pots to grow them out for later transplanting outside:

Our beautiful soil. Every year we supplement it with compost created in the paths between the raised beds, a sprinkling of wood-ash and coffee grounds and, in recent years we've added perlite too to aid in water retention.

Beautiful, healthy broccoli plants, started from seed in raised beds and transplanted into pots using soil from our raised beds.

This year, we are taking this experiment one step further. Chris decided to see if he could germinate some of the same kinds of seedlings, using this same method but in mid-January. (This is about a month earlier than what's suggested in our local planting guides!) So far, things are looking good.

Chris planting seeds on January 13, 2023. He planted: three kinds of lettuce, bunching onions, Sweet Spanish, Burgundy Red and Cippolini onions, Toscana kale, chard and arugula.

Because we're regularly getting nighttime temperatures in the low 30'S F and high, daytime temps have been in the 40's to 50's, Chris experimented by putting black plastic bags over the seedlings for several days before they emerged above ground. This raises the soil's temperature whenever the sun is out, and holds the heat in at night. Seeds need a minimum temperature to sprout but don't need light until their first leaves emerge from the ground.

Arugula seedlings (from seed we saved ourselves!) emerged after just five days. Chris checked the seedlings daily and, as soon as the first leaves began to show he removed the black plastic. The lettuce-seedlings emerged just a few days later.  (As of January 25, everything has germinated except the onions and the chard. Either the soil isn't warm enough or the seed isn't viable. We shall try and plant them again and either wait till the soil is warmer, or use heat mats for bottom heat.)

Once up, the seedlings need light but also appreciate protection from cold nights. Here we've covered them with re-purposed plastic lids found at the recycling center!

So far, our early-planting experiment seems to be working well. It's always a gamble getting seeds started this early but, since we have plenty of seed, if even a fraction of the plants grow to maturity, it will be worth it.

Update - May 2023: Here are some pics for how these experiments in early seed-starting in raised beds have fared...

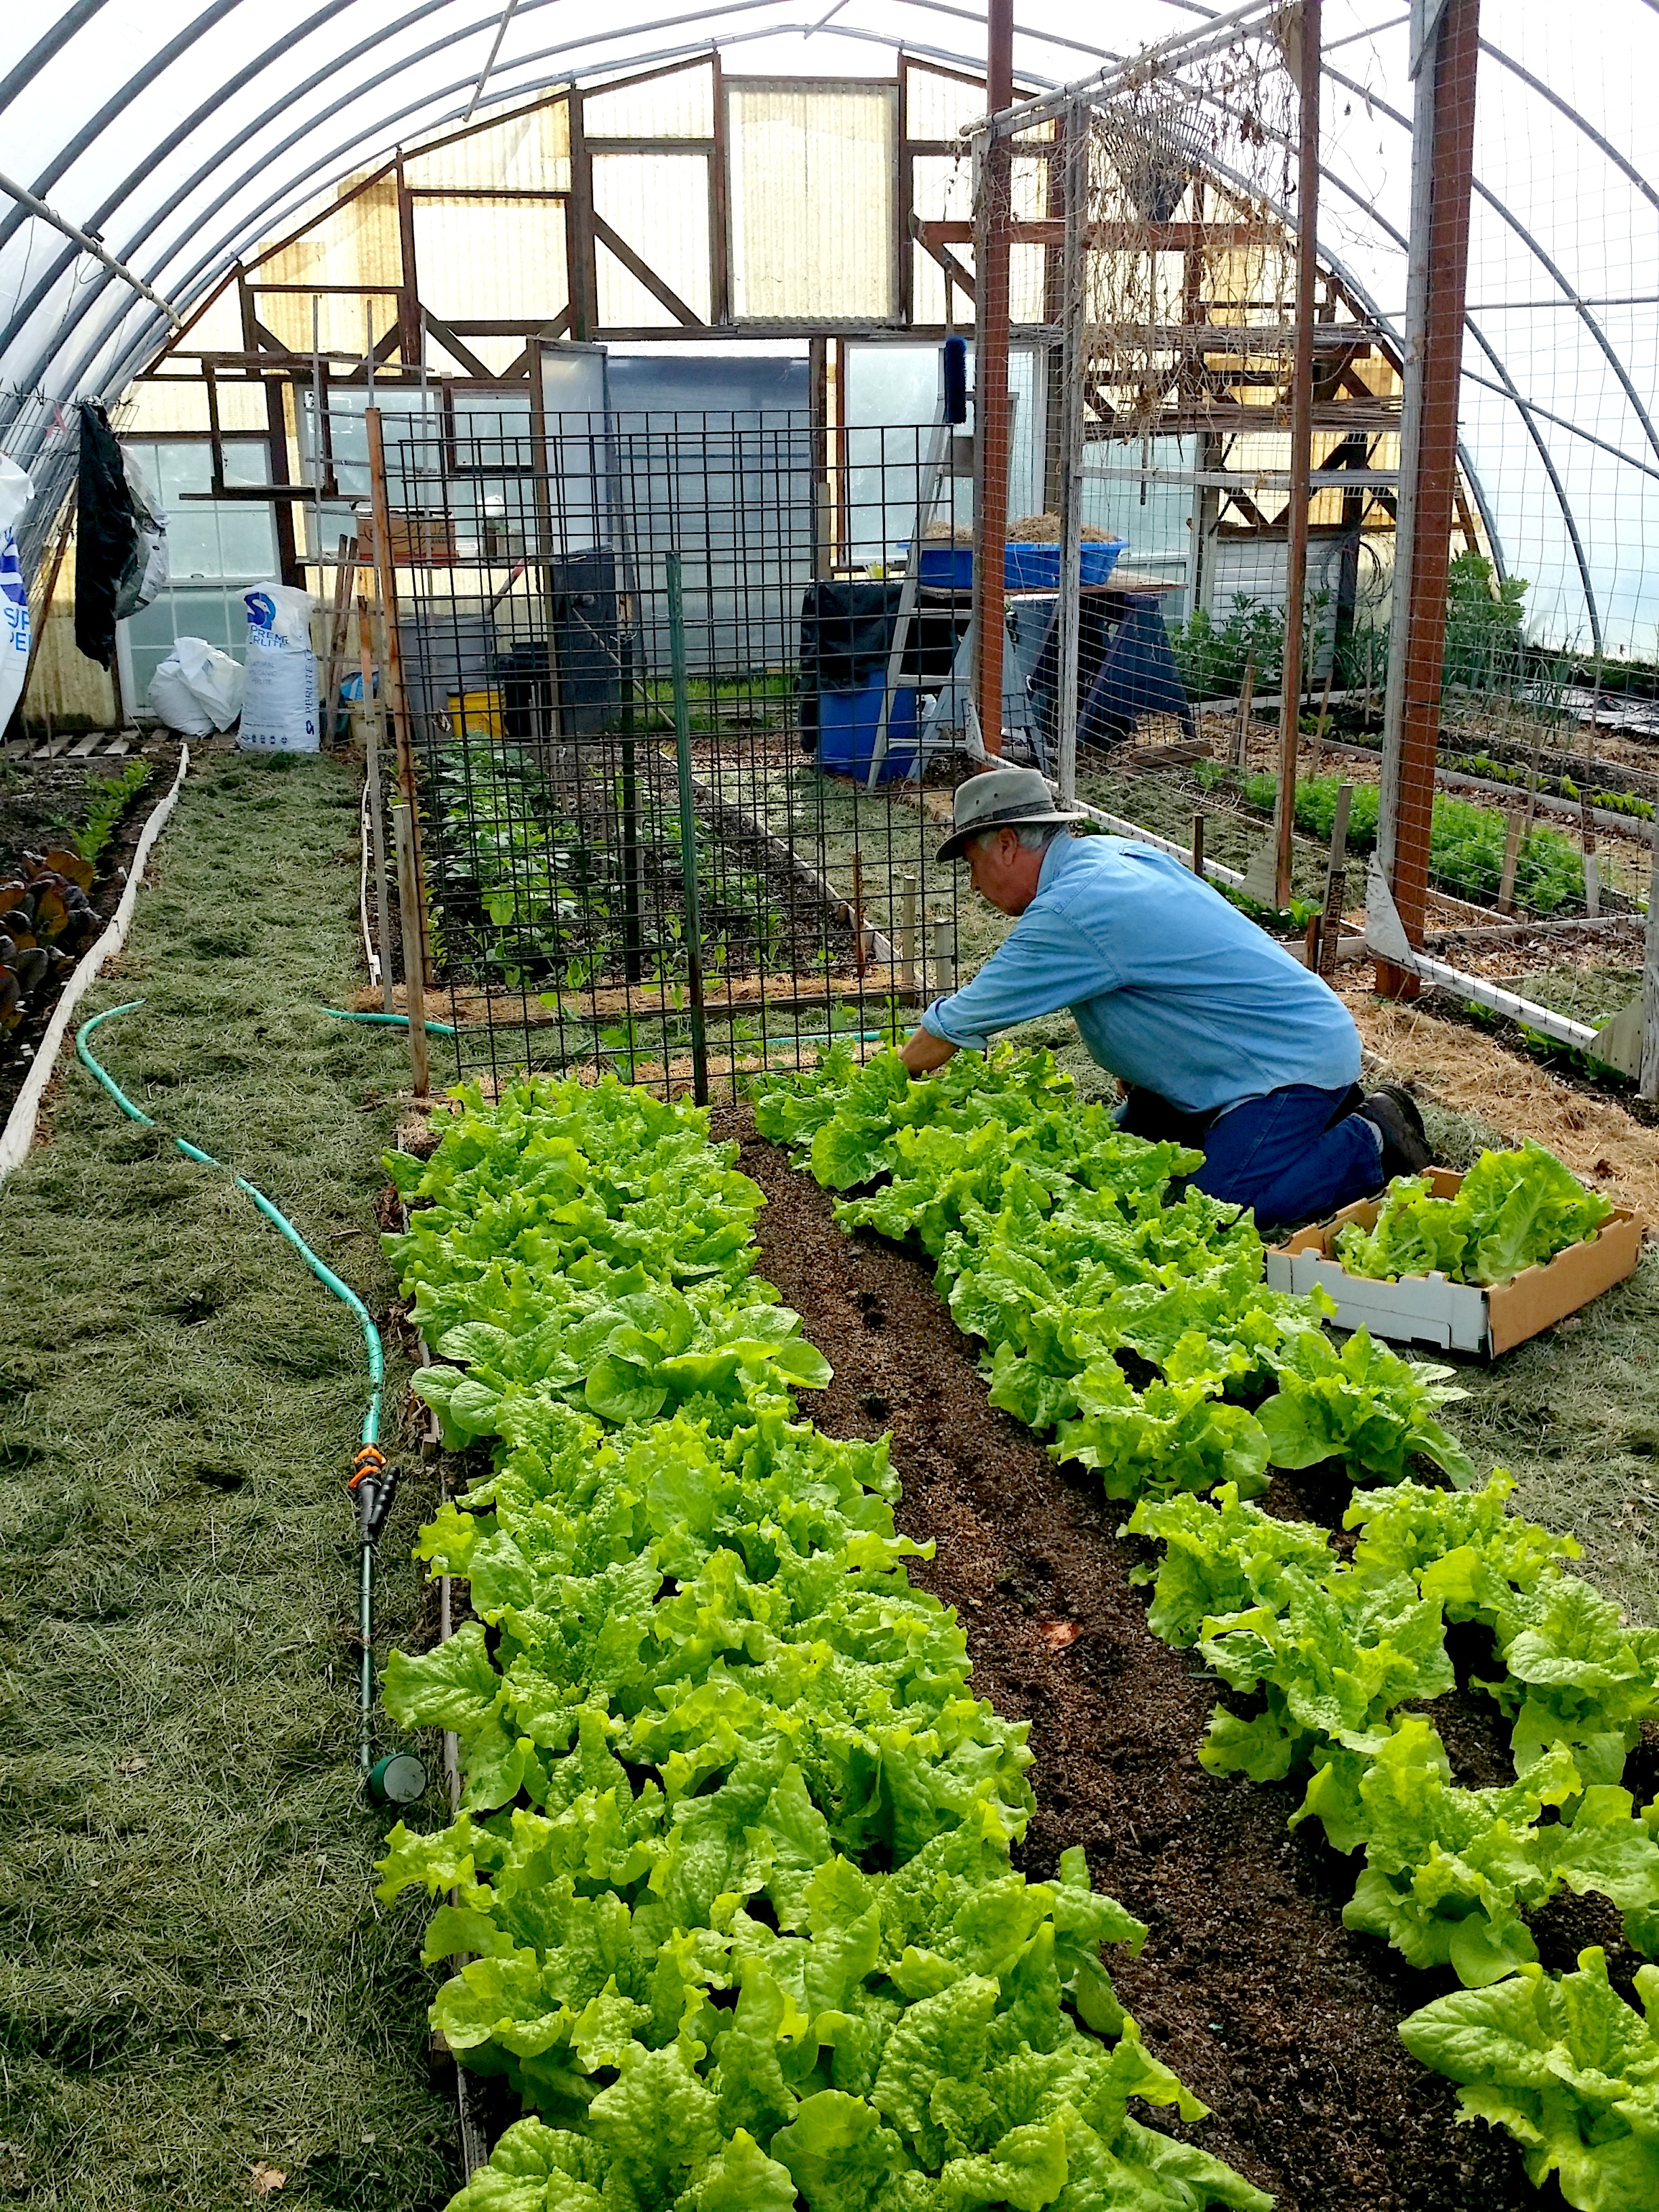
This lettuce was all started from seed in raised bed 'nurseries' as described above; then transplanted at proper spacing to mature. These lettuce seedlings were started in mid-January. We began eating individual leaves off the heads beginning in March which provided plenty of these fresh greens for us and our volunteers. Here, April 17th, Chris is seen selectively harvesting alternate heads to share at the Food Bank (so the remaining heads have more room to grow).

Here is a picture of the same bed on April 24th. That's 'Slo-bolt' lettuce on the left, potato leaves beginning to appear in the center row and Chris planting Sweet Spanish onions on the right.

Here are two boxes of lettuce, harvested and ready to be donated, in front of our Ark greenhouse. As of early May, the two greenhouses have yielded over 60 pounds of the most beautiful, tender, tasty lettuce imaginable! A successful experiment, wouldn't you say!

Thursday, January 8, 2026

Starting lettuce from seed *(re-purposing plastic tofu containers)

Red Iceberg Lettuce - a summer rose!
This post gives generic information for starting cool-weather crops (lettuce, cabbage, broccoli, kale etc) from seed.
 
Note: Though this was originally written and posted in 2011, and some of our practices have shifted (for example we no longer use rabbit manure - or any animal by-products - in our garden or soil-mix - LINK: Making Your Own "Veganic" Potting Soil in Your Greenhouse Paths - Using Worms) - the core of the information is still accurate and useful so we have republished with minimal editing...
 
Here at the Sharing Gardens (in the Pacific NW) we have several ways of starting seeds. This post is about starting them in a grow-tunnel or greenhouse using re-purposed tofu containers to get them started. (To read about Starting Seedlings Directly in Greenhouse Raised Beds - click here).

We're vegetarians and end up with a lot of these white, plastic, square tofu containers. We've found they make great tubs to start small seedlings. We drill holes in the bottom for drainage and fill with a finely sifted, moist, organic potting mix.
This method presumes you have a greenhouse though it doesn't need to be very big. Seedlings will need sun and protection from wind and severe cold once they have germinated. In 2010, we started everything we needed for three 50 x 50' garden-beds in an 8'x10' greenhouse (below). We just had to time everything so that the first seedlings that were less cold-sensitive (lettuce, peas, cabbage etc.) could be brought outside in time for the hot-weather crops (tomatoes, peppers, melons etc.) to be started inside.

Of course if you have a much larger greenhouse, you can start many more seedlings!
In 2010 we started everything we needed for three 50 x 50' garden-beds in this cozy, little 8'x10' greenhouse. We just had to time everything so that the first seedlings that were less cold-sensitive (lettuce, peas, cabbage etc.) could be brought outside in time for the hot-weather crops (tomatoes, peppers, melons etc.) to be started inside.

First step - Soil: In the early days of the Sharing Gardens we purchased soil by the trailer-load. We chose an organic soil that didn't have any nutrients added, and added an organic fertilizer. We mixed up batches in a wheelbarrow. Later, once we were more established, we began to make our own potting mix but most people don't have that capacity. Just be sure you use 'organic' potting mix from a reliable source.
 
In the early days, we bought organic soil by the trailer-load and added commercially-made fertilizer. Now, we make our own. Making Your Own "Veganic" Potting Soil in Your Greenhouse Paths - Using Worms

Sifting Soil:
The key here is that, if your potting mix has large chunks of organic matter, your seedlings will struggle to grow. We sift our soil through a nursery flat with tiny holes to remove all large chunks.
We use a nursery-flat to sift our potting mix. This gets rid of larger chunks of material that would make new seedlings struggle to grow.

Be sure your soil is moist, but not wet.
Fill with a good potting mix, using the bottom of another tofu tub to pack the soil firmly and make a flat surface for the seeds. This is important as, if the soil level is uneven you will get varying germination-times for your seedlings. You want them all to come up at once.

Planting seeds: After misting the soil so it is good and damp, we sprinkle the seeds with our finger-tips trying to distribute them evenly and not too thickly. If the are planted too densely, it's hard to tease them apart when you transplant them to larger pots.  
 
Seedlings germinating in re-purposed tofu containers. We try to sprinkle them evenly and not-too densely.
 
Lastly we gently sprinkle a thin lay of cover soil over the seeds and lightly mist to settle the seeds. They must be kept moist but not overly wet or the seeds and starts may rot. Lettuce and brassica seeds germinate best in a cool soil so you shouldn't need to put it on a heat mat or under a lamp to get it to germinate. If you do apply bottom heat, check seedlings frequently so they don't dry out.
 
Chris and Donn transplanting seedlings into tofu containers; six to a 'pot'.
When the seedlings are about 1/2" - 1" (2 cm) high, they are ready for transplanting. We put ours in regular or "jumbo" six-packs, or in the same tofu-containers (six to a container). We use a basic, organic potting soil and add our own fertilizer. To each wheelbarrow of soil we add about two cups of all-purpose organic fertilizer and about a half-gallon of sifted rabbit manure. (Note 2025: We now make our own potting mix from the compost 'harvested' in our greenhouse paths, wood-ash and perlite: Making Your Own "Veganic" Potting Soil in Your Greenhouse Paths - Using Worms).

For the Sharing Gardens, where we might grow 1,000 or more lettuce plants per season, transplanting is done in large batches. Being systematic in the nursery will save you time and materials and you will have much better results. Have labels ready so you keep track of the varieties you are transplanting. 
 
Being systematic in the nursery will save you time and materials and you will have much better results.
Fill a flat of six-packs (or tofu containers) with soil and mist them with water. Wet soil is less shocking to transplanted roots than dry. 
 
Adri, filling 6-packs with soil. A fun, relaxing job, at any age!
Using your finger, a stick or some other object, make a generous hole in each of the cells of the six-packs (or whatever you're planting into).
Lettuce seedlings in a tofu container. Using a pen to make holes for transplants.
To remove seedlings for transplanting: Cupping your hand over the whole tofu-tub of seedlings, flip it over and tap the bottom, catching the whole clump of soil and seedlings in your hand. Gently flip it back over and place it on a tray to catch the loose soil as it drops off.
 
From the tray, pull off a clump of seedlings and, holding them by their leaves, tease apart a single plant with its roots. 
 
It is very important that all the roots go down into the soil and are covered. If they stick out from the surface, this is called 'J-rooting' and  will often kill the plants as they dry out too easily. This is why you want to dig a generously-sized hole so the rootlets don't catch on the sides as you lower them in. After pressing the soil in around each seedling, water them in gently to settle the soil. Label the tray and move onto the next.
Transplanting seedlings. Note: Hold seedlings by leaves, not roots or stems.
Depending on warmth and sunlight, and the size of the six-packs you use, your lettuce will be ready to plant in garden beds in six to ten weeks. If you stagger your plantings it will mean your lettuce doesn't all come ripe at once. Ideally you wait until the root ball has filled the six-pack cell enough to hold the soil as you pop it out, without being totally root-bound (roots coming through the bottom of the six-pack).

A variety of seedlings growing in tofu containers; six to a pot.
 A week or two before you transplant into your garden, bring the starts outside and begin "hardening them off". Put them where they will get plenty of sun but not too much wind. They will withstand a light frost but if it is going to get very cold, or doesn't warm up in the day, bring them back into the greenhouse till conditions improve. During this hardening-off period, prepare garden beds so they are ready to receive transplants. In our "deep-mulch/minimal till" gardens, we pull a row of mulch over to the adjacent path (with a pitchfork) and, with a trowel dig a small hole just the size of the lettuce's root-ball. This leaves worm holes intact and lettuce seems to thrive without any roto-tilling needed.
Seedlings "hardening-off".
Here in our area, slugs can be a real problem in the spring. Follow this link for ideas on how to re-use milk cartons or soy-milk containers to thwart off their feasting: Re-Purposing Things. Here is another way to deal with a slug problem: Organic Solution to Slugs - Iron Phosphate
Transplanting peas and lettuce
We don't find that additional fertilizing is necessary for lettuce plants. They receive enough nutrients from the soil. But heavy feeders such as broccoli, cabbage or any of the other 'brassicas' would benefit from added compost or some organic fertilizer mixed in at the site you are planting out your seedlings - just don't use too much or the plants will grow quickly and have thin cell walls making them more susceptible to pests.) 
Several weeks after transplanting. Picking individual lettuce leaves for salad.
We hold off on mulching them because we want the sun to warm up and dry out the soil and mulch provides habitat for the slugs. Sometimes, after the lettuce or other seedlings are well established and the soil is warmed up, we mulch with a few inches of grass clippings around our plants. Ideally, let the clippings dry out for a few days on a tarp or in a bin. Fresh clippings, if piled thickly, can heat up considerably and burn your plants.

Chris Burns with beautiful lettuce harvest! 2011
We plant our lettuce spaced about 6" - 8" (12 - 15 cm) apart (brassicas need more room: 18" seems to work well...). We harvest the lettuce intermittently, giving the remaining lettuce room to grow. In the early stages, before the heads are fully formed, we harvest one to three leaves off each plant, rather than clipping whole heads. As the heads become full-size we harvest by cutting them off at the root with a paring knife, leaving the roots in the ground to feed the worms.
 
We hope this post has helped take some of the mystery out of starting spring crops from seed. If you've been interested in learning to save your own seed, lettuce is one of the easier crops to save seeds from. Here's a post we wrote about the process: LINK: How to Save Your Own Lettuce Seed Enjoy!


Wednesday, October 8, 2025

Autumn Abundance!

Seed Saving, Stocking Up, the Amazing Quince, Pumpkin Pie from Scratch and other seasonal blessings...

Greetings, friends of the Sharing Gardens, near and far. We're working on an end of the season summary-post but thought you might find some of these previously published posts relevant to your own transition from summer's bounty to the quiet of winter. Enjoy! 

(Image: Three Sisters Abundance, from Mike Brunt: an amazing elder in our community who is dedicated to spreading the word about the importance of saving our own seeds.)

Re-planting Carrots or Beets for Seed: If you wish to save seeds from beets, carrots or onions next year, now is the time to set aside your best specimens so they have a period of dormancy before you re-plant them in the winter/spring. See the linked post for ideas on storage. This will only work if you grow heirloom/open-pollinated/non-hybrid varieties. 

Image: by Llyn Peabody

 Family Heirlooms - Saving Your Own Seed: In the Sharing Gardens we probably save about 80 - 90% of our own seeds. It really isn't that difficult to do and it is very gratifying to experience this deeper level of "local food self-reliance". If you have a garden plot that is separated from other gardens by at least 500 feet (to prevent unwanted cross-pollination) you can save your own seed. Even if there are other gardens nearby, there are many crops you can grow that will not cross (tomatoes and beans for example) so don't let that stop you. This LINK will take you to a post that features general information about seed-saving, and links to the specifics of saving seeds for lettuce, peas, Scarlet Runner beans, tomatoes and more.

Amazing Quince! - Sugar-free Recipe:  Here in the Pacific NW the quince fruit thrives. It's flavor, once baked or steamed (and with a touch of sweetener added) tastes like a combination of pears and lemons with a hint of peach and rose-oil! Ambrosia! Follow this LINK for a detailed, sugar-free recipe, prepared from scratch. (Image: right, www.modernfarmer.com)

Making Pumpkin Pie from Scratch: Making pumpkin pie from scratch is truly a labor of love! How much easier it is just to open a can of puree. Pumpkin pie filling can be made from sugar-pie pumpkins, or any kind of sweet, golden-meat type of squash. Delicata, Buttercup and Sweetmeat are all good varieties. Follow this LINK for the full recipe to make pumpkin pie filling that you can freeze and have on hand for a delicious taste of autumn throughout the year.

Saving Tomato Seeds: If you're new to saving seeds, tomato seeds are an excellent place to start. Because they are 'self-fertile' (having both male and female parts in each flower) they tend to breed true and not cross with other varieties grown nearby. Be sure you are saving seeds from an heirloom/non-hybrid variety. Hybrid seeds artificially marry two different parent plants and, when seeds are saved, they often revert back to one or the other parent which can yield unsatisfying results.

Tips for Maintaining a Well-Stocked Pantry
Whether you’re concerned about preparing for a natural disaster or economic hard times, or just tired of opening your cupboards and not having a variety of tasty, nutritious items to choose from, it’s always a good idea to get in the habit of stocking, and maintaining one’s pantry. Here are some tips to help.

The Coming Anastrophe (the opposite of Catastrophe): Because having an optimistic view about all the challenges the world is facing is always in season, here is a post from our All Things Sharing site that we hope you will find uplifting.

From the post: Some people think that we can't really move forward, to heal society and all its ills, until there's a 'collapse' or 'catastrophe' of some kind; otherwise (the story goes) we'll just keep putting patches on a system that's so broken that anything built on top of it will inherently be flawed. Corbett offers an alternative story: that an 'anastrophe' would be a sudden and rapid awakening of humanity that would lift us unified out of the many troubles facing the world.

He says that the change must begin at the community/neighborhood level. I admit that his views can seem a bit utopian but I appreciate him for shining a spotlight in a new direction -- away from the fascination many people feel in waiting for 'the BIG one'; the catastrophe that will hopefully, finally catalyze us out of the many messes the world is in. CLICK HERE for full post.

We hope your autumn is full of beauty and healthy harvests! Llyn and Chris - The Sharing Gardens 

Autumn Beauty sunflower with a honey bee (loaded with pollen!).