A unique and viable approach to establishing local food self-reliance and building stronger communities.

Thursday, October 31, 2024

Autumn Pleasures: Recipes and Tips for Stocking-Up

Recipes for: Pumpkin Pie, Crumb-free Cornbread, Amazing Quince and 'Nooks and Crannies' Hot Cereal

Autumn is a time for enjoying the bounty of the garden. Every bite of cucumber or tomato takes on special pleasure knowing the season is almost at an end. We enjoy preserving foods for later consumption; whether through canning, dehydration or freezing. It's also a time for seasonal favorites like pumpkin pie from scratch. Here is a collection of relevant posts to expand your autumn pleasure and help you squirrel away some of the season's bounty for leaner, winter times. Enjoy!


Stocking up:
Whether your motivation is to ride out a short-term power-outage, make less frequent trips to the grocery store, hedge your bets against the rising cost of food by taking advantage of sales or just to avert that sinking feeling when you go to your cupboards and there's nothing you really want to eat, this Tips for Maintaining a Well-Stocked Pantry offers many simple ideas and habits to keep your pantry 'topped off'. Note: the link will take you to All Things Sharing, our blog about positive things happening in the world.

Autumn at the Sharing Gardens; a time of beauty and bounty!

Amazing Quince! - Sugar-free Recipe (LINK): Many people are unfamiliar with quince though it's becoming more popular. Its tart apple flavor has undertones of pears and rose oil. It can be cooked into homemade applesauce, dehydrated for fruit leather or be baked as a stand-alone autumn treat. Be sure to read the full post and comments to read about other recipes and improvements we made on our methods of preparation. Nutritional benefits of quince. (image LT: www.modernfarmer.com)

Making Pumpkin Pie from Scratch - Recipe (LINK)

Pumpkin Pie recipe: Though it's a lot easier just to open a can of pumpkin puree to make your favorite pumpkin pie recipe, there's nothing that compares with the satisfaction of growing your own (or buying from a local farmer) and making enough puree as a base for pies all throughout the fall and winter. This post will help you avoid making common mistakes: Making Pumpkin Pie from Scratch - Recipe. (image RT: Llyn's niece, Jesse during her first autumn harvest, 4 months old).

Mix up a big batch of the dry ingredients for Crumb-Free, Whole-Grain Cornbread Recipe and you'll always have it on hand for a quick baked treat.

Cornbread recipe: We make large batches of the dry ingredients for this delicious Crumb-Free, Whole-Grain Cornbread Recipe. This makes it easy to just add the eggs, oil and other liquids, pop it in the oven and have a comfort-food snack or side dish for a larger meal, a quick dish to take to a last-minute pot-luck invitation or unexpected guests.

We grow two kinds of corn for our hot cereal. Hooker's Blue (left) and Golden Bantam (right). Though we've tried to keep the strains pure, corn is notorious for cross-pollinating, hence the variety in color. Grow your own Sorghum for grain and flour (LINK)

'Nooks and Crannies' hot breakfast cereal RECIPE (LINK): This recipe for hot cereal starts with the basics: mixed grains,nuts and dried fruit but it goes much further, offering suggestions for toppings that will make this a delicious power-house of nutrition that provides energy all morning long. Though we've been fortunate these past few years to grow enough of many of the ingredients ourselves, you'll find almost everything you need in a well-stocked bulk-foods section. Remember to buy organically grown ingredients: better for your health and better for the Earth. (RT: Tiffaney removing corn from the cobs using a homemade tool.)


And lastly, though not part of the main topics of this post, here is some really inspiring news about a river in England that was encouraged to return to its original meandering course. Not only did this encourage many kinds of wildlife to return but the new river's pathway and the subsequent wetlands this created served to mitigate flooding of the downstream towns and villages during record-breaking wet years of rainfall. (Note: the link will take you to All Things Sharing, our blog about positive things happening in the world.) LINK: What happens when you set a river free?

Double-rainbow seen to the north of our land.

Thursday, October 24, 2024

Tips for Maintaining a Well-Stocked Pantry

The autumn season always brings out the 'inner squirrel' in me! Time to clean out our pantries and use up or pass along to others anything getting close to its 'best by' date (or, if past that, compost or toss it out). Once clean and organized, I love restocking our pantries with the many foods we've harvested and preserved over the summer.

But even if you don't have a lot of food you've grown or preserved yourself, autumn is a great time to take refresh your pantry. Seasonally, it just 'feels right' and at least in the U.S. there are lots of holiday sales on food you can take advantage of.

Regardless of the season, whether you’re concerned about preparing for a natural disaster or economic hard times, or just tired of opening your cupboards and not having a variety of tasty, nutritious items to choose from, it’s always a good idea to get in the habit of stocking and maintaining one’s pantry. Here are some tips to help: Tips for Maintaining a Well-Stocked Pantry

Wednesday, October 23, 2024

How we grow...Veganic Community-based gardening

The Sharing Gardens is based on the concept of mutual generosity; building relationships through the sharing of time and resources. One of the ways we demonstrate this is through our process of building fertility in our soils.

Since 2020 we have grown all our food "veganically" and without the use of commercial fertilizers. This means we use no livestock manures (cow, chicken, sheep etc) and no animal by-products (blood or bone meal etc) or any products mined or shipped from distant lands (gypsum, bat guano etc.). Being vegetarian, and committed to deriving our food from local sources whenever possible, this way of growing food just makes sense to us!

Most of our garden's fertility comes from leaves...
Our system is simple: the majority of our soil's fertility comes from leaves and grass which we compost in large wooden bins or in the paths of our greenhouses

...and grass clippings.

The challenge is in gathering enough materials. Here's where the mutual generosity comes in! We provide a drop-off site for our neighbors and yard-maintenance companies to bring their leaves and grass. This means they don't have to pay to have these valuable materials hauled away in trash cans, or deposited at the closest municipal-scale composting site (25 miles away). We receive these materials in abundance and are able to extensively mulch and compost our garden beds, create our own potting mix and have enough compost to share with the volunteers in our gardens who have small gardens of their own.
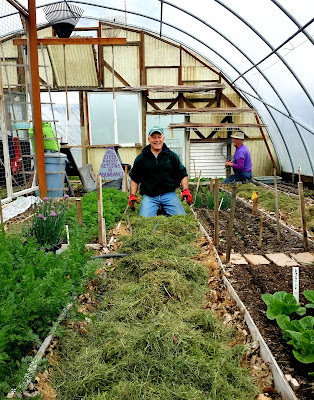
Besides composting yard waste in large wooden bins, we spread it in layers in the paths of our greenhouses which turns to compost beneath our feet. Donn: spreading grass clippings in the SunShip greenhouse.

Compost is scooped up from the paths in the autumn, sifted and bagged for use throughout the coming season.
Craig, sifting compost.
When people drop off their yard waste in plastic lawn/leaf bags
, we hang them to dry on clotheslines in our greenhouses. Once dry, we roll them into bunches of 5-6 bags, twist-tie them together and put them in a covered barrel at the drop-off site for our neighbors to take for free and use for future loads. This helps reduce our community's use of plastic.

Llyn, folding leaf bags for re-use.

We place a sandwich-board sign out on the street, inviting neighbors to bring us their  leaves and grass. Touching up the paint is a winter task...

Barrel on the left holds free bags that have been dried and rolled in bundles for people to re-use. We ask people to leave the bags untied and to turn them upside-down to prevent rain from getting in.

To read a detailed post about our veganic soil-making methods, CLICK HERE.


A small percentage of our soil  fertility also comes from coffee grounds collected from coffee shops by friends of the Gardens and wood ash (left), a by-product of how we heat our home. Here is a LINK explaining the benefits of these free resources.

We're so very grateful to all our neighbors who have participated in this program this year.


Amazing Quince! - Sugar-free Recipe

Update - Oct. 2024: We've been continuing with our experiments with quince recipes and learned a few things. Rather than re-write the post, we've added an addendum at the end. Also, please read the comments for info offered by fellow readers. Enjoy!

Hi folks - We've just made an amazing discovery. We love quince! When prepared as the recipe outlines below, quince tastes like a pear/lemon fruit with a hint of peach and rose-oil! Ambrosia!

This has been one of our most beautiful autumn seasons on memory! Pictured is the back of our 1875 Farmhouse, the yellow, shag-bark hickory tree (on the right) and a rainbow in-between. (October 2019)
Every year, about this time, one of the Monroe "locals" drops off two or three HUGE boxes of quince at our local Food Pantry. The quince usually sit on the shelves, for a month or more, with a sign that says "Take as many as you as you can use," but very few people take any, including us. Eventually the Pantry folks get tired of looking at them and they end up in the Sharing Gardens compost pile.

Quince after harvest. Photo credit: LINK
We've been reluctant to try them because they're so darn hard to cut open which makes them seem like a real pain to prepare. Also, they are very tart when they're raw and every recipe we'd heard of called for lots of sugar. We're always trying to find ways to limit our sugar intake, not add to it! So, until we discovered the joys of quince, we just figured our compost piles were going to have a nice big influx of worm-food in a month or two.

That is, until I (Llyn) looked up their nutritional content and Chris and I were pretty impressed - particularly as a good source of zinc and copper. Minerals are often the most difficult nutrients to get enough of in our modern diets. Most farm soils are increasingly depleted and, unless you're getting your food from an organic farmer who replenishes those minerals in natural ways that the plants can absorb, (like wood ash - LINK) it may be difficult to get enough minerals from your diet without taking any vitamin supplements (which we don't). Quince are also low-calorie, high in anti-oxidants and great for digestion (their natural pectin is soothing to the gut!). Who knew? LINK

While I was browsing for more general info about the quince, I found a recipe that suggested boiling them for 8-10 min before baking them and then my cooking creativity kicked in and I came up with the recipe below. I've made it twice so I'm still fine-tuning it (so check back for updates!) But the best thing is, this recipe calls for no refined cane sugar (just maple-syrup, and not much of that) and is easy to prepare.

Pears (on left). Whole, boiled quince (in bowl). Quartered quince (below) - this picture was taken before I figured out how to cut fruit away from core (see below).
The Recipe:

4-6 medium-sized quince (about 5 cups)
4-5 medium yellow pears (about 3 cups) (or sweet apples)
1/3 cup maple syrup (about 1 TBSP maple syrup per cup of quince)
1 TBSP lemon juice (don't over-do the lemon, as quince is plenty tart already!)
1 tsp cinnamon

Choose uniformly yellow, fully ripe fruit without bruises or other damage. It helps if they are a uniform size (for boiling phase).

Bring a pan of water to boil - deep enough to mostly cover the quince.
Using your bare hands, run the quince under water and rub as much of the fuzz off as you can (don't worry if you miss some).

Place in boiling water for 8-10 minutes, depending on size. I think I over-did it the second time I made this. I was trying to soften the fruit all the way through but the core remained quite hard, even with longer boiling and the second time the outer fruit got rather mushy.

Lift the quince out of the boiling water and allow to cool.

Preheat oven to 375 degrees. Grease a baking dish with coconut oil or butter.
Combine ingredients for sauce in a measuring cup with a lip for pouring.

Once cool, using a cutting board, cut off any brown spots or other blemishes on the fruit.
Slice the remaining fruit away from the core in as big pieces as possible (see picture). Your knife won't want to go through the core at all. It's super-hard! Just keep shaving off pieces all the way around the core till you've gotten as much as is easy.

Cut fruit away from the hard core.
Cut the fruit into bite-sized pieces.
Wash and core the pears. Cut into bite-sized pieces.
Mix the fruit together by layering it into the baking pan.
Drizzle the sauce over top of the fruit. Gently stir the fruit and sauce together to spread sauce evenly.

Quince, pears and sauce - before baking.
Use a pan with a lid, or cover with aluminum-foil.
Bake for forty-minutes covered (or until juices are boiling).
Take out, gently fold the fruit and sauce together so the fruit at the top gets re-sauced.
Leave cover off and bake for 10 more minutes to lightly caramelize the top.

After baking. Yum!
We like ours chilled with a scoop of organic low-fat, plain yogurt and some organic, lightly sweetened shredded-wheat cereal crushed on top.
We'll keep experimenting...seems like raisins or date-pieces would be good raw or cooked in with the fruit. Also, some crushed walnuts or granola might be good too.

A Quince Essential Fruit - here's a fun post that gives more details about this unique fruit including growing tips.

Let us know of your discoveries/variations in the comments below.

Addendum: We've discovered that, at least with our quince, we can skip the boiling stage of the recipe. The core of quince is so hard that even boiling doesn't soften it but by shaving pieces off and then cutting these pieces into bite-sized pieces, we've found we can skip the boiling phase of the recipe outlined above. Don't know if all varieties of quince are soft enough to do this...

Tuesday, October 22, 2024

Crumb-Free, Whole-Grain Cornbread Recipe

Yummm!
Here is a recipe I developed over the years for a delicious, whole-grain corn-bread mix. I make it in bulk, pre-mixing all the dry ingredients so, if we want a loaf for breakfast or guests, or potlucks, it's a simple matter of adding the wet ingredients and popping it in the oven.

For best results, use all 'organic' ingredients. Most corn grown in the United States that is not-organic, is GM (genetically modified) and both corn and wheat, even if not GM is often grown with heavy pesticide use. "Organically grown" means: good for your health; good for the health of the planet!
We grow our own blue-corn for meal.

Corn Bread Mix (makes enough for about 13 loaves).

In a large bowl, measure and mix thoroughly:

3 cups All Purpose Flour
2.5 cups Whole Wheat Pastry Flour
2 cups Corn Flour
3/4 cup Yellow Corn Meal
3/4 cup Blue Corn Meal

Mix all the flours and meals together thoroughly. I like to use my hands!

In a smaller bowl, measure and mix thoroughly:

2.5 cups Brown Sugar
3/4 cup Coconut Flour
1/2 cup Baking Powder
2.5 teaspoons Salt
1.5 cups Ground-Seed Mix (1/3 cup Poppy seeds, 1/3 cup Chia seeds, 2/3 cups (and a bit) of Flax seeds - See note below.)

Mix  the two bowls of dry ingredients together. Take extra-care to be very thorough in this mixing process, otherwise you may have some loaves that don't have enough baking powder to rise well, or a loaf might be too salty (or not salty enough). Store in an airtight container, in a cool place out of direct sunlight. Corn products are especially susceptible to rancidity.

Recipe uses a 7.5" x 4" mini-bread pan

Recipe for Individual Loaves: Preheat oven to 350 degrees. Oil 7.5 " x 4" mini-bread pan (see picture).

  • Measure wet ingredients, whip briskly - thoroughly mixing. For best results, bring wet ingredients to room temperature.
  • Add dried fruit/nuts, or savory ingredients (see notes below). Mix well.
  • Add bread-mix. Gently fold together so all flours are moistened. Don't over-mix because the baking powder works by creating air-bubbles. Mixing too briskly causes them all to pop, making a flat loaf.
  • Let batter stand in bread-pan for five minutes before putting into pre-heated oven so baking powder can begin to rise.
  • Bake for 30-35 min. (till top is brown and toothpick inserted comes out dry).
Wet ingredients:
2 eggs
1/3 cup not-milk (soy, almond, oat milk...)
1 tablespoon light oil - we use sunflower or safflower as they don't have strong flavors

Fruits/Nuts etc.
1/4 - 1/2 cup - This recipe is nice because it can be made sweet or savory depending on what meal it's accompanying. Be creative! (See variation-notes below).

Dry mix:
1 cup

Notes-Mix:

Blue Corn Meal: Blue corn meal is higher in protein than yellow corn meal (by as much as 30%). We like to grow and grind our own - LINK.
Coconut Flour: We recently discovered coconut flour and love using it for many purposes: we sprinkle about a tablespoon on our bowls of hot cereal, we use it in pie crusts and sometimes use it to thicken smoothies. Important: if you experiment with substituting it for regular flours, it is highly fibrous so use it in place of an other whole grain at a rate of 3/4:1 (if receipe calls for 1 cup WW flour, use 3/4 cup coconut flour instead).
Baking Powder: Baking powder, especially if exposed to air and moisture will lose its potency over time. So, don't buy more than you can use in 6-9 months and store it in an air-tight container.
Ground seeds: Using a 2-cup measuring cup, fill to 2/3 cup with chia and poppy and then top it off with flax-seeds up to 1.5 cups. Grind the mixture of seeds using an electric coffee-grinder that is dedicated to non-coffee grinding-- or cleaned very well.

Variations-Notes: 

Here are some of our favorite sweet combos:
  • Banana/dried date-pieces/walnuts 
  • Dried apricot pieces/date pieces/dried lemon peel (soak well in wet ingredients for 30 min.)
  • Raisins/sunflower seeds, 
OR savory options:
  • chopped red-peppers/green onions/small cubes of cheese. 
Pancakes - thin the batter with a splash of soy-milk, milk or water. Great with homemade apple butter, yogurt and honey or your own favorite topping!
Thin the batter for pancakes and add your favorite toppings.
The Sharing Gardens is a registered non-profit and tax-exempt organization. We exist entirely through donations. If you have found benefit from our project or our site, please consider making a small donation through PayPal. (Click button below.)


Monday, October 21, 2024

Making Pumpkin Pie from Scratch - Recipe

Sugar-pie pumpkins; a variety bred for sweet, smooth flesh.

(This is re-posted from October 2020) Making pumpkin pie from scratch is truly a labor of love! How much easier it is just to open a can of puree. In the spirit of the slow food movement, we start making our pies back in April when we first plant the seeds! The small vines are transplanted into mounds of compost we've made ourselves, mulched, watered and weeded through the summer and harvested by the hundreds of pounds after they get their first kiss of frost.

This year, because of the tremendously hot and dry summer, almost all our winter-squash (the types we use to make pie-filling) finished ripening well before the first frost so we harvested them anyway. They're not as sweet as when they've been frosted but every bit as nutritious.

Provence, Buttercups and Sweetmeats.
When you're planning your garden for next season, consider sketching out enough space for plenty of winter-squash. Winter squash are the varieties that have a harder skin and store well for enjoyment all through the winter.  "Pumpkins" are just a variety of the larger category of "squash". Pumpkin pie filling can be made from sugar-pie pumpkins, or any kind of sweet, golden-meat type of squash. Delicata, Buttercup and Sweetmeat are all good varieties. If you don't have room in your garden next year, look for these varieties at your local market. Sometimes we combine two types of squash/pumpkin to make one batch of filling. Jack-o-lantern pumpkins are not good to use as they are not bred for sweetness and the meat can be quite stringy. Our current favorite is the Provence pumpkin, an heirloom variety that has the sweetest meat we’ve found. It tends to grow quite large so it provides filling for many pies but, because they tend to be so big, they're not often grown commercially (most people can't use that much squash before it goes bad) so, if you want a Provence, you'll probably have to grow your own.

We make many batches of filling at once and freeze them. If you’re going to mess up the kitchen, you might as well make it worth it! Be sure you have plenty of all the ingredients you’ll need on hand. Or, you can also bake the squash and freeze it in 2-cup batches plain, using it much like you'd use a can of store-bought puree.


To bake the squash: 
The Provence is one of our favorites for pie.
Preheat oven to 400
Wash pumpkin/squash and dry skin 
Cut it open: Use a stout, sharp knife on a table or counter low enough that you can use the weight of your upper body to quarter the squash.  Doing it on the floor might even be easiest. 

Use a strong metal spoon to scrape out seeds and loose pulp/strings. You can put the seeds and pulp outside to feed birds and squirrels or separate the seeds, oil, salt and bake them. You probably won't want to save the seeds for planting, unless you're certain that they haven't "crossed" with other varieties. 

Cut into smaller pieces: Though it can be quite a challenge to cut these large, winter squash into smaller pieces for baking, you’ll be rewarded with a much shorter cooking time.

Orange, sweet flesh, yum!!
Place squash with skin facing down in a baking pan that has sides that are at least a two-inches deep. Many squash give off quite a lot of juice and can make a mess in your oven if the juice spills over the side of the pan. A roasting pan is ideal.

Bake squash/pumpkin for one hour, or until a fork pokes easily, deep into the flesh.


Once done, allow to cool. If you’ve chosen one of the juicier squashes, you’ll have best results by putting the pieces in a large colander over a bowl to drain any excess juice. The juice makes a delicious soup stock. I used to peel off the skins but found that they can be food-processed and taste just fine.


If you baked more squash than you’re prepared to deal with, you can freeze it and thaw to make filling at a later time. Freeze in 2-cup batches.

Sydney w/ a Provence

Yummy Natural Pumpkin Pie Filling 
YIELD: Filling for one, 9” pie.
Preheat oven to 365

In a food processor (a blender will not work), combine:

2 eggs (sorry, we haven't perfected a vegan version yet...)
2 cups squash/pumpkin

2/3 cup brown sugar
2 TBSP powdered milk (or soy protein powder*)
2 tsp pumpkin pie spice
½ tsp salt

½ cup soy milk, cow’s milk, almond or coconut milk

Begin with eggs, alone. Mix thoroughly.
Add squash. Puree till smooth. Check to be sure there are no pumpkin lumps.
Add milk and all dry ingredients making an effort to distribute spices evenly. Mix in well.

* (not soy-flour).

Pour into your favorite pie shell and bake in preheated oven for 1 hour at 375 or until the pie is golden-brown, the middle is reasonably firm (it will get firmer as it cools) and before the crust gets too brown. Cool on wire rack before eating. Cover and chill to store.

To freeze filling for later:

Combine everything except the eggs. Make one batch at a time. Each batch is a little less than a quart so you can put it in your favorite freezer-containers. We use qt-size plastic zip-lock bags. Label them with blue, painter’s masking tape (it won’t come off in the freezer and you can peel it off after you empty the bag, wash the bag and re-use it.) I always write a reminder on the label to add two eggs. Lay the bags flat and you can easily stack many of them in your freezer.

When you want to make a pie, thaw the filling, add the eggs and use a blender, a mixer or food processor to mix it all well. By mixing in the eggs right before baking, you’ll have a fluffier, more pudding-like pie. Bake as above.

If you run out of any ingredients, before you've used up your squash, just freeze bags of the plain squash puree' and add the other ingredients right before baking. Freeze in 2-cup batches so you can thaw them, one pie at a time.

James and Jaye holding Buttercups; a drier, sweet, golden squash.

Flaky Rolled Pie Crust – YIELD: Two 9” pies without top shells

1 ¼  cups unbleached pastry flour
3/4 cup whole wheat pastry flour
1/4 cup coconut flour
1 tsp. salt
2/3 cup sunflower oil (chilled is best)
1/3 cup ice water

Mix the flours and salt. Pour the oil and water into a cup but don’t stir. Mix with the flour. Press into a ball. Cut into halves. Place between two sheets of 12-inch waxed paper. Dampen a tabletop to prevent slipping. Roll out until the circle of dough reaches the edge of the paper. Peel off top paper and place the crust face down in a pie tin. Peel off the other paper and fit dough into tin. Freeze extra pie crust, in a pie-tin, in a plastic bag for later use.

Llyn, with Sugar-pie pumpkins.


The Sharing Gardens is a non-profit and tax-exempt organization. We exist entirely through donations. If you have found benefit from our project or our site, please consider making a donation through PayPal. (Click button below.)

Sunday, October 20, 2024

'Nooks and Crannies' hot breakfast cereal RECIPE

We get feedback sometimes that our posts are too garden-specific and, for people who aren't gardeners they wonder what they can do to live a healthier, more sustainable lifestyle. Well, here's a recipe for the hot cereal mix that we eat almost every morning.

We named the cereal mix 'Nooks and Crannies' because it seems to meet so many of our nutritional needs. After a bowl of it we feel incredibly sated and it gives us slow-burning fuel that lasts the morning. Our philosophy is to try and get as many nutrients (and as few toxins!) from the food we eat so we lean towards whole foods with the least amount of processing. We mainly buy organically grown foods and everything we grow is, of course, also organic. We also try to eat a variety of foods so that the micro-nutrients that are low in one food might be filled in by eating something else. (LINK: Why We Grow and Eat "Organic" Food )

This post contains the recipe for making 'Nooks and Crannies' cereal, including a list of ingredients (all 31 of them!) followed by instructions for making your own pre-ground seed/nut mix. Enjoy!

Kassaby sorghum - sweet and nutty in flavor. (LINK: Grow your own Sorghum for grain and flour )

Honestly, the recipe for making the cereal itself isn't much different from what most people make and eat: grainsand dried fruit.  What really sets Nooks and Crannies apart are the variety of the ingredients and the toppings we add after the cereal is cooked.  Here is the basic recipe for the grain-base of the cereal followed by ideas to make your experience truly deluxe! 

Basic cooking recipe: 1-part grains to 2-parts water. 1-part fruit/nuts

For two of us, we use:
1/2 cup of the corn/sorghum mix (recipe below)
1/2 cup rolled oats (kept separate in their own air-tight jar)
dried or frozen fruit/whole nuts (about 1/2 cup)
pinch of salt

Mix grains, fruits, nuts and salt in a saucepan.
Heat water and pour onto cereal. Stir.
Simmer on very low heat.
Add more hot water as needed as you simmer.
Dish up, Add Nooks and Crannies special toppings (listed below). Serve.

Sorghum drying. We grow our own, dry it and grind it for cereal and baking.

The key to swift morning prep-time is to have some of the ingredients pre-ground and pre-mixed  - the grain mix and the seed/nut mix (see below). This makes the daily prep much faster as we just need a scoop or spoonful of each.

We have all the ingredients stored close together in jars with lids so I can just open each one and add a handful to the pot. The frozen fruits are also kept in jars; I just find it easier to open and close a jar than to mess with freezer bags (that zip closed) or twist-ties (which aren't air-tight).

So I go down the line of jars and add everything to the pot. The only thing I actually use a measuring cup for is the grain-mix (corn and sorghum) and the oats. Everything else I just scoop out little (or big!) handfuls with my hands. You'll find what works best for you.

If time is an issue in your morning routine, pre-soak the grains and fruit overnight and add some hot water in the morning and simmer till done.

Other goodies to cook into cereal: I add a selection of dried/frozen fruits, nuts and other goodies before cooking...(about 1/2 cup total). (left: home-grown grapes before freezing).

Choose from:

dried shredded coconut - just a small handful
cacao nibs -  they're a bit bitter but highly nutritious so I just put about 1 rounded teaspoon per double person serving.
frozen blueberries, grapes or strawberries -  sweet goodness!
 
Dried fruit: There are so many delicious ones to choose from. Mix and match your favorite combo!
raisins, pears, figs and/or:
    dried date pieces coated in oat flour - (these are found in the bulk section)
    prunes - I read somewhere that a few of these a day is especially good for bone density...We all know the other health benefit their known for...regularity!
dried bananas  - Sometimes bananas will be sold at a huge discount if they become too ripe so we dehydrate a bunch of them for later use.  
Nuts: Nuts and seeds are a great source of protein, fiber and many essential minerals. We grind many seeds to use as toppings (see below) but like to add whole walnuts while the cereal is cooking.
Frozen strawberries from our garden. We lay them on a tray to freeze them before bagging so they don't clump together.
Nooks and Crannies special toppings: These are all added after cooking (to preserve their maximal nutritional value).  After cooking, we scoop the the cereal into bowls and add toppings to make the cereal extra satisfying. Again, these are all stored in jars close to the stove; each with their own little scoop or measuring spoon so we can swiftly add the ones chosen for the day.

- pre-ground seed and nut mix - our current mix contains nine ingredients - all organically grown seeds and nuts. We pre-grind and pre-mix it so, at the time of making the cereal, we just put a TBSP on each serving of cereal (to make your own, see below).
- dried and powdered turmeric - scant 1/8 tsp. - this is purported to provide anti-inflammatory relief (and a host of other benefits). We bought a big bag of it when we found it on sale but then found that its flavor got in the way of us using it regularly. By adding just this tiny amount to our cereal, it doesn't affect the flavor and we figure that having a tiny bit each day is better than none at all.
- dried and powdered lion's mane mushrooms - scant 1/8 tsp. - though not as strong flavored as the turmeric and touted as having equally impressive health benefits (particularly for the neurological system) we just weren't eating it! So, now we get a little bit almost daily with our cereal.
- powdered cacao powder: about 1/2 tsp. High in anti-oxidants; gives a mild cocoa flavor to the cereal
- powdered, buffered vitamin C (in the citrate form): about 1/4 tsp. Adds a tart, fruit-like taste and valuable nutrition. Vit. C is heat-sensitive so I always add it at the end with the the non-dairy 'milk' to minimize loss of potency.
- dried coconut flour - 1 rounded tsp per serving - adds sweetness and protein (very concentrated; a little goes a long way!)
- maple syrup - for many people, the dried fruit will make your cereal plenty sweet but we still like to add maple syrup after cooking
- soy milk and/or nut milk - we've gone through phases of making our own but can't seem to use it fast enough to balance out the hassle of prep-time. It's frustrating when it spoils before we use it up and we have to throw some of it away. So for now, we settle for commercial soy and nut milks.

One of the unusual ingredients we add to our cereal is dried Lion's Mane mushroom. LINK: Health Benefits of Lion's Mane)

Recipe for Pre-ground seed mix: (Added after the grains and fruits are cooked - 1 TBSP per serving) As mentioned above, we save on morning prep-time by having the following ingredients pre-ground and mixed

Seeds are incredibly nutrient-dense. They need to be as they hold everything the little plant needs to get started in life! Be sure and consume only organically grown seeds...Better for you; better for the Earth.

We use an electric coffee-grinder to grind the seeds. We have one that is specifically dedicated to this so it doesn't pick up the taste of coffee. Of the following list, the only thing we grow ourselves are the two kinds of amaranth (Right: Llyn with Hopi Red Dye Amaranth). Everything else is store-bought. We buy them in bulk. As you'll see, almost half the mix is composed of flax seeds.

A tip for grinding:
Measure out all the seeds and combine in a bowl or large measuring cup. Mix them well and scoop out the amount that fits in your grinder. Grind, and pour into another bowl. Scoop more/grind/pour etc. By mixing the flax seeds in with the other seeds the grinder won't get as bogged down with the seeds that are high in oils (especially sesame seeds). Store in airtight containers in your fridge or freezer. Freeze all but a small jar of it to keep it fresh). Seeds (and nuts), once ground can lose a lot of their nutrients quickly if exposed to air or heat.

Here's the combo of seeds we use:

4 parts flax seeds -  We love their flavor; they're great for digestion and give a sense of bulk/fluff to the cereal. Here's a LINK explaining many of Flax seed's health benefits.
2 parts pumpkin seeds - raw, unsalted
2 parts sunflower seeds - raw, unsalted
1 part sesame seeds - we use the brown ones as they've not had their hulls removed so they are more nutritious than the white ones
1 part hemp hearts - these are soft, inner parts of the hemp seeds after removing the outer shell/hull - highly nutritious. (Be sure to get the hulled seeds as those that still have their seed coating are a bit bitter. LINK)
1 part chia seeds
1/2 part poppy seeds
1/2 part Golden Amaranth - we grow this ourselves - sweet and nutty flavored
1/2 part Hopi Red Dye amaranth - this doesn't taste as sweet as the Golden amaranth but it volunteers all over our garden so we might as well harvest, dry it and eat it!

Llyn with dried blue corn, before grinding

Corn and Sorghum Grain mix:

We grow, process and grind the blue corn, yellow corn and sorghum ourselves. We grind them courser than a flour...more like a "meal" (we like the texture and at this level of coarseness it doesn't take too long to cook). If you aren't able to grow your own, purchase them from the bulk-foods section. Use a courser grind (corn meal instead of corn flour).

This mix forms the foundation for Nooks and Crannies and is cooked with rolled oats and dried fruit). (right: Daimant grain mill we use to grind our corn and sorghum)

Basic pre-mixed grain recipe:
2 parts ground blue corn - (higher in protein than yellow corn meal; turns your cereal a delightful purple!) (LINK: Grow Your Own 'Blue Corn' )
2 parts ground yellow corn
1 part Kassaby sorghum* - sweet, long-season sorghum
1 part BaYeKi sorghum* - not as sweet; used primarily for baking (LINK: Grow your own Sorghum for grain and flour)

Combine these ingredients together and keep in an airtight container. Keep some handy on the counter to make your morning cereal and store the surplus in an airtight container in your fridge.
*Sorghum is a high-protein, gluten-free grain. If you can't find it, just use corn meal: equal parts blue and yellow, coarsely ground.

This post isn't meant to suggest a rigid rule for making 'Nooks and Crannies' but to inspire you in your own breakfast cereal creations. Enjoy!