A unique and viable approach to establishing local food self-reliance and building stronger communities.

Showing posts with label Autumn. Show all posts

Saturday, January 10, 2026

Basic Seed-Saving on a Small Scale

Hello dear friends of the Sharing Gardens. It's been a long stretch since we posted anything new. Autumn is our busiest season and then we often need a bit of time to recharge our energy as the season turns into winter. (Image credit left: Seed abundance! Mike Brunt)

The following post is about processing seed crops on a small-scale.
Hopefully, it will inspire you to begin saving some of your own seeds and sharing them locally.
 
Though we're writing this in the heart of winter, if you're interested in saving seeds in the coming growing season, now is the time to be thinking about the varieties you wish to grow (they must be non-hybrid/Heirloom/open-pollinated varieties or they won't produce 'true' seeds).  

It is becoming increasingly clear that growing our own seeds is essential for locally-based food resilience. Rapid climate change (whether from man-made or other causes), the break down of supply chains, the increasing cost of purchasing seeds, all point to this need. 
 
Fortunately, for many plants, it is not that difficult to grow and save your own seeds. Over time, these will become increasingly adapted to your local climate and soil conditions.  
 
Image credit: Llyn Peabody 

The process of saving seeds
 begins with procuring high-quality, open-pollinated (non-hybrid) seed and growing out the plants in excellent soil with appropriate levels of water and sunlight and protection from pests. These topics are beyond the scope of this post.  
 
This post simply highlights some of the methods and innovations we've come up with over the years for small-scale seed saving. At the bottom of this post you'll find many links posts we've written that go into much more detail about growing and saving seeds from particular crops.  

Humans eat the seeds of many plants. Here, Olivia is harvesting Hopi Red Dye amaranth. Some grain-seeds we save for future planting, some we share with other growers, and most we grind for use in our very own hot breakfast cereal mix. (LINK: 'Nooks and Crannies' hot breakfast cereal RECIPE)

Once you've grown plants to maturity, it's important to harvest them at peak ripeness but not to wait too long or, for seeds that mature in flower heads or seed pods, you risk losing them as they pop-free and fall to the ground. In general, you're looking for pods or flower heads to dry and the seeds themselves to swell and darken. To determine ripeness for individual plant varieties, do your own research. 

For seeds that grow in pods (these are Red Russian kale seeds) you'll want to check them periodically to pick them at peak ripeness. But don't wait too long or the pods may shatter, spreading your precious seeds on the ground.
After harvesting grains, DRYING: Beans, grains, and many other types of seeds, all require a bit of drying before they can be processed. This makes them easier to break out of their pods. To dry, they need warm, dry conditions, protected from mice and birds. In summer and early fall months, we do this in our greenhouses. Use tarps or lay them in flat boxes or plastic totes to catch any seeds that fall from the plants. Be systematic in laying out the seed-heads, spreading them out so they dry evenly.  

Be systematic as you lay out grains, beans or other seed crops to dry. If they are laid out too thick, the bottom layers may not dry properly. (Chris and Suzanne laying out Kassaby sorghum-heads on sheets.)

Smaller seed-heads like these two kinds of amaranth need to be put on tarps to catch falling seeds as the plants dry. (Hopi Red Dye and Golden amaranth)

We lay corn out to dry on tarps before shucking it off the cob. Pull husks back to facilitate drying and only put the cobs one layer deep. (Hooker's Blue and Golden Bantam varieties. Both make excellent dried corn for grinding).

If you have trouble with birds eating your grains or seeds while drying, use a light-colored cotton sheet or cloth to cover them.

We often use cardboard boxes to dry some grains and seeds. The trick is to find boxes that have no holes at the corners (or to tape them closed). (Nantes carrot seeds drying)

Kassaby sorghum drying in a cardboard box.

We dry down some kinds of seeds in plastic totes. (Radish seeds pictured)

Different plants require different methods for removing seeds from their husks. Most seeds (grains and beans) also require sifting to remove the bulk of the chaff from the seeds. These steps are then followed by winnowing (see below). Here are some methods we use:

Some seed-pods are spiky and require gloves to remove them from their husks. Here, Hopi Red Dye amaranth being rubbed through a screen. It will still require winnowing to remove some remaining chaff from the seeds.

Amaranth seed can also be removed by rubbing the seed heads vigorously between one's hands (gloves definitely required). Seeds fall to the tarp. Sifting and winnowing to follow (Image: Darlene and Suzanne with Golden Amaranth - a sweet, mild grain. One of our favorites for breakfast cereal).

Golden amaranth seed being run through a sieve. Seeds shake out below.

Rolling pin method: Some seeds are more conducive to a rolling-pin method (radish seeds pictured). Using a rolling pin, or wide, wooden dowel, the seeds are popped out of their pods. They are then sifted to remove big pieces of chaff, and winnowed.

Sorghum:
Here are some specific techniques we've developed to process sorghum seed.

Sorghum processing tools: Sifter on left and a tool Chris invented by affixing a metal pet-comb to a 2"x4" piece of wood. These tools work great for medium-sized seed-heads such as sorghum.

Chris' pet-comb tool in use. The seed-heads are gently drawn upwards to dislodge them from the plant-stalk and captured in the tote below. (Image: Kassaby sorghum)

Sorghum being passed through a 1/4"  metal screen to further break up the seed-head clusters.

Sorghum (BaYe Ki variety) being passed through a final screening (a nursery-flat with smaller holes than 1/4" screen). Winnowing will follow.
Corn:

Note that, while corn is drying on the cob, we've peeled the husks back but left them attached. This facilitates them drying faster as the husks wick away moisture. (Golden Bantam corn, with a bit of crossing with Hooker's blue in previous years of seed-saving. Corn is a very 'frisky' plant; eager to cross-pollinate).

Chris invented this tool to remove dried corn kernels from the cob. Long screws are drilled in from the outside with reinforcements of wood on the sides to prevent the tool from splitting under pressure. A handle makes it easier to use.

Corn-shucking tool, in use. As you rub the cob against the screws, the kernels fall into the bin below. Corn definitely requires further drying before storage or it is at risk of molding.

Beans: We use different methods to process seeds from pole beans (like Scarlet Runner beans) than bush beans (Kidney beans). Pole beans we process by hand; letting the beans dry on the vine and popping them from their pods by hand. Bush beans are more conducive to flailing (see below).
Many of our beans seeds are processed over a wide-mouth bin or tarp to capture falling seeds. A fun task for all ages! Be sure pods are good and dry. This will make processing much easier.

Kidney beans (which are a bush-variety of beans) are processed most quickly through a flailing method. It helps if the pods are fairly dry. We lay them on a tarp and whack them with pieces of plastic piping. This knocks the seeds from their shells.

After flailing, to further dislodge the beans from their pods, we sift them through a 1/2" wire mesh which removes the longer pieces of stems and chaff.

Kidney beans after sifting. The next step is winnowing.
Winnowing: Next we winnow our seeds, separating the remainder of the chaff (or at least most of it) from the seeds by pouring them from one container to another, multiple times, on a mildly windy day (or in front of a fan). The heavier seeds drop into the container below while the chaff blows away. Be sure you have a high enough 'drop' (space between the top and bottom containers) for the wind to blow away the chaff and a large enough receptacle below so that all the pouring seeds fall within it. 
 
Chris, winnowing beet seed in the wind.

Chris, winnowing Kidney beans in front of a fan.
Further Drying: All beans, grains and seeds will require further drying after they've been processed otherwise they are in danger of molding when in storage. We have found that bringing them indoors and finishing the drying process with a heat source works best for us. For small amounts, a food dehydrator on a very low setting can work as well.

If we're harvesting our seeds in late fall, some will require more drying than is possible outdoors as the sun becomes weaker and the air becomes more humid. When this is the case, we bring them inside and put them on shelves above our wood stove to dry. These are Kassaby sorghum heads before processing arranged in a basket for best air-flow. 

After winnowing, we put grains and beans and other seeds in baskets with a paper lining and continue to dry them inside.

We've hung shelves all around our living room above the wood stove to dry plant material, including seeds. If you don't have a wood stove, you can use a small space-heater or put seeds some place where warm, dry air circulates in your home.
Storage: After all your precious time and effort has gone into saving your seeds, be sure to store them well. Everything should have a clear label with the variety of seed and the year it was harvested. 
Our seed supply is mostly kept in our freezer with everything stored in air-tight containers. Though the cold temps will slow down the aging of the seeds, conditions can be too dry if seeds don't have air-tight protection. Sometimes we even use freezer-bags inside of plastic jars just to be sure.

Our food supply of grains and beans are also stored in air-tight containers in our pantry, out of direct sunlight. 

Nantes carrot seeds almost ready for harvest. These seed-heads all came from just three carrots re-planted after a period of dormancy in our fridge (Re-planting Carrots or Beets for Seed) . So, three seeds produced this many seeds for the future! (Note: lettuce plant going-to-seed at the left of the picture.)
Seeds are about community: Lastly, once you begin saving seeds, you'll soon find that your plants are able to produce far more seeds than you will be able to use. We have shared seeds with the Agrarian Sharing Network and their Seed Increase Initiative to help us distribute our seeds to a wider regional community and hope to participate in the Cascadia Seed Guild as they develop. This group, stewarded by Mike Brunt (the featured artist in this post) has developed this comprehensive guide outlining the need for bio-regional seed sovereignty and a road-map for getting there. Good stuff.
 
Seed swap at an Agrarian Sharing Network Propagation Fair, 2025.

Seeds help grow community connections. Here is a seed swap in someone's living room. Most of these women are connected to a small-scale, non-profit garden project so these shared seeds will continue to multiply and spread to an ever greater community.

Relevant Sharing Gardens LINKS
: Here are relevant posts for saving specific kinds of seeds: (Image credit left: Five Sisters Abundance (corn, beans, squash, amaranth and sunflowers) Mike Brunt)
Family Heirlooms - Saving Your Own Seed: A general guide to saving seeds.
In addition, we have written posts on the specifics of saving seeds from the following plants:

Though we're writing this in the heart of winter, if you're interested in saving seeds in the coming growing season, now is the time to be thinking about the varieties you wish to grow (they must be non-hybrid/Heirloom/open-pollinated varieties or they won't produce 'true' seeds). 


Wednesday, October 8, 2025

Autumn Abundance!

Seed Saving, Stocking Up, the Amazing Quince, Pumpkin Pie from Scratch and other seasonal blessings...

Greetings, friends of the Sharing Gardens, near and far. We're working on an end of the season summary-post but thought you might find some of these previously published posts relevant to your own transition from summer's bounty to the quiet of winter. Enjoy! 

(Image: Three Sisters Abundance, from Mike Brunt: an amazing elder in our community who is dedicated to spreading the word about the importance of saving our own seeds.)

Re-planting Carrots or Beets for Seed: If you wish to save seeds from beets, carrots or onions next year, now is the time to set aside your best specimens so they have a period of dormancy before you re-plant them in the winter/spring. See the linked post for ideas on storage. This will only work if you grow heirloom/open-pollinated/non-hybrid varieties. 

Image: by Llyn Peabody

 Family Heirlooms - Saving Your Own Seed: In the Sharing Gardens we probably save about 80 - 90% of our own seeds. It really isn't that difficult to do and it is very gratifying to experience this deeper level of "local food self-reliance". If you have a garden plot that is separated from other gardens by at least 500 feet (to prevent unwanted cross-pollination) you can save your own seed. Even if there are other gardens nearby, there are many crops you can grow that will not cross (tomatoes and beans for example) so don't let that stop you. This LINK will take you to a post that features general information about seed-saving, and links to the specifics of saving seeds for lettuce, peas, Scarlet Runner beans, tomatoes and more.

Amazing Quince! - Sugar-free Recipe:  Here in the Pacific NW the quince fruit thrives. It's flavor, once baked or steamed (and with a touch of sweetener added) tastes like a combination of pears and lemons with a hint of peach and rose-oil! Ambrosia! Follow this LINK for a detailed, sugar-free recipe, prepared from scratch. (Image: right, www.modernfarmer.com)

Making Pumpkin Pie from Scratch: Making pumpkin pie from scratch is truly a labor of love! How much easier it is just to open a can of puree. Pumpkin pie filling can be made from sugar-pie pumpkins, or any kind of sweet, golden-meat type of squash. Delicata, Buttercup and Sweetmeat are all good varieties. Follow this LINK for the full recipe to make pumpkin pie filling that you can freeze and have on hand for a delicious taste of autumn throughout the year.

Saving Tomato Seeds: If you're new to saving seeds, tomato seeds are an excellent place to start. Because they are 'self-fertile' (having both male and female parts in each flower) they tend to breed true and not cross with other varieties grown nearby. Be sure you are saving seeds from an heirloom/non-hybrid variety. Hybrid seeds artificially marry two different parent plants and, when seeds are saved, they often revert back to one or the other parent which can yield unsatisfying results.

Tips for Maintaining a Well-Stocked Pantry: 
Whether you’re concerned about preparing for a natural disaster or economic hard times, or just tired of opening your cupboards and not having a variety of tasty, nutritious items to choose from, it’s always a good idea to get in the habit of stocking, and maintaining one’s pantry. Here are some tips to help.

The Coming Anastrophe (the opposite of Catastrophe): Because having an optimistic view about all the challenges the world is facing is always in season, here is a post from our All Things Sharing site that we hope you will find uplifting.

From the post: Some people think that we can't really move forward, to heal society and all its ills, until there's a 'collapse' or 'catastrophe' of some kind; otherwise (the story goes) we'll just keep putting patches on a system that's so broken that anything built on top of it will inherently be flawed. Corbett offers an alternative story: that an 'anastrophe' would be a sudden and rapid awakening of humanity that would lift us unified out of the many troubles facing the world.

He says that the change must begin at the community/neighborhood level. I admit that his views can seem a bit utopian but I appreciate him for shining a spotlight in a new direction -- away from the fascination many people feel in waiting for 'the BIG one'; the catastrophe that will hopefully, finally catalyze us out of the many messes the world is in. CLICK HERE for full post.

We hope your autumn is full of beauty and healthy harvests! Llyn and Chris - The Sharing Gardens 

Autumn Beauty sunflower with a honey bee (loaded with pollen!).

Wednesday, October 1, 2025

Re-planting Carrots or Beets for Seed

Autumn Update: If you wish to save seeds from beets, carrots or onions next year, now is the time to set aside your best specimens so they have a period of dormancy before you re-plant them in the winter/spring. See below for ideas on storage. This will only work if you grow heirloom/open-pollinated/non-hybrid varieties.

Original post: Early to mid-winter is the time to re-plant bulb/root crops to grow seed crops. Beets, carrots and onions are biennials. This means they produce seeds in their second year and then die.

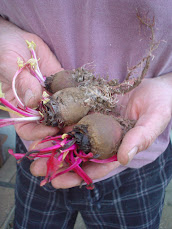
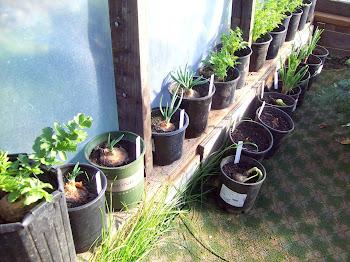
Below are pictures of beets (left) that have wintered over and are beginning to sprout leaves and root hairs. These we plant into pots with soil or directly in raised beds in our grow-tunnels. On the right is a picture of a row of potted root crops that are developing enough roots and sprouts to then be planted again in the ground so they can mature and set seeds. Note: seed-saving can only be done with heirloom/non-hybrid varieties.


Because our ground can be so wet and cold through the winter, we often dig up these root crops in mid to late fall. At harvest time we cut the greens off but leave the crowns so they'll re-sprout. We then store them in a plastic bag or clam-shell container with dried leaves or straw so they stay moist (but not too moist) till we're ready to replant them. A plastic container in the fridge also works well (below).

Those pictured above were harvested in late September and re-planted in late December. In previous years we have waited till January or February for replanting but noticed the beet in the lower right corner was developing mold in its crown so decided it was best to get it in the ground before the mold progressed.
 Here are some Imperator carrots we grew in 2024. You have to have deep, loose soil to grow them. They're not as sweet as the Scarlet Nantes (our other favorite 🥕) but because they're so long, we get more pounds of carrots per bed.

Chris, planting carrots.

Almost done. We bring soil up to, but not covering the crowns. Then we water them well to settle the soil. 

Nantes carrots, 11 days after planting. The greens are already growing! Once the greens get taller, we will put a cage around them to support the greens and flower stalks (see below).  Depending on when one starts re-growing these root-crops, seeds will be ready to harvest in mid to late summer.

Caging: Seed crops can get quite top-heavy and will require caging and staking. Image: Waltham broccoli going to seed. We made a cage out of 4'-tall fencing material and drove stakes deep into the ground.

Caging: For crops with lighter seed-heads (lettuce, above) a simple stake driven in the ground with strips of cotton-sheeting to hold it up will do.

Note: Carrots will cross with wild Queen Anne's Lace (pictured above) and can produce woody, bitter carrots from any crossed seed. To prevent this, we try to time our carrots' flowering to precede that of QAL (which usually happens later in the summer). If you see these growing near your gardens, it's best to cut off the flowers or dig the plant out entirely. This will greatly diminish chances of cross pollination. Image credit: https://white-rock-lake.blogspot.com/2012/05/queen-annes-lace-intrigueing-wildflower.html

Other ways to reduce the risk of cross-pollination: Grow out the seed-crop under cover (grow-tunnel). Carrots can be hand-pollinated by breaking off a flower and tapping it gently on other flowers to spread the pollen (make the flowers 'kiss'). For extra security, cover your flowering carrots with re-may cloth/white row-cover (after hand-pollinating). Image: Imperator carrots, summer 2024, grown from our own, saved seed!

Seed crops often create beautiful 'sprays' of seed heads. Here's Chris with a 'bouquet' of kale seed.

Note: Beets will cross with other varieties of beets as well as CHARD (same family) so keep them isolated from each other if saving multiple varieties of beets, or beets and chard in the same year. Image: Jim, harvesting whole branches of beet seed for processing. Beet flowers have a very sweet scent like Alyssum flowers (or even a mild cotton candy smell!).

Winnowing beet seed. (See these other posts for more info on winnowing seed: Saving and Storing Kale Seed Small-Scale, Grain Production and Processing)

Beet seed after winnowing.

...and the cycle starts again!


Kids who help grow their food are more likely to want to eat it! Here are Bella and Adri with a handful of fresh-dug carrots.