A unique and viable approach to establishing local food self-reliance and building stronger communities.

Showing posts with label Garden-Tips. Show all posts

Wednesday, April 9, 2025

Three Sisters - Winter Storage Crops and How to Grow Them

Many people are familiar with the Native American combination of growing beans, corn and squash; commonly called 'The Three Sisters". 

Here are LINKS to growing them and tips on storage and usage...

Scarlet Runner beans are our favorite beans to grow for dried-bean/winter storage. They're delicious and have a smooth, thin outer skin which makes them ideal for chili, or soups, or just to eat as a hearty winter dish. They do require a tall strong trellis or tipi, space to finish drying the pods in the fall (after harvest) and many willing hands to remove them from their pods (this is a coveted task for our volunteers in the Fall!). But they're highly productive, and beautiful too! Grow Your Own Protein - Scarlet Runner Beans 

Here are instructions for building a simple tipi, perfect for growing pole-beans. Tipis are a great way to support these vigorous climbers and a fun and shady hideout for your smaller garden helpers!  How to build a Bean Tipi/Teepee  

Part of becoming more self-sufficient has been to grow our own corn-meal. We chose an heirloom-variety of blue corn called Hooker's Blue because it's easy to grow, has high yields and makes delicious corn-meal that can be used as hot cereal, and in baked goods such as corn bread and pancake mix. Grow Your Own 'Blue Corn' 

We haven't yet written a post specifically about growing squash, or saving squash seed but here are some LINKS to posts about ways to use the squash after harvest: Making Pumpkin Pie from Scratch - Recipe; Baking Delicata Squash;

Saturday, February 22, 2025

Best Video on Pruning Table Grapes!

Here is the best video I've found on pruning table grapes (and I've watched a lot!). I was able to watch this video and head straight for our vineyard of 36 plants and confidently prune them for what I hope will be our most productive year yet while preparing them to be productive for next year as well.

Grape Vine Pruning Made Easy! (Table Grapes) Using The Double Guyot Method

And, for an excellent written post on pruning grapes: both cane and spur methods explained, click here: How to Prune Grape Vines – Cane and Spur Pruning Explained (Thank you Deep Green Permaculture!)

Update - February 2025: We followed the method outlined in the video above for our grape vines in 2023 and 2024 with excellent results.

Some of the 36 grape vines we grow...after pruning.
In previous years, we had experimented with different methods of pruning. Our plants looked a lot like his did at the beginning of the video. Our theory was: the more fruit spurs we left behind, the more fruit we'd get from them. It can be a bit anxiety-producing to cut off so much plant material and reduce your grapes to just two canes and two renewal spurs (for next year's growth)! In truth, by cutting back the plants so radically, you may get fewer bunches but the ones you get will be larger and more filled out and easier to harvest.

Just a fraction of our harvest using the pruning technique outlined above.

Thursday, January 30, 2025

Onions - Growing from Seed - Using heat mats and shallow pots

Note: This article explains how to start onion seeds using a heat mat and shallow pots. To read about how to start seeds in deep pots, without heat mats, CLICK HERE).

There are literally hundreds of varieties of onions grown in this world, but unless you grow your own you usually have access to only a handful of varieties from the grocery store.  If you rely on growing onions from ‘sets’, (the little onions, about the size of a large grape) your options are often still quite limited.  Growing from 'sets' has other disadvantages too; often they will produce a significant number of ‘doubles’ (meaning smaller onions at harvest-time) or they bolt and go to seed, which makes them tough and unpalatable.
   
Here is a guide you can follow that will increase your chances of success at growing onions from seed.

Onions going to seed.
Here in the Willamette Valley of Oregon (USDA Zone 7b - Link to finding what zone you are in), we do best to grow what are called ‘long day’ varieties which include Cipollini (chip-o-leenie) both red and yellow varieties, Southport White Globe,  or White and Yellow Sweet Spanish. (Choosing Onions-Long or Short Day?) There are many more varieties to choose from; check your seed catalogs or go online to see a greater selection. (Be aware that, if you wish to save your own seed, you must choose Heirloom/Open Pollinated non-hybrid seeds. Those listed above are all Heirloom varieties.)

You will need:
  • Sifted potting mix
  • Sand (optional)
  • Pots: We used to use rather large pots (4" x 6" deep - 25 seeds per pot) but have shifted to using tofu containers with holes drilled in the bottom (see picture below), or jumbo six-packs. These use less soil for the same amount of seeds.
  • Seeds: start with fresh seeds each year; onion seeds lose viability within one or two years. If you wish to save seed, choose Heirloom/Open Pollinated varieties. Choose a variety appropriate to the length of your summer days.
  • Greenhouse or grow-lights
  • Heat mat (seeds will germinate better with a little bottom heat).
  • Plant-mister  
When to start: About eight-to-ten weeks from the time you wish to transplant them into your garden. Usually we get the seeds started around the middle of February but, if we have extra seed, sometimes we experiment with starting a little earlier (this would only work using a heat mat for bottom heat). By late April the seedlings will be ready to set out into the garden.  They are ready when you can see a clearly defined "bulb", 1/8" to 1/4" pushing above the soil-surface in the pot. At this stage, the sooner they get into the ground the larger your onion bulbs will be at harvest time.  It’s always a good idea to have a bed in mind that you’ve prepared during the previous fall since it’s difficult to prepare beds in the spring if you have a long rainy season like we often experience here in Oregon. The seedlings can handle a touch of frost at this stage but its no fun transplanting them in really muddy garden beds. Some people wait until early or mid-March to start seeds and still have plenty of time for the onions to ripen.
 
Another option, if you have raised beds in your grow-tunnel/greenhouse, is to transplant the 'starts' there - instead of outside). Onions are easy to use to fill in spaces between larger plants, maximizing your raised-bed use. But they need full sun so don't plant them where they'll get a lot of shade later in the season as other plants mature.
 
When planning ahead for planting, consider also the practice of companion planting as some plants are more or less compatible with onions (LINK).

Pots: If you will need to wait more than 8-10 weeks, to transplant the seedlings into their permanent growing space, follow this guide for planting in 4"x 6" pots. This way you won't run the risk of the onions becoming root-bound before you transplant them.
 
In recent years, because we have increased space in the raised beds of our greenhouses, we've shifted to using re-purposed tofu-containers with holes drilled in the bottom - (see picture below - approx. 3"x 5"x 2" deep) (we eat a lot of tofu! - if you're local to us and need some of these containers for seed-starting, let us know!). Jumbo six-packs work too.
Tofu containers for seed-starting. We've used them as 'six-packs' too. Though the roots of the 'starts' grow together, it's easy to tear them apart without damaging them. The tofu containers, 3"x 5"x 2" deep, use less soil than jumbo six-packs so we save on potting mix.

Soil/Sand:
Start with a good organic seed-starting mix.  It doesn’t need to be a premium potting blend, in fact, if you start with too rich of a soil blend you can experience a condition referred to as ‘damping off’ which looks like algae or mold growing on the surface and which causes the young seedlings to rot as they emerge from the soil.  One way to help eliminate this condition is to sprinkle a thin layer of sand over the seeds.  By keeping the soil damp but not too wet and having good ventilation you shouldn’t have this problem. 


Onion seeds can be started in a variety of containers.
Fill the pots with a sifted soil to about 1/2" from the top (tiny seeds find it difficult to germinate in soil with large chunks of material). Level out the soil, tamping it down with the bottom of another pot to create a level surface so that all of the seeds will be sewn at the same depth (otherwise they germinate unevenly). Label each pot with the name of the variety and the date you started them. 

Seeds: You may want to actually count out the seeds the first time so that you can have an idea of what 25 - 35 seeds looks like because that is about how many would be optimal to sew in the tofu-containers or six-packs.  You can adjust up or down depending on the size container you choose.  The idea is to not have an overcrowded condition that would produce weak and unhealthy seedlings.  Place the seeds in the palm of your hand and pinch out a few at a time. Gently drop them on the surface of the soil, distributing them as evenly as you can without becoming too concerned about accuracy.  It’s OK if some seeds are touching each other. Sprinkle a sifted layer of starting mix or sand over the seeds at a depth of about an eighth to a quarter inch.  Tamp it down again and water gently (a planter mister works great at this stage). 

Watering:  Keep the soil moist using either a small spray bottle or water them from below by putting water in trays and setting pots in them (light watering minimizes 'damping off' too). Tiny seeds, until established can be washed away with more aggressive watering techniques. Do not over-water! Soil should be damp but seedlings should never be in standing water. 
 
Heat mat: A heat mat is helpful for germinating seeds if you are doing so in an unheated greenhouse and nights still are getting cold. Heat mats can cause soil to dry out more quickly than ambient air so cover the seedlings with something to keep warmth and moisture contained.
 
Then it’s time to be patient, and let Nature do her work.

The seeds will not require sunlight until they have emerged from the soil, usually about two weeks from the time they are sewn, so you can keep them indoors where they will not freeze, on a window sill or in a greenhouse if you have one. Once the greens are up, they will require full sun. If you don't have grow-lights or a greenhouse, be sure to bring them inside at night if it looks like you may have freezing temps.
 
You will know it is time to transplant when the greens are stout and well-established and you can see a tiny bulb pushing up from the surface of the soil.

Teasing onion-roots apart before trimming.
Transplanting: Each pot of seedlings must be teased apart. You will need to trim back both the tops and the roots before trying to stick these tiny seedlings into the ground. You trim the roots so they're easier to slip into the holes and you trim the tops so that the pruned roots can support the greens above. Don't be too aggressive with your pruning however or it can shock the plants and make it hard to recover.

First, dump the whole pot into the palm of your hand.  Next, separate the clump into several sections (maybe 10-12 seedlings in each clump).  Hold one clump by its 'greens' and gently tap the root ball until most of the soil has fallen away.  Tease the seedlings apart and lay them back in your hand so that the small bulbs are in a line (see picture below). Using a scissors or hand pruner, cut away the tips of the roots, so they'll easily slip into the soil.  Trim the tops to about the same length as the roots. Now set the clump into another shallow container with a little water in the bottom to keep them from drying out while you prepare the rest for transplanting.  Prepare only as many as you are able to transplant in one session. If you end up with extras, surround their roots with some moist soil and keep them in the shade until you have time to get them in the ground.

Trim roots and greens to same length.
If you are going to plant them in rows, open up small holes about 4-5 inches apart. When we plant our onions this way, our beds are 2'-3' wide, with several rows in each bed. 
 
In recent years we have planted rows on the south edges of the raised beds in our greenhouses and in and amongst other crops that won't shade the onions later in the season (for example, on the south side of tomatoes or peppers), or we plant them among crops that will be harvested before the onions are mature, leaving the onions in full sun (like among lettuce plants).

Make holes: To make the holes you can fashion a planting stick called a ‘dibble’ from a smooth branch or a ¾ in dowel with a point or, just use a ‘Sharpie pen’, or even your finger to make the hole.  Be systematic: make  5-10 holes and then go back and drop a single onion in each hole.  Gently press the roots into the hole and pinch the soil around each one, making sure the part that was under the soil in the pot is covered when you transplant, leaving only the green top and a tiny bit of the bulb showing.  Be sure that all the roots go in the hole and don't "J-root": with bits of the roots poking out from the soil; this will dry out the plant and force it to use extra energy in turning its roots back down into the soil. You’ll get the hang of it after a few tries and be able to transplant hundreds in no time at all!

Onions in a wide bed.
Now the focus becomes keeping the bed weed-free and well watered.  Mulching between the onions with fresh grass-clippings keeps moisture in the soil and fertilizes the plants each time you water through the clippings. Just don't bury the seedlings! Once the plants have become established and the warmer, sunny weather settles in you’ll be amazed at how fast everything grows.  Feel free to thin out your onions when they are immature and be sure to use the whole thing, greens and all. 

If you have planted non-hybrid seeds, hold back a few onions to replant next spring to save seed. Onions are biennial meaning they don't produce seed till their second year. By collecting your own seeds you can begin the process all over again, and saving seeds, dear friends, is one big step toward greater food security!

Link to another post we wrote about onion-growing.
 

Saturday, January 25, 2025

How to help the Monarch Butterflies - Starting milkweed from seed

Monarch, ready to be released. Image credit.

Note:  This post was originally posted in 2021, a year that the numbers of Monarch butterflies counted in the southern California populations plummeted!  (only 2,000 counted in southern California nesting sites in January of 2021). LINK-Western Monarch populations

But the last two years have shown substantial increases in the winter count:
Feb 19, 2023 LINK: "...Over 130,000 butterflies were reported in Santa Barbara and San Luis  Obispo Counties alone. The San Francisco Bay Area also witnessed a comeback from last year with more than 8,000 butterflies reported in surrounding counties.

This season’s results are a welcome reprieve from the dismal total of less than 2,000 individuals counted in 2020—and larger than the 250,000 counted last year.

335,479 is squarely back into what was considered “normal” in 2000-2017." 

Pic credit: https://earthwiseradio.org/2015/07/monarch-butterflies-2/
Perhaps the public's concern for their plight has actually made a difference! Here at the Sharing Gardens, we've been starting Showy Milkweed plants from seed for several years. We've been successful to the point that the plants are now reseeding themselves in various places on our land.
 
This post is about our experience growing milkweed at the Sharing Gardens with tips on how you can do it too. At the end of the post are many other resources to help you, help the Monarchs (and other beautiful and necessary pollinators)!
 
Adri's instructions
Last spring (2020), when grade schools were first shut down in Oregon during the pandemic, our dear little friend Adri (who's been coming to the Sharing Gardens since she was a baby in a back-pack) arrived at our weekly volunteer-time with a small packet of showy-milkweed seeds and instructions for planting them that she'd carefully hand-copied from her teacher's instructions. She was wondering if we'd be willing to grow some out in our gardens as she doesn't have a sunny enough yard at home. We said, "Sure!". 
Showy Milkweed in bloom
We've been growing "showy" milkweed (Asclepias speciosa) since 2018. To begin with, someone gave us a few "starts" and a hand-full of seeds to experiment with. The variety we grow is native to the Pacific NW - where we live - and well- suited to our site (full sun, moist soil). (If you live elsewhere, you might wish to research what varieties will do well for you). Also, whatever variety you decide to plant, there seems to be some evidence that butterflies prefer native species to their hybrid cousins, so choose accordingly (LINK).
 
We had tried several different ways to germinate the seeds but they were only moderately successful. We did establish a patch of about a dozen plants that wintered over and began producing flowers themselves (summer 2020) but the method Adri brought to us has been the most successful so far. Here's what to do: Wrap the seeds in a damp paper-towel (squeeze it out thoroughly so it's just lightly moist), secure the seeds in a sealed freezer bag and put them in your refrigerator for 30 days. This simulates a cold, wet winter that the seeds need to break from dormancy. Plant in soil (about 1/4" deep) being very careful not to damage the tiny emerging root. Place in a sunny window, or greenhouse and water from below. They should emerge from the soil in about ten days.
 
This is what seedlings should look like after placing the seeds in a damp paper-towel inside a zipper bag and refrigerating for thirty days.

To grow seedlings bigger, arrange in potting soil...

...and cover with about 1/4" soil. Be very careful with their fragile roots.

Seedlings after several more weeks...
Though theoretically, you could transplant the seedlings into the ground at this point, they will have a much better chance of surviving if you pot them into larger pots and plant them into the ground once they have bigger root systems. With Adri's seedlings, we re-potted them two times through the summer until they were in half-gallon pots. These, we wintered-over by clustering the potted plants in a sunny spot in our yard, protected from cold, north winds under a blanket of fall leaves.

Adri and Kaylynn with milkweed plants at about 120 days from putting seeds in fridge. Two plants per pot.

Milkweed plants wintered over two years in pots. Ready to get into the ground!

This coming spring, we'll transplant them into a sunny spot. Aside from propagating from seeds, the roots also send out runners and start new plants. We have a patch of milkweeds that grew as volunteers from underneath the pots we'd wintered-over in a previous season!

Milkweed is a perennial plant. Under the right conditions, it returns year, after year. But plants don't begin flowering till their second or third year so be patient!
 
The showy milkweed is well-named as it has beautiful, pink flowers but its real contribution to a perennial garden is its rich fragrance. Very much like an Asian lily! Though we've yet to see any monarchs on our plants, during their blooming season last year, our plants were covered in many kinds of other pollinators including bees, both wild and "honey" bees.

Life-cycle of the monarch butterfly (by Adri Kitchen).
Milkweed is a "host" plant to the monarch because adults enjoy the nectar produced by its flowers (though they seem to enjoy other nectar plants too LINK). But, as far as is known, they only lay their eggs on milkweed plants as these are what the larvae eat. Milkweed has a mild toxin in it which builds up in the bodies of the larvae and makes them bitter for their predators to eat. This toxin remains in the bodies of the adult butterflies too also giving them protection from predators.

People who raise cattle have tried to eradicate milkweed because it can be toxic to their livestock. Since we're vegetarians and have no grazing animals on our land, we're happy to provide this host plant for the monarchs and other beneficial insects who enjoy its nectar.

Studies show that a mixed stand of wildflowers seems to be beneficial to monarchs (and probably to other pollinators too). In other words, it's not ideal to grow milkweed alone. Llyn with crocosmia (red) and tansy (yellow - a volunteer "weed" that, though reviled by horse-owners is beloved of bees! Super fragrant too!).
Recent studies suggest that monarchs have a higher reproduction success-rate if the milkweeds are growing in a stand of mixed wildflowers LINK. We didn't know this when we established our first plot so they are growing alone. But this next spring, when we plant Adri's plants, we will grow some other wildflowers amongst them. That should be really beautiful!
 
Be sure to plant at least a dozen plants in a patch. If the larvae emerge from their eggs and begin munching their way through the leaves of the plant and should fall off for some-reason, they need to have multiple options for plants to climb back up on. Also, adult monarchs are far more likely to find a large patch of milkweeds than a small one. 

Plant at least a dozen milkweed plants together. This will help monarchs find them.

Milkweed seeds, ready for harvest.
The cycle of planting milkweed is complete when they begin producing flowers and seeds (in their second or third year). We have some extra seeds if you're interested in growing some milkweed in your yard. Just let us know (shareinjoyATgmail.com).

Honey bee on tansy.
Here are some other links with info you may find helpful and inspiring as you begin your butterfly garden:
 
Ways you can help right now:
 
1. Plant native milkweed: In Willamette Valley, that's showy milkweed (Asclepias speciosa) and narrow leafed milkweed (Asclepias fasciculatis)
2. Provide nectar
3. Don't use broad spectrum pesticides (https://monarchjointventure.org/monarch-biology/threats/pesticides)
4. Reduce your lawn size
5. Support local efforts by educating others, advocating for different practices in your community, or become a citizen scientist
 
From the National Wildlife Federation: on how to benefit butterflies. When you're planning your garden this coming spring, think of the monarchs!
 
 Check out Xerces Society and Monarch Joint Venture for more information on national efforts and ways you can help. Monarch Watch and Journey North are two citizen science groups that record monarch  and milkweed sightings. For an interactive map that tracks seasonal migration, try Journey North There are monarch butterflies in the Willamette Valley, but we need more citizen science reporters!
 
These findings suggest that the efforts of individual gardeners to plant milkweed, either wild-type native plants or native cultivars, can be helpful in supporting the declining populations of both monarch butterflies and other insects. 
"For example, the diversity of plants in a garden, the specific plants that are used and their arrangement — all of those things matter for how the butterflies are able to locate the hosts and move from one to the next."
 
 
Finally, some good news! Conservationists have successfully reintroduced previously extinct large blue butterflies to the UK, with the creatures populating parts of the country for the first time in 150 years. 
 
Image credit: Llyn Peabody - 2020

 Rewilding at the Sharing Gardens...Here's a post about our efforts to create more wildlife habitat on our 3 and 1/2 acres.

Thursday, January 2, 2025

How to Grow Your Own Celery

Though growing celery takes a little patience at first (the seeds are very slow to germinate), it is not a difficult plant to grow and the flavor and crispness of home-grown celery makes it well worth setting aside a little corner of ones garden for this delicious and health-enhancing plant.

This post covers:

  • How to germinate the seed
  • Transplanting/optimal soil conditions
  • Watering
  • "Cut and come again" - celery beyond the first cutting
  • Nutritional content of celery and why to only eat it organically grown 

How to germinate the seed:  Most gardeners have a favorite way of germinating seeds but we'll just share what works for us and you can adapt it to your own preferences. 

Celery seed is very slow to germinate. Seeds can take 2-3 weeks to show their first leaves and the plants are not big enough to be planted in the ground for at least two months after that. Here in the Pacific NW, USA (USDA zone 7b) we start our celery in mid-February and they're usually ready to go into the ground by late April or early May. Don't worry if you've missed that planting schedule; celery can be started all through the spring. 
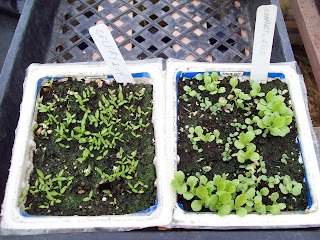
Celery seed is very slow  to germinate. Celery seedlings (left) over 1 month old. Lettuce (right) approx. 3 weeks old.
Our favorite variety that we grow is called "Utah". It's an heirloom/open-pollinated type so you can save your own seed. One plant will give you enough seed for years of future planting, plenty to use in cooking and to share with other gardeners.

One celery plant starting to flower. One celery plant will yield thousands of seeds!
For starting the seeds, we use tofu-containers with holes drilled in the bottom for drainage (see pic above), on heat mats in our greenhouse. We use a finely-sifted, well-draining potting mix that is not too rich. At this early stage, too much nitrogen can cause an algae-film to grow on the surface of your soil and lead to stem-rot in the plants. Moisten the soil before planting.
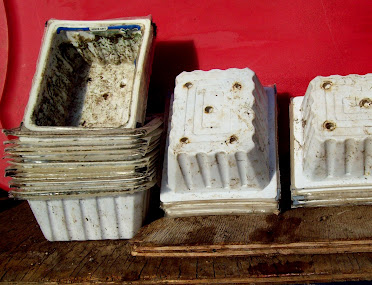
Being vegetarian, we eat a lot of tofu! With holes drilled in the bottom for drainage, they make excellent pots for germinating seeds.
Celery seeds are tiny and it can be a challenge not to sow them too thickly. Ideally you want about 1/4" between each seed. Put some seed in the palm of one hand and take a small pinch of seeds in the other hand. If you hold the seeds about 6" above your pot and drop them slowly, they will tend to spread out evenly as they fall. Use only the thinnest covering of finely sifted soil to lightly cover the seeds (or rinsed sand works too - be sure the sand you use doesn't have salts on it if you collected it yourself). Gently press the surface of the soil so the seeds below have good contact.

A good rule of thumb is to only cover seeds with soil twice as deep as the seed is thick. So, a millimeter-sized seed, would be planted approximately 2 mm's deep. 

They will germinate best with some bottom-heat from a heat mat, or to be kept indoors until the seedlings pop up above ground but as soon as the green leaves appear they need sunlight or a grow-lamp. Keep the soil moist (but don't over water!) by bottom-watering (in a shallow dish) or with a plant-mister as too much water can kill the tiny seedlings.

The seedlings will develop an extensive root-system first which can take many weeks. Don't give up on them! 

Transplanting/optimal soil conditions: Our celery seedlings go through two transplanting processes. First, once the root-system has developed and the plants are about 1/4 - 3/8" tall, we carefully tease them apart and give them each their own pot. Jumbo six-packs work fine. We have also used the tofu containers mentioned above (six to a container). These work well if you'll be able to do the next phase of transplanting as soon as the roots fill the soil. The jumbo six-packs extend this time a little bit as they hold more soil.
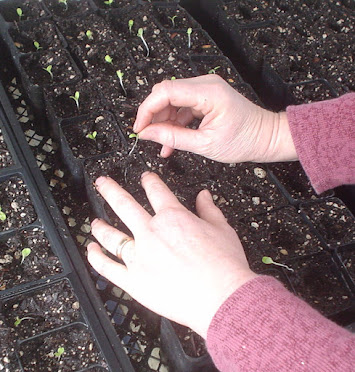
Transplanting tiny seedlings...

Celery is a heavy-feeder and the soil you transplant into should be well-draining and relatively high in nitrogen and minerals.

Allow the seedlings to grow for about two months or till they have a dense root system and healthy greens. (Celery pictured to the left still needs another month or so to grow. The roots are well-developed but they'll do better with more greens.) Our first transplants go into raised beds in our grow-tunnels (greenhouses) but a few weeks later, a second crop can be planted outside. Celery doesn't mind cool weather but it doesn't want a hard freeze, and, though you want to keep its soil moist, celery doesn't like soggy, wet feet (standing water).

Celery naturally grows flat on the ground (like a starfish - if seen from above). To get upright bunches (like you buy from a market) it must either be grown close together in a block, or in collars. In the first few years we grew celery, we used milk cartons and large soy-milk containers to keep the celery growing upright (see pics). The collars blocked the sun from getting to the celery and hence "blanched" it (kept it from getting too dark-green or tough). But we always had problems with slugs which found the collars to be a perfect habitat. For the last several years we've simply grown the celery close-enough together so each plant holds the others up that are around it. Spacing them about 8" apart seems to be the ideal distance. To use this method (without collars), plant them in a block or square (not a single row). They'll grow fine in a single row, they just won't grow upright and may be darker green and a little more fibrous.
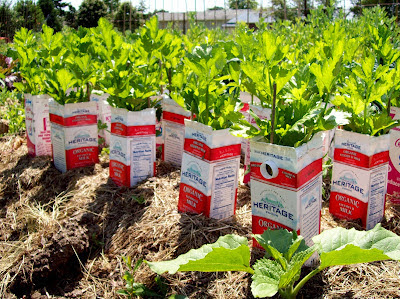
We used to use milk cartons (held in place with bamboo stakes in two corners) to keep celery upright - it tends to flop flat - and to blanch it (direct sun makes celery darker green and more fibrous) but the collars proved to be ideal slug habitat.

Now we plant the celery in "blocks" (not rows), 8" apart, and the plants hold each other upright. They're not quite as blanched as with the collars but it takes less time and we don't have problems with slugs or snails.
Watering
: Celery plants are approximately 95% water so they appreciate consistent, deep watering. In the beginning, after they're first transplanted in the ground, they'll need to be watered more frequently but not as deep. Later, it's better to water less frequently but more deeply which encourages the roots to reach down into the soil and pull up the water and minerals from below. Shallow watering creates a shallow root system which is much less tolerant to fluctuations in air-temperature and soil wetness.

Late winter celery in our greenhouse. This has been harvested once and grown again.
"Cut and come again" - celery beyond the first cutting: If you are careful about harvesting, celery will re-sprout from its roots. We cut just above the point at which all the stalks are still joined to the roots. The stalks will not be joined at the root (like you buy it in the store) but this gives the roots the best chance of re-sprouting. Keep the plant watered after harvesting to assist it in putting on new growth. This cut-and-come-again celery in the raised beds of our greenhouses has frequently survived through the winter, providing flavorful, mineral-rich stalks to harvest the following, early spring. Sometimes this second-growth celery is a bit more fibrous but it's still delicious and the fibers won't be a problem if you chop the celery finely.

Second-cutting of celery is often more coarse but also more flavorful. Chop finely to use in soups. "Mmm, good!"
The leaves of celery are typically removed before the bunches are sold in a market but they are delicious, chopped finely in soup or salads. They can also be dehydrated and used for seasoning for when you don't have access to the fresh plants.

Nutritional content of celery: Celery is high in water and fiber-content and very low in calories. Since celery is mostly made of water (almost 95%), it is not particularly high in any one vitamin or mineral. Nevertheless, celery is a good source of vitamin K, with one cup containing about 30% of the recommended daily intake, according to the University of Michigan. Celery can also help you get enough folate, potassium, fiber and the micronutrient molybdenum. It contains small amounts of vitamin C, vitamin A and some B vitamins. "Celery is naturally low in calories, carbohydrates, fat and cholesterol," (Read full post here: Celery: Health benefits & nutrition facts)
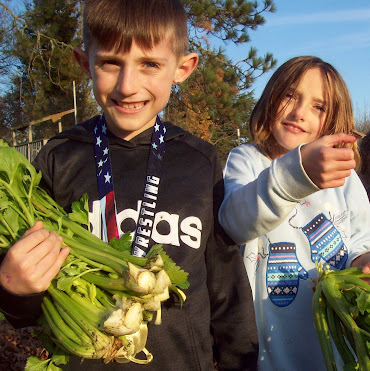
Always grow or buy organically grown celery. Having such a high water-content, it absorbs and retains pesticides and herbicides.
If you're not able to grow your own celery, always buy it organically grown. Because of its high-water content, it absorbs lots of whatever herbicides or pesticides that are used in growing it. It consistently shows up in the "Dirty Dozen" of fruits and veggies you should always buy from an organic source. (For more info, read this post: Which Fruits and Vegetables to Always Buy Organic-LINK)

As people tour our gardens, they commonly remark that they've never grown their own celery. We hope this post has helped demystify the process and we wish you much success with your growing.


And here's some more excellent guidance on growing celery from the National Gardening Association: How to Grow and Care for Celeries

Wednesday, November 27, 2019

Leaf Love!

How we use leaves in the garden...

Shag bark hickory.
Hello folks - Well, the autumn leaves have mostly fallen here in Monroe. It's been our best year yet for leaf-collection! We had a couple of cold snaps early on and not much rain so the colors were gorgeous (prettiest I can remember in over 20 years of living out west) and wonderfully dry, which makes it easier to rake them and bag them. This is the second year we've had a sign out front welcoming leaf-donations and the locals are definitely catching on. Hardly a day goes by without at least several bags showing up under our big Hickory tree. 

It's a real "win-win" as neighbors have a free, local place to bring their leaves (which they would otherwise need to burn, compost or take to the land-fill). We recycle the leaf-bags by hanging them in our greenhouses to dry and re-bundling them in packets of six which we offer free to folks in a trash can out front, saving people money from buying new ones and helping to reduce the purchase of single-use plastic.

Leaves in greenhouse paths.
The gardens benefit from having a free source of fertilizer - whether added to our compost bins, the paths of our greenhouses or directly mulching the garden-beds over the winter.

About a month ago, a local reporter offered to write an article about using leaves in one's landscape or garden and she included info about the Sharing Garden's leaf-collection program. Here is Edie's article re-printed with permission from the Tribune News (where it was first published).

By Edie Moro

The trees are beautiful in the fall with their shades of red, orange and burnt yellow. Then, the leaves are shed and the trees are bare. What do you do with the leaves?
 
Homeowners may want to make use of their bounty of leaves in their own gardens. Spread the leaves in a layer on the lawn and run a lawnmower over them several times. This chops up the leaves and adds grass clippings, which may then be spread over garden beds and under shrubs. Keep the chopped leaves away from the base of shrubs or trees where they could hide voles and other rodents that may chew on the bark.

Mowing leaves to use as mulch.
Also, for rhododendrons and azaleas, spread a light layer, no more than one or two inches, over their root zone. These shrubs are shallow-rooted and need access to oxygen. Piling mulch and clippings too deeply around these plants has been known to smother and kill them – called “death by volcano.”

Even easier - homeowners may want to just mow the leaves and let them melt into the lawn over the winter. It is a great, economical way to feed the lawn.

Sharing Gardens in Monroe would love your leaves. They use them to cover large areas of the gardens so they have time over the winter to compost and feed the worms and other soil-organisms and suppress weeds. The garden has stopped using animal manures as a source of soil fertility, and have turned to leaves, grass-clippings, wood-ash and coffee grounds as a replacement (see links below for more info).

Llyn Peabody and Chris Burns are the Sharing Gardens coordinators. They write a blog about the garden at www.thesharinggardens.blogspot.com/, which includes gardening information, recipes and other "homesteading" info. 

Llyn explains the need for the leaves, “There is a saying that, 'for every calorie you harvest out of a farm or garden, you must put at least a calorie back in'. In a typical year we harvest and share over six-thousand pounds of produce. We have to replenish a huge amount of organic-matter so our soils don't get depleted!”

Neighbors bring us grass!
The garden will accept most bagged leaves and grass clippings, with the following exceptions: “no animal waste, trash or sticks/branches, no holly or roses (too sharp), or black walnut leaves (they can kill plants). Also do not include diseased or insect-laden plant material. Just leaves and grass.

Sharing Gardens is located at 664 Orchard Street, Monroe, Oregon 97456, where there is a bright yellow house behind the Methodist Church. The coordinators ask people to leave the bags in a pile under the big, hickory tree at the back of the church parking lot. There are free previously-used lawn/leaf bags available in a trash-can underneath the hickory tree. The coordinators ask that bags be filled not too full and only lightly tied so that they may be re-used.

Thank you Edie and thank you to all the new and returning leaf-donors from this year! 
Gratitude for garden support!
For info on using leaves and grass clippings for fertility in your garden, CLICK HERE.

Leaves to mulch the gardens in winter.
For info about using wood-ashes and coffee grounds for fertility, CLICK HERE.

Adding wood ashes (and coffee grounds) for fertilizer.
For info about making your own potting mix (soil) in your greenhouse paths - using worms, CLICK HERE
Grass-clippings in our greenhouse paths.

The Sharing Gardens is a registered non-profit and tax-exempt organization. We exist entirely through donations. If you have found benefit from our project or our site, please consider making a small donation through PayPal. (Click button below.)