A unique and viable approach to establishing local food self-reliance and building stronger communities.

Friday, September 5, 2025

Grow your own Sorghum for grain and flour

Small-Scale Grain Production and Processing

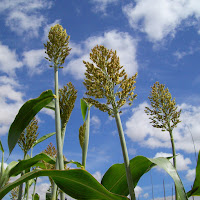
 (Re-published from Sept. 2024) For the past few years, the Sharing Gardens have been growing sorghum, amaranth and corn to process and use in baking, and breakfast cereals. This post is specifically about growing, processing and storing sorghum on a small-scale. (Image left: Kassaby sorghum ripening.) To read about growing blue corn, and for other relevant LINKS, see below.

Rook and Chris harvesting Ba Ye Ki sorghum.
Sorghum is a highly nutritious grain. We live in USDA zone 8B, with relatively mild winters and a long enough growing season to ripen the types of sorghum listed below. We mainly use the grain, ground for hot breakfast cereal but sorghum, when ground finely, can be used in recipes for baked goods as well. It contains no gluten so it is appropriate for those on gluten-free diets. 7 Surprising Benefits of Sorghum, Are There Health Benefits to Eating Sorghum?.

Though sorghum has no gluten, when mixed with wheat flour, it still makes wonderful baked goods. Here it is with a Whole Grain No-knead Bread recipe we've made.

Growing conditions needed:
Sorghum grows to various heights (up to 12 feet!). The plant, in early stages, looks very similar to corn. We have experimented with two varieties, Ba Ye Ki and Kassaby. (Ba Ye Qi Grain Sorghum, Ba Yi Qi Grain Sorghum (Milo) and Kassaby Sorghum - description). Ba Ye Ki is a very short-season grain so we're almost guaranteed a ripe harvest but it is also much less sweet than Kassaby - whose canes have been compared in flavor to sugar cane. Ba Ye Ki is shorter in height (6'-7') vs. Kassaby which can grow to 12'. Because of Kassaby's greater height and its higher sugar content, it also requires a longer growing season. Both can grow in moderately rich soil but do require regular, moderate irrigation to really thrive (though I'm sure that people who have experience at dry-land farming could achieve success with less, or no watering, we have not developed that capacity on our farm).
Ba-Ye-Qi Sorghum - Annapolis Seeds - Nova Scotia Canada
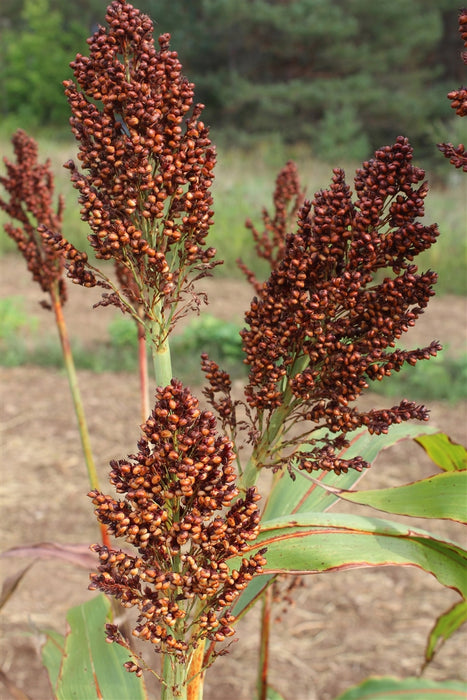
Ba Ye Ki sorghum: a shorter crop (5'-7') and shorter season grain. Not as sweet... (pic credit: https://annapolisseeds.com/products/ba-ye-qi-sorghum)

...as Kassaby sorghum: taller (9'-12'), longer season, sweeter. Stalks can be pressed for syrup (though we've never tried it). (Image credit: https://store.experimentalfarmnetwork.org/products/kassaby-sorghum)

Trellising: We have grown both varieties with, and without trellising. Kassaby - the taller variety has a sturdier stalk and seems to do fine without trellising. Ba Ye Ki, which produces grain faster, puts less energy into stalk formation and, in our experience, is prone to lodging. This can be mitigated somewhat by growing it in multiple rows or blocks of grain, with approximately 6" between plants in all directions. The plants will tend to hold each other up. 

If you only have space for a single row, the type of trellising shown above will work. Strong cable/wire is stretched taught between 10' T-posts. In the picture, we've attached bamboo uprights for pole beans to climb on.Sorghum doesn't need the bamboo uprights, it just needs to be attached to the trellis once it reaches the height where it starts to "lodge" or fall over.

Another trellising idea is to plant your grains inside a wire cage (6" between each plant, in each direction). The cage will keep them from lodging. This works for fava beans too!

Sorghum is largely self-pollinated (each plant can pollinate itself) but plants can also cross-pollinate through wind or insects transferring pollen between plants. Growing multiple plants in rows or blocks will aid in cross-pollination. Also, when laying out your garden plan, keep in mind the height of the variety you are growing so they don't block smaller plants of sunlight and water as they grow in height. (Though you can use their height to your advantage if you want to grow a shade-loving crop like lettuce, on the north or east side, to protect it from the most intense afternoon sun.)

Sorghum grows much like corn though it is "self-fertile" and relies less on wind than corn for full pollination. Kassaby sorghum is the tall, whiteish fronds to the left of Darlene while Golden Bantam corn is growing to her right.

Starting sorghum from seed: We have used two different methods for germinating sorghum seeds. The easiest method is to prepare the ground to be as weed-free as possible and scatter the seed lightly; gently covering the seed by raking or a very shallow tilling, so the seed is barely covered with soil. Later, once the sprouts have come up to 3" or 4", plants should be thinned to 6" apart. 

We've had good luck with direct-sowing our sorghum and shallowly tilling it under so it's just barely covered with soil. A good rule of thumb is to plant seeds twice the depth of the seed at its widest point.

The down-side to the scatter method is that some varieties need a long season to ripen (Kassaby variety needs 110 days, minimum) so, if you're having a cool, wet spring and can't direct sow till late in the spring, you may wish to germinate the seeds in small pots in a greenhouse or grow-tunnel and transplant them once the ground warms up/drys out. We use jumbo six-packs, or the shallow, plastic containers that our favorite tofu comes in (with holes drilled in the bottom for drainage). To germinate in pots: we fill the pots with soil, water them and then make a small indentation with our thumb so the seeds will settle in these depressions (six per tofu pack). We then place 2-3 seeds in each cell to maximize germination. Once the seedlings are about 3" high, we thin them to one per cell. 

If you try to grow them in a clusters of 2-3 plants, none of them will mature well as they compete for nutrients, water and sunlight. We have had success at teasing the individual sprouts apart at this stage and replanting them in their own cells. It just depends on if your supply of seed is limited so you need to make every seedling count and how much time you have to do this.

Sorghum plants started in 'jumbo six-packs'. We sow 2-3 seeds in each cell and then thin to a single stalk, otherwise the plants compete for nutrients and light when they're transplanted to the field. Singles are on the left; the plants on the right have yet to be thinned to one plant per cell.
Summer growth and maintenance: Irrigate the soil only as needed. Deeper, less frequent watering will encourage the roots to grow deep, pursuing the water-table and thus being more resilient to hot and dry periods and less likely to lodge (fall over) in the wind. Keep the bed as weed-free as possible till your plants are well-established. After that, they should be able to out-compete most weeds. 

When to harvest: It's important to let your sorghum ripen as much as possible before harvesting. The seeds will be sweeter, and easier to thresh (remove) from the plant, the riper they are. On the other hand, autumn rains, if they aren't followed by strong sunny periods can lead to mold forming in the seed-heads. We start checking our crops for ripeness in mid-September. The Ba Ye Ki will darken to a strong russet/red. The Kassaby will become notably whiter as it ripens.

We usually harvest the seed-heads over a span of several weeks. We use pruners to cut off ripe seed-heads with 8-10 inches of stalk still attached. This helps in the drying out process; the stalks draw moisture from the seed-heads as they dry. Having the long stalk also gives you something to hold onto for the threshing phase.

Kassaby, long-season sorghum (tall and sweet) while it's still ripening. Kernels become a pearly white when they are ripe.
Kassaby sorghum in baskets for drying (with one, red Ba Ye Qi seed-head on the right). We cut it with 8" - 10" stalks which helps it dry down (the stalk pulls out moisture from the kernels) and this gives us something to hold onto for combing the kernels off the stalk (see below).
 
Ba ye Ki sorghum, laid out in cardboard boxes in our greenhouse while days are still sunny, warm and humidity is low. These aren't as red as they should be for ideal ripeness. Our season was cut short that year by cold, heavy rains. The sorghum was still edible; just not as sweet and it was harder to thresh as well.

If we're having mostly sunny days with only moderate humidity, we lay the seed-heads on cardboard trays in our greenhouse to dry. If skies are overcast and the humidity is high, we put them in cardboard trays or baskets and bring them in the house. We heat our house with wood and have shelves all around the upper walls of our living room where our wood stove is, for the purpose of drying foods in the fall. Many fall mornings we'll start a small fire in the wood stove just to dry the air in our house and bring the temperature up slightly. Even if we have to open the windows later in the day (because outside temps have climbed) it's worth the few sticks of firewood to keep the drying process progressing.

As temperatures drop and humidity rises in the autumn, we bring our bean and grain crops inside and dry them in baskets and boxes on shelves above our wood stove. It's super important to make sure these crops are very dry. We've lost previous batches to mold that formed after we put the grains or beans into storage containers for the winter.

Threshing the sorghum: We've tried several methods over the years to remove the grain from the stalks but this year Chris came up with our best method yet! He attached a metal pet-grooming-brush/comb to a 2' x 4' board (see pic). This is placed in a deep plastic tote to catch the seed as it falls. The seed-head is combed through the tines of the comb which causes the seeds to release and fall into the tote below.

This year, Chris built two new tools for processing the sorghum. Sifter, on the left, and a pet-comb attached to a 2'x4', for teasing the grain off of the stalk (right).

Close-up of the tool we use to thresh the grain from the stalk. It's a pet-comb we found at a 2nd-hand store, bolted to a 2'x4' board.
Close-up of pulling the grain-heads across the comb. This is why we always cut the grain-heads leaving several inches of stalk for use as a handle.
 
Sifting: The next stage is to sift the seeds through a wire mesh with 1/4" sized holes. (This wire mesh is called "hardware cloth" in the USA). Chris made a framework that's the same size as the tote we're sifting into and solidly attached the mesh to its bottom edge. The grain is poured into the top and rubbed vigorously through the screen. The seeds fall through and (most) of the longer stems and chaff remain on the top of the screen.

After the grain is teased from the stalk, it is vigorously rubbed through a screen with 1/4" holes. This breaks up the clumps of grains into individual pieces and removes much of the chaff which remains on the screen.

Winnowing:
There will still be some fiber that makes it through the screen so, on a day with a mildly steady wind (or standing in front of a box-fan) pour the grain back and forth from one container to an other. You will have to experiment to find the right height from which to drop the grain and, if using a fan, how far from the front of the fan to pour the grain. It's helpful if your containers are lightweight (so it's easy to pour them when full of grain) and with a wide surface area so that, as the grain falls straight down, it's not bouncing off the rim of the receiving container. The grain will fall straight into the container below and the chaff will be blown away by the wind. 
 
Repeatedly pour the grain back and forth between your two pans until you've achieved results you're satisfied with. There's no need for you to winnow out all the chaff. Just do the best you can. Any un-removed chaff will float in the cooking water if you cook it whole and can be scooped or poured off before you cook it or, if you're grinding cereal or flour, will be ground along with the seed and just provide some extra fiber to your diet!

We winnow the grain, separating the remainder of the chaff (or at least most of it) by pouring it from one container to the other multiple times on a mildly windy day (or in front of a fan). The heavier grain drops into the container below while the chaff blows away.
Drying: As our sorghum seed progresses through these phases of threshing, sifting and winnowing, we put it back into a warm, dry place between each step to keep it from absorbing more moisture. At the end of all these steps we put it into cardboard flats, or shallow pans (to give the maximum surface area) and keep it on our drying shelves until we are absolutely certain it is completely dry. Grains that are stored moist, can end up molding in your pantry and be ruined.

Here's a top view of sorghum heads drying in a basket.
Grinding: Though we've seen recipes for cooking sorghum while still whole (How To Cook Wholegrain Sorghum) we've always used ours in a ground form: either coarsely ground for cereal, or finely ground for flour to use in baked goods. It adds a sweet, almost nutty taste to our hot cereal mix. We use a Diamant grain mill that Chris hooked up to an old motor with a clothes-dryer belt. This greatly speeds up the process of grinding - though if we ever lost electricity for an extended period, we can easily convert it back to being hand-ground.

Chris hooked up our Diamant grain mill to an electric motor so we're able to efficiently grind enough grain for our own use as well as to share with our volunteers.

Course ground sorghum for use in hot cereal.
We hope this tutorial has been helpful and inspires you to begin growing sorghum yourself. Please post your questions and comments below so we can all benefit from them.
 
Seed Saving: Save the ripest, driest grains/seeds for future plantings. One seed-head has enough seeds  for most small-scale grain growers, with enough to share with other growers in your area!

  Here is the post we wrote about growing and processing your own blue corn
  for drying and grinding. These methods also work for growing/processing 
 Golden Bantam and other varieties of corn. Grow Your Own 'Blue Corn' 
 
 And here's a recipe we've developed to make a Crumb-Free, Whole-Grain Cornbread  (just substitute sorghum flour in a 1:1 ratio with the corn flour in the recipe).
 
If you'd like to try popping sorghum (like popcorn), Click here: How to Make Perfectly Popped Sorghum (3 Min Recipe) or, if you're more visually oriented, here's a video: How to Pop Grain Sorghum Seeds Like Popcorn with Oil
 
Here is an excellent video about making sorghum syrup from the canes: Making Sorghum Syrup! Best Crop For A Self Sufficient Homestead!

Growing grains as a community makes the task of processing it much less daunting. Here, Jessie and Llyn are husking the corn in preparation for shucking and further drying.


Thursday, September 4, 2025

Grow Your Own Protein - Scarlet Runner Beans

by Chris Burns
Just like snow flakes, you'll never find two that look exactly alike,  attesting to Nature's infinite variety of expression!
Have you ever seen these beautiful beans for sale at any market?  Would you even know what they were if I didn't tell you?  Don't they look like some kind of 'Magic Bean' that Jack of 'The Beanstalk' fame might have planted?  If you haven't guessed by now, I'll tell you. They're Scarlet Runner Beans and they're called that for two good reasons.  One, they have the most intensely scarlet red flowers, and Two, they 'run' up any pole, tree, fence or trellis that happens to be close to where they are growing.  If you've never grown them then maybe it's time to consider giving them a place in your garden.

I've grown them many times before, but up until recently I always considered them to be strictly 'ornamental'.  Don't know why!  Perhaps it's because they were described that way in the catalog from which I ordered my first seeds.  As you can see in the pictures posted with this article, they add exquisite beauty to any garden patch. It wasn't until 2011 that I sampled them as cooked, dried beans and discovered their beauty is only rivaled by their delicious flavor!
Scarlet Runners vining up the bamboo trellis. We grew a 70-foot row last year and are doubling it in the 2013 season.
These beauties grow steadily to a dramatic height of 10-12 feet (or more) and need a sturdy trellis of some sort to support the weight of their generous profusion of bean pods (we used bamboo poles tied to a wire pulled taught between t-posts). For those who enjoy attracting pollinators to your garden, you'll likely find (as we did) that the flowers regularly attract hummingbirds and many beneficial insects. (If you have cats, best not to grow the runners as we've heard sad tales of hummingbirds being caught and killed by those furry, domestic predators).

Bean-trellis made with bamboo poles wired to a cable.
Scarlet Runner Beans will grow in a greenhouse too. Just be sure to leave enough vents open to allow pollinators to come and go.
Plant beans 4"-6" apart and 1"- deep. Soil can be course and should stay moist but not too wet as seeds germinate. Often we will pre-sprout the seeds by keeping them between wet towels for several days till they germinate. Be very careful when planting as the sprouts are fragile.
The pods are deliciously sweet when they are young and tender (about 3-4 inches long).  So sweet, in fact that it was the first thing our two teen-age garden-helpers would seek out and munch on whenever they came to the gardens.

Bean pod-loving teens!
If it's mainly green beans that you're looking for though, it's probably best to grow another variety like 'Blue Lake' or 'Contender' which provide you with more of a volume at each picking.  These Scarlet Runners tend to produce pods steadily over a longer season but they become tough and stringy if they aren't picked on the small side.  The reason they probably aren't grown commercially for dried beans is that they must be hand-picked. At the Sharing Gardens we've turned this limitation into an asset as the weekly bean-picking was a task that folks with back and knee-issues could accomplish easily standing up. After a few days laid out on screens in the greenhouse the husks were dry enough to split open easily by hand. This was a task that many volunteers (share-givers), who weren't able to do more strenuous tasks, found fun and relaxing; it also provided an opportunity to sit in the shade and chat with new found friends.

Pods, any bigger than this and they're too tough to eat green.
If it's dried beans you want, don't pick the pods until they are evenly tan and dry. If picked too green, beans won't store well, nor will they be viable for planting next year's crop. Once the frost hits, beans will no longer ripen much more. Pull up the whole vine and let the beans finish ripening in a green-house or warm, dry place before picking them off the vines. When they are as dry as they're going to get, shell these partially ripe beans and use them first as they won't store as well as fully cured beans.

These beautiful beans are rather large --about the size of a fat Lima bean-- and therefore yield enough to make a pot of soup-beans in a short time. If you're serious about growing your own protein-source, Scarlet Runners make an excellent choice.
Harvest beans once their pods are tan and dry. OSU-students shelling Scarlet Runner Beans.


Shelling beans from their pods is a fun activity for all! Jim and Adri shelling kidney beans.
But the best kept secret of all is just how delicious the dried beans are. They have a mild flavor and, unlike Fava beans, their skin is thin (not even noticeable) and they have a velvety texture.

A bamboo tipi provides a trellis for beans and beautifully frames our garden helpers.
Recipe: To cook these beans for eating, soak them over night just like you would any other, with about 1/3 beans to 2/3 water in a stainless or cast iron pot.  Pour off the water the next day; rinse the beans with fresh water and put them back in the pot. Add fresh water until the level is about 2-3 inches over the beans.  Don't add any salt because it won't allow the beans to absorb the water as they cook and they'll never soften.  I like to cook them on the woodstove in the winter.   These beans stay very firm when they're finished cooking but can be easily mashed and used as refries, or made into a hearty chile with tomatoes, onions, peppers and Mexican spices.  I cook up a large pot at a time and, once rinsed and cooled, I pack them into smaller zip-lock bags which I stack in the freezer to add to stir-fried kale and leeks with potatoes all winter long. Instant dinner!

Be creative! Sometimes just a plain ole' bowl of beans with olive oil, soy sauce, finely chopped onions and grated cheese is all you need to get you in the mood to go outside and brave the winter elements.

Such beauty!
Anyway, if you want to enjoy these wonderful and versatile garden gems, the time to plant is coming up soon! (late May or first week of June in our region)  If any of our local readers need seed  please let us know and we'll get you started, and you can save your own for next year.  Happy Gardening!
 
Update June 2022: Since originally writing this post, we've discovered another bean we love that's also in the "runner" family: Giant Greek White Beans. They have a white flower and produce a white bean that's even larger than the Scarlet runners. Though each bean is typically larger, the plants themselves don't seem to be quite as productive. We didn't realize the varieties would cross so now, sometimes when we plant a purple, Scarlet runner seed, it produces white flowers and beans!
This tipi is covered in Giant Greek White beans.


Wednesday, September 3, 2025

Amazing Quince! - Sugar-free Recipe

Update - Oct. 2024: We've been continuing with our experiments with quince recipes and learned a few things. Rather than re-write the post, we've added an addendum at the end. Also, please read the comments for info offered by fellow readers. Enjoy!

Hi folks - We've just made an amazing discovery. We love quince! When prepared as the recipe outlines below, quince tastes like a pear/lemon fruit with a hint of peach and rose-oil! Ambrosia!

This has been one of our most beautiful autumn seasons on memory! Pictured is the back of our 1875 Farmhouse, the yellow, shag-bark hickory tree (on the right) and a rainbow in-between. (October 2019)
Every year, about this time, one of the Monroe "locals" drops off two or three HUGE boxes of quince at our local Food Pantry. The quince usually sit on the shelves, for a month or more, with a sign that says "Take as many as you as you can use," but very few people take any, including us. Eventually the Pantry folks get tired of looking at them and they end up in the Sharing Gardens compost pile.

Quince after harvest. Photo credit: LINK
We've been reluctant to try them because they're so darn hard to cut open which makes them seem like a real pain to prepare. Also, they are very tart when they're raw and every recipe we'd heard of called for lots of sugar. We're always trying to find ways to limit our sugar intake, not add to it! So, until we discovered the joys of quince, we just figured our compost piles were going to have a nice big influx of worm-food in a month or two.

That is, until I (Llyn) looked up their nutritional content and Chris and I were pretty impressed - particularly as a good source of zinc and copper. Minerals are often the most difficult nutrients to get enough of in our modern diets. Most farm soils are increasingly depleted and, unless you're getting your food from an organic farmer who replenishes those minerals in natural ways that the plants can absorb, (like wood ash - LINK) it may be difficult to get enough minerals from your diet without taking any vitamin supplements (which we don't). Quince are also low-calorie, high in anti-oxidants and great for digestion (their natural pectin is soothing to the gut!). Who knew? LINK

While I was browsing for more general info about the quince, I found a recipe that suggested boiling them for 8-10 min before baking them and then my cooking creativity kicked in and I came up with the recipe below. I've made it twice so I'm still fine-tuning it (so check back for updates!) But the best thing is, this recipe calls for no refined cane sugar (just maple-syrup, and not much of that) and is easy to prepare.

Pears (on left). Whole, boiled quince (in bowl). Quartered quince (below) - this picture was taken before I figured out how to cut fruit away from core (see below).
The Recipe:

4-6 medium-sized quince (about 5 cups)
4-5 medium yellow pears (about 3 cups) (or sweet apples)
1/3 cup maple syrup (about 1 TBSP maple syrup per cup of quince)
1 TBSP lemon juice (don't over-do the lemon, as quince is plenty tart already!)
1 tsp cinnamon

Choose uniformly yellow, fully ripe fruit without bruises or other damage. It helps if they are a uniform size (for boiling phase).

Bring a pan of water to boil - deep enough to mostly cover the quince.
Using your bare hands, run the quince under water and rub as much of the fuzz off as you can (don't worry if you miss some).

Place in boiling water for 8-10 minutes, depending on size. I think I over-did it the second time I made this. I was trying to soften the fruit all the way through but the core remained quite hard, even with longer boiling and the second time the outer fruit got rather mushy.

Lift the quince out of the boiling water and allow to cool.

Preheat oven to 375 degrees. Grease a baking dish with coconut oil or butter.
Combine ingredients for sauce in a measuring cup with a lip for pouring.

Once cool, using a cutting board, cut off any brown spots or other blemishes on the fruit.
Slice the remaining fruit away from the core in as big pieces as possible (see picture). Your knife won't want to go through the core at all. It's super-hard! Just keep shaving off pieces all the way around the core till you've gotten as much as is easy.

Cut fruit away from the hard core.
Cut the fruit into bite-sized pieces.
Wash and core the pears. Cut into bite-sized pieces.
Mix the fruit together by layering it into the baking pan.
Drizzle the sauce over top of the fruit. Gently stir the fruit and sauce together to spread sauce evenly.

Quince, pears and sauce - before baking.
Use a pan with a lid, or cover with aluminum-foil.
Bake for forty-minutes covered (or until juices are boiling).
Take out, gently fold the fruit and sauce together so the fruit at the top gets re-sauced.
Leave cover off and bake for 10 more minutes to lightly caramelize the top.

After baking. Yum!
We like ours chilled with a scoop of organic low-fat, plain yogurt and some organic, lightly sweetened shredded-wheat cereal crushed on top.
We'll keep experimenting...seems like raisins or date-pieces would be good raw or cooked in with the fruit. Also, some crushed walnuts or granola might be good too.

A Quince Essential Fruit - here's a fun post that gives more details about this unique fruit including growing tips.

Let us know of your discoveries/variations in the comments below.

Addendum: We've discovered that, at least with our quince, we can skip the boiling stage of the recipe. The core of quince is so hard that even boiling doesn't soften it but by shaving pieces off and then cutting these pieces into bite-sized pieces, we've found we can skip the boiling phase of the recipe outlined above. Don't know if all varieties of quince are soft enough to do this...

Monday, September 1, 2025

'Nooks and Crannies' hot breakfast cereal RECIPE

We get feedback sometimes that our posts are too garden-specific and, for people who aren't gardeners they wonder what they can do to live a healthier, more sustainable lifestyle. Well, here's a recipe for the hot cereal mix that we eat almost every morning.

We named the cereal mix 'Nooks and Crannies' because it seems to meet so many of our nutritional needs. After a bowl of it we feel incredibly sated and it gives us slow-burning fuel that lasts the morning. Our philosophy is to try and get as many nutrients (and as few toxins!) from the food we eat so we lean towards whole foods with the least amount of processing. We mainly buy organically grown foods and everything we grow is, of course, also organic. We also try to eat a variety of foods so that the micro-nutrients that are low in one food might be filled in by eating something else. (LINK: Why We Grow and Eat "Organic" Food )

This post contains the recipe for making 'Nooks and Crannies' cereal, including a list of ingredients (all 31 of them!) followed by instructions for making your own pre-ground seed/nut mix. Enjoy!

Kassaby sorghum - sweet and nutty in flavor. (LINK: Grow your own Sorghum for grain and flour )

Honestly, the recipe for making the cereal itself isn't much different from what most people make and eat: grainsand dried fruit.  What really sets Nooks and Crannies apart are the variety of the ingredients and the toppings we add after the cereal is cooked.  Here is the basic recipe for the grain-base of the cereal followed by ideas to make your experience truly deluxe! 

Basic cooking recipe: 1-part grains; 1-part fruit/nuts to 2-parts water  

For two of us, we use:
Rounded 1/3 cup of the corn/sorghum mix (recipe below)
Rounded 1/3 cup rolled oats (kept separate in their own air-tight jar)
dried or frozen fruit/whole nuts (about 1/2 cup) (ideas below)
pinch of salt

Mix grains, fruits, nuts and salt in a saucepan.
Heat water (about 2 cups) and pour onto cereal. Stir.
Simmer on very low heat.
Add more hot water as needed as you simmer.
Dish up, Add Nooks and Crannies special toppings (listed below). Serve.

Sorghum drying. We grow our own, dry it and grind it for cereal and baking.

The key to swift morning prep-time is to have some of the ingredients pre-ground and pre-mixed  - the grain mix and the seed/nut mix (see below). This makes the daily prep much faster as we just need a scoop or spoonful of each.

We have all the ingredients stored close together in jars with lids so I can just open each one and add a handful to the pot. The frozen fruits are also kept in jars; I just find it easier to open and close a jar than to mess with freezer bags (that zip closed) or twist-ties (which aren't air-tight).

So I go down the line of jars and add everything to the pot. The only thing I actually use a measuring cup for is the grain-mix (corn and sorghum) and the oats. Everything else I just scoop out little (or big!) handfuls with my hands. You'll find what works best for you.

If time is an issue in your morning routine, pre-soak the grains and fruit overnight and add some hot water in the morning and simmer till done.

Other goodies to cook into cereal: I add a selection of dried/frozen fruits, nuts and other goodies before cooking...(about 1/2 cup total). (left: home-grown grapes before freezing).

Choose from:

dried shredded coconut - just a small handful
cacao nibs -  they're a bit bitter but highly nutritious so I just put about 1 rounded teaspoon per double person serving.
frozen blueberries, grapes or strawberries -  sweet goodness!
 
Dried fruit: There are so many delicious ones to choose from. Mix and match your favorite combo!
raisins, pears, figs and/or:
    dried date pieces coated in oat flour - (these are found in the bulk section)
    prunes - I read somewhere that a few of these a day is especially good for bone density...We all know the other health benefit their known for...regularity!
dried bananas  - Sometimes bananas will be sold at a huge discount if they become too ripe so we dehydrate a bunch of them for later use.  
Nuts: Nuts and seeds are a great source of protein, fiber and many essential minerals. We grind many seeds to use as toppings (see below) but like to add whole walnuts while the cereal is cooking.
Frozen strawberries from our garden. We lay them on a tray to freeze them before bagging so they don't clump together.
Nooks and Crannies special toppings: These are all added after cooking (to preserve their maximal nutritional value).  After cooking, we scoop the the cereal into bowls and add toppings to make the cereal extra satisfying. Again, these are all stored in jars close to the stove; each with their own little scoop or measuring spoon so we can swiftly add the ones chosen for the day.

- pre-ground seed and nut mix - our current mix contains nine ingredients - all organically grown seeds and nuts. We pre-grind and pre-mix it so, at the time of making the cereal, we just put a TBSP on each serving of cereal (to make your own, see below).
- dried and powdered turmeric - scant 1/8 tsp. - this is purported to provide anti-inflammatory relief (and a host of other benefits). We bought a big bag of it when we found it on sale but then found that its flavor got in the way of us using it regularly. By adding just this tiny amount to our cereal, it doesn't affect the flavor and we figure that having a tiny bit each day is better than none at all.
- dried and powdered lion's mane mushrooms - scant 1/8 tsp. - though not as strong flavored as the turmeric and touted as having equally impressive health benefits (particularly for the neurological system) we just weren't eating it! So, now we get a little bit almost daily with our cereal.
- powdered cacao powder: about 1/2 tsp. High in anti-oxidants; gives a mild cocoa flavor to the cereal
- powdered, buffered vitamin C (in the citrate form): about 1/4 tsp. Adds a tart, fruit-like taste and valuable nutrition. Vit. C is heat-sensitive so I always add it at the end with the the non-dairy 'milk' to minimize loss of potency.
- dried coconut flour - 1 rounded tsp per serving - adds sweetness and protein (very concentrated; a little goes a long way!)
- maple syrup - for many people, the dried fruit will make your cereal plenty sweet but we still like to add maple syrup after cooking
- soy milk and/or nut milk - we've gone through phases of making our own but can't seem to use it fast enough to balance out the hassle of prep-time. It's frustrating when it spoils before we use it up and we have to throw some of it away. So for now, we settle for commercial soy and nut milks.

One of the unusual ingredients we add to our cereal is dried Lion's Mane mushroom. LINK: Health Benefits of Lion's Mane)

Recipe for Pre-ground seed mix: (Added after the grains and fruits are cooked - 1 TBSP per serving) As mentioned above, we save on morning prep-time by having the following ingredients pre-ground and mixed

Seeds are incredibly nutrient-dense. They need to be as they hold everything the little plant needs to get started in life! Be sure and consume only organically grown seeds...Better for you; better for the Earth.

We use an electric coffee-grinder to grind the seeds. We have one that is specifically dedicated to this so it doesn't pick up the taste of coffee. Of the following list, the only thing we grow ourselves are the two kinds of amaranth (Right: Llyn with Hopi Red Dye Amaranth). Everything else is store-bought. We buy them in bulk. As you'll see, almost half the mix is composed of flax seeds.

A tip for grinding:
Measure out all the seeds and combine in a bowl or large measuring cup. Mix them well and scoop out the amount that fits in your grinder. Grind, and pour into another bowl. Scoop more/grind/pour etc. By mixing the flax seeds in with the other seeds the grinder won't get as bogged down with the seeds that are high in oils (especially sesame seeds). Store in airtight containers in your fridge or freezer. Freeze all but a small jar of it to keep it fresh). Seeds (and nuts), once ground can lose a lot of their nutrients quickly if exposed to air or heat.

Here's the combo of seeds we use:

4 parts flax seeds -  We love their flavor; they're great for digestion and give a sense of bulk/fluff to the cereal. Here's a LINK explaining many of Flax seed's health benefits.
2 parts pumpkin seeds - raw, unsalted
2 parts sunflower seeds - raw, unsalted
1 part sesame seeds - we use the brown ones as they've not had their hulls removed so they are more nutritious than the white ones
1 part hemp hearts - these are soft, inner parts of the hemp seeds after removing the outer shell/hull - highly nutritious. (Be sure to get the hulled seeds as those that still have their seed coating are a bit bitter. LINK)
1 part chia seeds
1/2 part poppy seeds
1/2 part Golden Amaranth - we grow this ourselves - sweet and nutty flavored
1/2 part Hopi Red Dye amaranth - this doesn't taste as sweet as the Golden amaranth but it volunteers all over our garden so we might as well harvest, dry it and eat it!

Llyn with dried blue corn, before grinding

Corn and Sorghum Grain mix:

We grow, process and grind the blue corn, yellow corn and sorghum ourselves. We grind them courser than a flour...more like a "meal" (we like the texture and at this level of coarseness it doesn't take too long to cook). If you aren't able to grow your own, purchase them from the bulk-foods section. Use a courser grind (corn meal instead of corn flour).

This mix forms the foundation for Nooks and Crannies and is cooked with rolled oats and dried fruit). (right: Daimant grain mill we use to grind our corn and sorghum)

Basic pre-mixed grain recipe:
2 parts ground blue corn - (higher in protein than yellow corn meal; turns your cereal a delightful purple!) (LINK: Grow Your Own 'Blue Corn' )
2 parts ground yellow corn
1 part Kassaby sorghum* - sweet, long-season sorghum
1 part BaYeKi sorghum* - not as sweet; used primarily for baking (LINK: Grow your own Sorghum for grain and flour)

Combine these ingredients together and keep in an airtight container. Keep some handy on the counter to make your morning cereal and store the surplus in an airtight container in your fridge.
*Sorghum is a high-protein, gluten-free grain. If you can't find it, just use corn meal: equal parts blue and yellow, coarsely ground.

This post isn't meant to suggest a rigid rule for making 'Nooks and Crannies' but to inspire you in your own breakfast cereal creations. Enjoy!