A unique and viable approach to establishing local food self-reliance and building stronger communities.

Sunday, September 7, 2025

Grow Your Own 'Blue Corn'

Jim husks blue corn.
Part of becoming more self-sufficient has been to grow our own corn-meal. We chose an heirloom-variety of blue corn called Hooker's Blue because it's easy to grow, has high yields and makes delicious corn-meal that can be used as hot cereal, and in baked goods such as corn bread and pancake mix.

Our first corn crop was in the summer of 2015. We'd been given a small, shriveled ear at a seed-swap. The corn was already two years old and, since corn seed degrades faster than most, we weren't sure how viable it would be. In this case we pre-sprouted it and only planted seeds that germinated. Our young friend Serenity patiently and diligently planted the corn in cultivated soil -- 5" apart and 1" down, gently covering the seeds with soil as she went.

This is the cob-size we used to start our first crop of Hooker's Blue corn, which we grew out and re-planted as seed. Just two years later, our harvest is enough to feed Chris and I for a year with  enough surplus to share with the garden-families who help us (at least 10-gallons of shucked corn! This was from four, sixty-foot rows.)
We have a lot of blue-jays in our neighborhood, and some crows - both who love corn! One year we planted corn, saw the new seedlings sprout above-ground in the afternoon -- a whole long, row of them, came back the next morning and discovered that each and every one had been dug up and eaten! So, to prevent this happening again we covered our newly planted corn with 'floating row cover' (brand-name: "Reemay") a synthetic, white cloth that lets rain and sunlight reach the plants but protects them from light frosts and hungry garden-creatures! Reemay must be pinned in place, or held down with bricks or stones. It can be left on till seedlings start pushing at it from below at which point it's unlikely that birds/animals will dig up and eat your plants.

Covered row cloth protects young crops from mild frosts and animals that might eat the tender, new plants. Remove once plants are pushing up on bottom of cloth. (Pic credit)
The soil we planted in was fairly poor and newly tilled so once the seedlings were a few inches above-ground, we gave them a thorough soaking with compost-tea.

Compost tea is steeped in large batches and then poured generously on crops to fertilize them.
That first year, our harvest was moderate but plenty for a large seed-crop to plant in our second year. Since we had plenty of fresh seed, we used a different method for planting. We prepared the ground by spreading a light sprinkling of wood-ash LINK. Chris tilled this into the soil as deep as the tiller would go. He then scattered a combination of corn seed and kidney bean seeds (a 'bush' variety that we dried and shelled for use in soups and chili). He then set the tiller to a very shallow setting - about 2", and tilled both varieties of seed into the ground. We then marked the row with string so no-one would walk on it and waited for the seedlings to emerge.

The orange string (around bed to left of hose) is used to mark newly planted soil so no one walks on it by accident.
Corn is typically a heavy-feeder (it needs rich, fertile soil). If your soil is depleted, your corn-crop will benefit from additional feeding as it grows. This past year, about mid-season, after a thorough weeding, we added a thick layer of partially composted leaves and grass-clippings around the base of the corn and bean plants. Then, whenever we watered, the plants were fed.

Shucking corn and shelling beans are a favorite autumn activity at the Sharing Gardens.
Corn is pollinated primarily by wind so it is best if you plant either multiple rows, near to each other, or wide-beds (the width of the tiller - as we did). If you are growing a small crop, planting it in a solid square, or block works well too. Since the beans and corn are both left till dry on the plant, you do not need access to the plants in the center of the patch during the growing season. (Note: Hooker's Blue corn is also quite tasty as a sweet-corn if you harvest it once kernels are fully formed but still soft and yellow. Cook as you would regular sweet-corn).

Hooker's Blue corn, though not very tall at full height (typically 4 to 4 and 1/2 feet) yields large harvests -- one to two 4"-6" ears per stalk. Here, students are mulching an adjacent bed with wheat straw.

In this picture, corn has finished ripening, and is partially drying on the stalk. Christie harvests the ears to be husked and further dried in our greenhouse.
Because we use the corn to make corn-meal, we leave it on the plants, in the field, till it is quite hard and has turned dark purple (almost black). We check it every few days by pressing a fingernail into the kernels of corn. It's done when you can no longer dent it with your nail. Ears of corn are then harvested, husked and left to dry on racks in our greenhouses. The dryer it is, the easier it is to remove the kernels from the cob (shucking). If Fall weather starts getting too damp for the corn to dry properly, we bring it inside and put it on shelves above our wood stove to finish the process.

Christie and Chelsea remove husks and lay cobs onto a drying table to continue to dry. Corn is easiest to remove from the cobs if it is dried well.
Shucking can be done simply by twisting the cobs in your hands to break loose the kernels (you might want to wear gloves!). If you have a lot of shucking to do, here's a simple tool Chris made that really speeds up the process!

Home-made corn-shucker. The cob is twisted against protruding screws.
Close-up of corn-shucker. Long screws are driven in from four sides leaving an interior hole ~ one-inch in diameter so cob fits but corn is rubbed off; wood is added at ends to prevent splitting and the handle makes it easier to use.
A tub of dried corn-kernels.
Lastly, be sure to store your corn in a cool place, in air-tight containers. Because of corn's high oil content it can go rancid; this ruins the flavor and makes it unhealthy to eat. Be sure to set aside enough seed for next year's crop. To ensure best viability, we freeze our corn-seed in air-tight containers.

Grinding corn: Obviously, if you're growing your own corn for grinding, you're going to need a grain-mill! After carefully comparing reviews of different brands and models, we chose to invest in a top-of-the line Diamant grain-mill. This is considered an 'heirloom' appliance in that, with proper care it will last for generations. Ours came with a handle for hand-grinding, can be hooked up to a bicycle for larger, human-powered batches or hooked up to a small motor (which is what we did) so we can grind large batches with ease. If the price-tag is prohibitive, consider purchasing one with your neighbors and setting it up in a central location for all to share.

Mill hooked up to motor for faster grinding. It comes with a handle, for hand-grinding and we also have seen instructions for hooking it up to a stationary bicycle.
Close-up view of Diamant grain-mill. The 'can' on top has an open bottom and allows us to pour more grain in at a time. The knob at left adjusts the fineness of the grind.
Close-up of mounted engine.
Variety we like: Hooker's Blue corn
Obtained from Native Americans in the Pacific NW (Washington state, USA) in the 1950's. It is an Heirloom, non-hybrid variety that will "grow-true" year-after-year so you can save your own seed.
Description: 75-80 days - to maturity. The 4-4 1/2 foot stalks produce 5-7 inch ears of some of the finest tasting corn. Ears typically have 10-12 rows of kernels that dry blue-black upon maturing - 1 or 2 ears per plant.
Why we like it: Does well in a cooler, damper climate. Because of its short-stalk, it won't 'lodge' (fall over) as taller varieties sometimes do. Grinds into the sweetest cornmeal! Can be as much as 30% higher in protein than regular 'sweet-corn' LINK-nutritional facts.

Another variety we like: Golden Bantam corn. This variety is typically grown as a sweet-corn and eaten fresh but we discovered that it can be dried on the cob and processed in the same way as the Hooker's Blue and makes a delicious, sweet corn-meal! It tends to grow on shorter stalks so is less likely to blow over than some other varieties and produces corn with an old-fashioned, buttery, sweet-corn flavor. It's delicious even raw, right off the stalk! Bantam is also an Heirloom/open-pollinated variety so you can save your own seed.
 
Saving seed:  Corn is notorious for cross-pollinating so, on years you are saving seed, you need to grow only a single variety or have multiple varieties grown quite distant from each other. Since corn is primarily wind-pollinated, grow the variety you wish to save seed from upwind (of your area's prevailing winds) to further minimize crossing.

Favorite recipes: Hooker's Blue corn is deliciously sweet and nutty-flavored. Here are some ideas for using it in recipes.

Hot cereal: Stir ground corn into lightly salted water in a 3:1 ratio (three times as much water as corn). Gently heat the corn  and water together, stirring occasionally and simmer on low heat, in a covered pan for ~20 min.

Crumb-Free Whole Grain Corn Bread: We make a large batch of the dry-mix ahead of time so it's easy to just add milk, eggs and oil for a quick batch of corn bread or pancakes. Yum! LINK-Recipe

Whole Grain No-Knead Bread: We've adapted Jim Lahey's delicious no-knead bread-recipe to incorporate whole wheat flour and blue-corn meal. So tasty and nourishing! LINK-Recipe


Scarlet Runner Beans: Here is a post about "Growing Your Own Protein - Scarlet Runner Beans" - LINK. Beans and corn together give you all the essential amino-acids needed in one meal (a complete protein) and it's delicious too!

Beautiful scarlet runner bean blossoms!
Leave us your tips for growing, and links to recipes in the comments below! (But please don't include ad-links to our 100% ad-free site - thanks!)


Saturday, September 6, 2025

Family Heirlooms - Saving Your Own Seed

Llyn, with a variety of bean seeds
In the Sharing Gardens we probably save about 80 - 90% of our own seeds. It really isn't that difficult to do and it is very gratifying to experience this deeper level of "local food self-reliance". If you have a garden plot that is separated from other gardens by at least 500 feet (to prevent unwanted cross-pollination) you can save your own seed. Even if there are other gardens nearby, there are many crops you can grow that will not cross (tomatoes, beans and onions, for example) so don't let that stop you.

There are many good reasons to save your own seed:
  • It will be more adapted to your local growing-conditions
  • You can "select" for certain qualities/characteristics (early ripening, sweetness, cold-tolerance etc)
  • The flowering plants provide food for pollinators
  • You have better control over the quality of your seed
  • You are not as dependent on supplies being available from outside sources
  • It's fun!
Chris, winnowing lettuce-seed.
Always start with Heirloom (or "open-pollinated") seed. "Hybrid" seed is developed in a carefully controlled environment that crosses unique qualities between parent-plants to yield consistent, specific results (like early-ripening "Early Girl" tomatoes). If you save seed from a hybrid plant, it is likely that it will revert back to one, or the other's parent-qualities and not give you the desired outcome. Many seed-companies will label their packets, or inform you in their catalog descriptions so you know what you are starting with;  or you can do an on-line search and have your "shopping list" handy next time you pick out seeds, or starts. Of course, once you start saving your own, you always know you've got "heirloom" seed.

Some plants easily cross-pollinate with other plants of the same family (see below). It is difficult to control the outcome of these crosses and, you won't know the results until you grow out the seed the following year. For example, many gardeners have had the experience of having a squash seed germinate in their compost pile, grow to gigantic proportions and discover at harvest time that their "zucchini" is funny shaped, or has a woody skin or poor flavor. These variations are due to cross-pollination. Peppers also cross easily so, if you grow hot- and sweet-peppers close to each other, the seed you save may either have "sweetened" your hot peppers, or "heated" up the sweet.
    Sometimes these crosses are beneficial, creating a variety that is an improvement over either of its "parents" but beneficial "crosses" are rare. Often (unless you know what you're doing) you'll end up with something that isn't quite as good as either of its parents.

    Squash-blossom with bees.
    Examples of plants that easily cross-pollinate:
    • Squash - with other squashes (some varieties won't cross with each other but for specifics, do more research HERE)
    • Cucumbers - with other varieties of cukes
    • Melons - with other varieties of melons
    • Peppers - with other peppers
    • Lettuce - with other lettuce
    • Broccoli/Cabbage/Kale/Cauliflower - with each other
    • Chard/Beets - with each other
    If you wish to save seed from the plants listed above you either need to learn which varieties cross and keep them far away from each other when they're going to seed, or grow them on alternate years.

    Some plants won't easily cross, even with other plants in the same family. Tomatoes are a good example: you can grow two, five or ten varieties in close proximity with each other and the seed you save will almost always have the same characteristics as the plant you picked it from. On rare occasions we've had tomatoes that were a 'cross' from two varieties of plants we grew the year before. (Though we haven't experienced it ourselves, we've heard that 'potato-leaf' varieties such as Stupice or Brandywine are especially susceptible to crossing.)

    Brandywine Heirloom tomatoes
    Examples of plants that won't easily cross-pollinate:
    • Tomatoes
    • Beans
    • Peas
    • Onion family (includes garlic, shallots, leeks)

    Can my garden seed cross with "weed" seed? Yes! There are wild relatives of domestic vegetables that, if flowering at the same time, can 'cross' making your seed produce fruit that is woody, or bitter or has other undesirable characteristics. Learn to identify your local weeds (especially if there are big, open fields of them nearby). Consult expert sources to learn of techniques to avoid this problem (i.e. hand pollinating, bagging the flowers, timing your bloom to avoid the wild varieties' blooming. etc). Examples: Wild lettuce can cross with domestic lettuce; Queen Anne's Lace is a wild variety of carrot.

    Dustin saving sunflower seed
    Can I "save seed" from produce I buy from the store? Sometimes, but not always. Tomatoes are often hybridized (and being "organic" does not mean they grew it from heirloom-seed). Melons are often from hybrid seed, and they may have been grown in a field next to other melons that they could have crossed with (true with squash as well). On the other hand, we have gotten excellent bean seeds at the bulk-food section of the grocery, and grown fantastic sunflowers from bulk-seed (raw and unsalted, and still in the shell -- of course.) See the article below, if you want to grow potatoes from grocery-store "seed".

    This post just covers some of the most basic aspects of seed-saving. For more detailed info, read our posts below and/or consult other sources through books or the internet.

    Please leave us comments about your own experiences of saving seed below. It's great when we can all learn from each other!

    Here are several posts we've written that include information on saving seed: (click on the bolded text.)

    Tomato Seeds: Tomatoes are a good plant to start with if you're learning to save seed. As long as you know that the plant you're saving from is not hybrid (see above) you are bound to be successful!


    Lettuce: Just be sure you save seed from only one variety of lettuce at a time (it crosses easily if plants are closer than 50-feet apart). With one plant you can save enough seed to keep you, and your whole neighborhood (!) supplied with seed for several seasons to come.


    Peas: are easy (if you can restrain yourself from picking every last ripe pea-pod <smile>). Be sure to follow the instructions in the post and, once the seed is fully ripened and dry, freeze the seed to prevent pea-weevil larvae from ruining your batch.


    Scarlet Runner Beans: Beautiful red blossoms, big seeds (easy to harvest and dry) and the most delicious bean we know of...what's not to like!


    Potatoes: If you're already growing potatoes, saving seed is as simple as sorting out the smaller egg-sized ones and storing them till next season. You can also find seed-potatoes in the organic section of your grocer's in the spring.


    Saving your own seed is only one of the many benefits of a sharing-type garden (one big garden, instead of many separate plots). To read about how a sharing garden works, and many of its other benefits, CLICK HERE- Overview of the Sharing Gardens).


    Ismael trimming dill seed-heads; lettuce going to seed in lower-left corner.

    A great post
    by Oregon State University Extension Service on saving seeds: A step-by-step guide to saving seeds
    The Sharing Gardens is a registered non-profit and tax-exempt organization. We exist entirely through donations. If you have found benefit from our project or our site, please consider making a small donation through PayPal. (Click button below.)


    Friday, September 5, 2025

    Grow your own Sorghum for grain and flour

    Small-Scale Grain Production and Processing

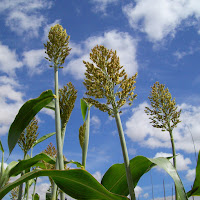
     (Re-published from Sept. 2024) For the past few years, the Sharing Gardens have been growing sorghum, amaranth and corn to process and use in baking, and breakfast cereals. 
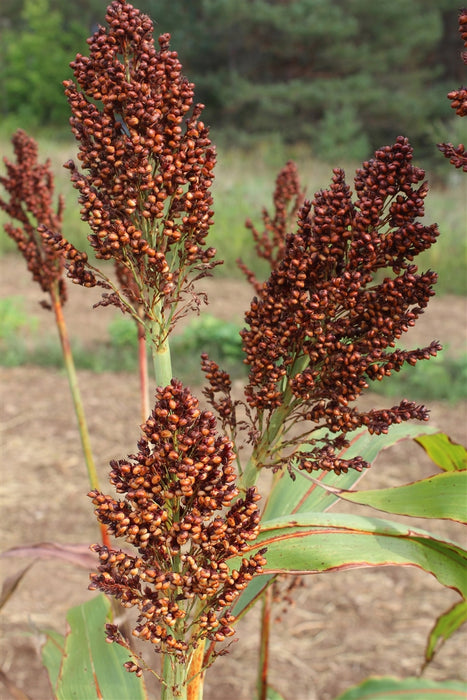
This post is specifically about growing, processing and storing sorghum on a small-scale. (Image left: Kassaby sorghum ripening.) To read about growing blue corn, and for other relevant LINKS, see below.

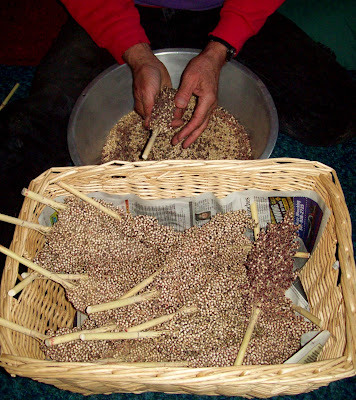
    Rook and Chris harvesting Ba Ye Ki sorghum.
    Sorghum is a highly nutritious grain. We live in USDA zone 8B, with relatively mild winters and a long enough growing season to ripen the types of sorghum listed below. We mainly use the grain, ground for hot breakfast cereal but sorghum, when ground finely, can be used in recipes for baked goods as well. It contains no gluten so it is appropriate for those on gluten-free diets. 7 Surprising Benefits of Sorghum, Are There Health Benefits to Eating Sorghum?.

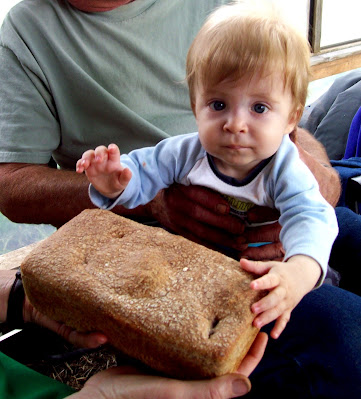
    Though sorghum has no gluten, when mixed with wheat flour, it still makes wonderful baked goods. Here it is with a Whole Grain No-knead Bread recipe we've made.

    Growing conditions needed:
    Sorghum grows to various heights (up to 12 feet!). The plant, in early stages, looks very similar to corn. We have experimented with two varieties, Ba Ye Ki and Kassaby. (Ba Ye Qi Grain Sorghum, Ba Yi Qi Grain Sorghum (Milo) and Kassaby Sorghum - description). Ba Ye Ki is a very short-season grain so we're almost guaranteed a ripe harvest but it is also much less sweet than Kassaby - whose canes have been compared in flavor to sugar cane. Ba Ye Ki is shorter in height (6'-7') vs. Kassaby which can grow to 12'. Because of Kassaby's greater height and its higher sugar content, it also requires a longer growing season. Both can grow in moderately rich soil but do require regular, moderate irrigation to really thrive (though I'm sure that people who have experience at dry-land farming could achieve success with less, or no watering, we have not developed that capacity on our farm).
    Ba-Ye-Qi Sorghum - Annapolis Seeds - Nova Scotia Canada
    Ba Ye Ki sorghum: a shorter crop (5'-7') and shorter season grain. Not as sweet... (pic credit: https://annapolisseeds.com/products/ba-ye-qi-sorghum)

    ...as Kassaby sorghum: taller (9'-12'), longer season, sweeter. Stalks can be pressed for syrup (though we've never tried it). (Image credit: https://store.experimentalfarmnetwork.org/products/kassaby-sorghum)

    Trellising: We have grown both varieties with, and without trellising. Kassaby - the taller variety has a sturdier stalk and seems to do fine without trellising. Ba Ye Ki, which produces grain faster, puts less energy into stalk formation and, in our experience, is prone to lodging. This can be mitigated somewhat by growing it in multiple rows or blocks of grain, with approximately 6" between plants in all directions. The plants will tend to hold each other up. 

    If you only have space for a single row, the type of trellising shown above will work. Strong cable/wire is stretched taught between 10' T-posts. In the picture, we've attached bamboo uprights for pole beans to climb on.Sorghum doesn't need the bamboo uprights, it just needs to be attached to the trellis once it reaches the height where it starts to "lodge" or fall over.

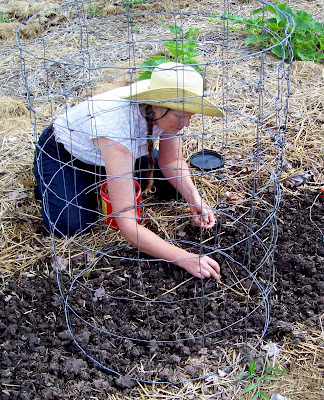
    Another trellising idea is to plant your grains inside a wire cage (6" between each plant, in each direction). The cage will keep them from lodging. This works for fava beans too!

    Sorghum is largely self-pollinated (each plant can pollinate itself) but plants can also cross-pollinate through wind or insects transferring pollen between plants. Growing multiple plants in rows or blocks will aid in cross-pollination. Also, when laying out your garden plan, keep in mind the height of the variety you are growing so they don't block smaller plants of sunlight and water as they grow in height. (Though you can use their height to your advantage if you want to grow a shade-loving crop like lettuce, on the north or east side, to protect it from the most intense afternoon sun.)

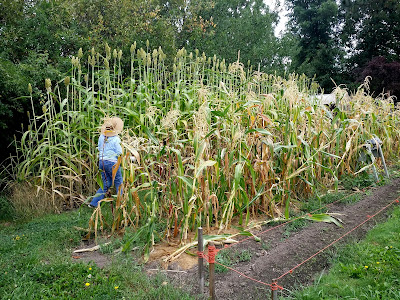
    Sorghum grows much like corn though it is "self-fertile" and relies less on wind than corn for full pollination. Kassaby sorghum is the tall, whiteish fronds to the left of Darlene while Golden Bantam corn is growing to her right.

    Starting sorghum from seed: We have used two different methods for germinating sorghum seeds. The easiest method is to prepare the ground to be as weed-free as possible and scatter the seed lightly; gently covering the seed by raking or a very shallow tilling, so the seed is barely covered with soil. Later, once the sprouts have come up to 3" or 4", plants should be thinned to 6" apart. 

    We've had good luck with direct-sowing our sorghum and shallowly tilling it under so it's just barely covered with soil. A good rule of thumb is to plant seeds twice the depth of the seed at its widest point.

    The down-side to the scatter method is that some varieties need a long season to ripen (Kassaby variety needs 110 days, minimum) so, if you're having a cool, wet spring and can't direct sow till late in the spring, you may wish to germinate the seeds in small pots in a greenhouse or grow-tunnel and transplant them once the ground warms up/drys out. We use jumbo six-packs, or the shallow, plastic containers that our favorite tofu comes in (with holes drilled in the bottom for drainage). To germinate in pots: we fill the pots with soil, water them and then make a small indentation with our thumb so the seeds will settle in these depressions (six per tofu pack). We then place 2-3 seeds in each cell to maximize germination. Once the seedlings are about 3" high, we thin them to one per cell. 

    If you try to grow them in a clusters of 2-3 plants, none of them will mature well as they compete for nutrients, water and sunlight. We have had success at teasing the individual sprouts apart at this stage and replanting them in their own cells. It just depends on if your supply of seed is limited so you need to make every seedling count and how much time you have to do this.

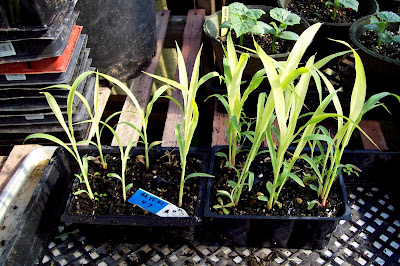
    Sorghum plants started in 'jumbo six-packs'. We sow 2-3 seeds in each cell and then thin to a single stalk, otherwise the plants compete for nutrients and light when they're transplanted to the field. Singles are on the left; the plants on the right have yet to be thinned to one plant per cell.
    Summer growth and maintenance: Irrigate the soil only as needed. Deeper, less frequent watering will encourage the roots to grow deep, pursuing the water-table and thus being more resilient to hot and dry periods and less likely to lodge (fall over) in the wind. Keep the bed as weed-free as possible till your plants are well-established. After that, they should be able to out-compete most weeds. 

    When to harvest: It's important to let your sorghum ripen as much as possible before harvesting. The seeds will be sweeter, and easier to thresh (remove) from the plant, the riper they are. On the other hand, autumn rains, if they aren't followed by strong sunny periods can lead to mold forming in the seed-heads. We start checking our crops for ripeness in mid-September. The Ba Ye Ki will darken to a strong russet/red. The Kassaby will become notably whiter as it ripens.

    We usually harvest the seed-heads over a span of several weeks. We use pruners to cut off ripe seed-heads with 8-10 inches of stalk still attached. This helps in the drying out process; the stalks draw moisture from the seed-heads as they dry. Having the long stalk also gives you something to hold onto for the threshing phase.

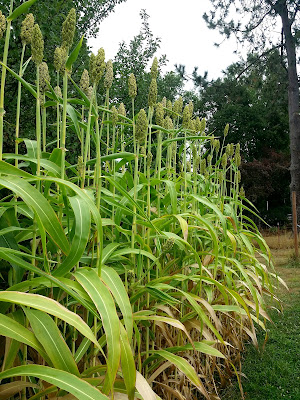
    Kassaby, long-season sorghum (tall and sweet) while it's still ripening. Kernels become a pearly white when they are ripe.
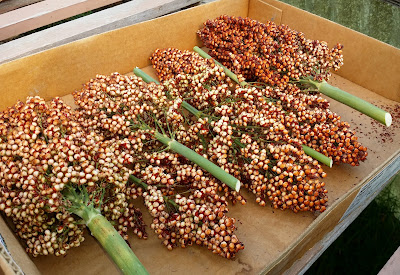
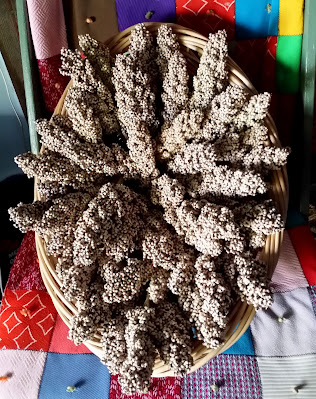
    Kassaby sorghum in baskets for drying (with one, red Ba Ye Qi seed-head on the right). We cut it with 8" - 10" stalks which helps it dry down (the stalk pulls out moisture from the kernels) and this gives us something to hold onto for combing the kernels off the stalk (see below).
     
    Ba ye Ki sorghum, laid out in cardboard boxes in our greenhouse while days are still sunny, warm and humidity is low. These aren't as red as they should be for ideal ripeness. Our season was cut short that year by cold, heavy rains. The sorghum was still edible; just not as sweet and it was harder to thresh as well.

    If we're having mostly sunny days with only moderate humidity, we lay the seed-heads on cardboard trays in our greenhouse to dry. If skies are overcast and the humidity is high, we put them in cardboard trays or baskets and bring them in the house. We heat our house with wood and have shelves all around the upper walls of our living room where our wood stove is, for the purpose of drying foods in the fall. Many fall mornings we'll start a small fire in the wood stove just to dry the air in our house and bring the temperature up slightly. Even if we have to open the windows later in the day (because outside temps have climbed) it's worth the few sticks of firewood to keep the drying process progressing.

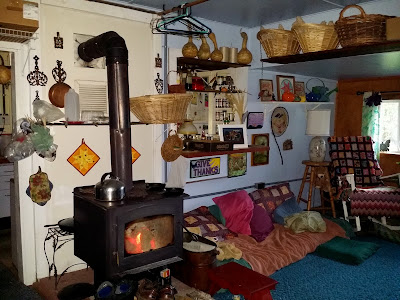
    As temperatures drop and humidity rises in the autumn, we bring our bean and grain crops inside and dry them in baskets and boxes on shelves above our wood stove. It's super important to make sure these crops are very dry. We've lost previous batches to mold that formed after we put the grains or beans into storage containers for the winter.

    Threshing the sorghum: We've tried several methods over the years to remove the grain from the stalks but this year Chris came up with our best method yet! He attached a metal pet-grooming-brush/comb to a 2' x 4' board (see pic). This is placed in a deep plastic tote to catch the seed as it falls. The seed-head is combed through the tines of the comb which causes the seeds to release and fall into the tote below.

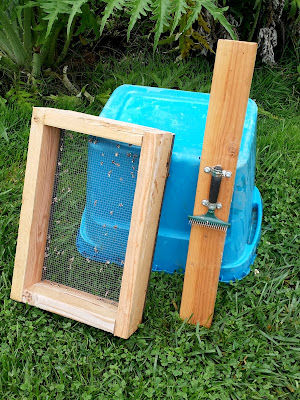
    This year, Chris built two new tools for processing the sorghum. Sifter, on the left, and a pet-comb attached to a 2'x4', for teasing the grain off of the stalk (right).

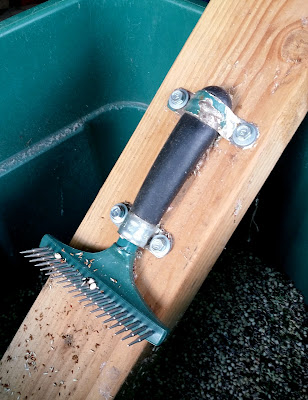
    Close-up of the tool we use to thresh the grain from the stalk. It's a pet-comb we found at a 2nd-hand store, bolted to a 2'x4' board.
    Close-up of pulling the grain-heads across the comb. This is why we always cut the grain-heads leaving several inches of stalk for use as a handle.
     
    Sifting: The next stage is to sift the seeds through a wire mesh with 1/4" sized holes. (This wire mesh is called "hardware cloth" in the USA). Chris made a framework that's the same size as the tote we're sifting into and solidly attached the mesh to its bottom edge. The grain is poured into the top and rubbed vigorously through the screen. The seeds fall through and (most) of the longer stems and chaff remain on the top of the screen.

    After the grain is teased from the stalk, it is vigorously rubbed through a screen with 1/4" holes. This breaks up the clumps of grains into individual pieces and removes much of the chaff which remains on the screen.

    Winnowing:
    There will still be some fiber that makes it through the screen so, on a day with a mildly steady wind (or standing in front of a box-fan) pour the grain back and forth from one container to an other. You will have to experiment to find the right height from which to drop the grain and, if using a fan, how far from the front of the fan to pour the grain. It's helpful if your containers are lightweight (so it's easy to pour them when full of grain) and with a wide surface area so that, as the grain falls straight down, it's not bouncing off the rim of the receiving container. The grain will fall straight into the container below and the chaff will be blown away by the wind. 
     
    Repeatedly pour the grain back and forth between your two pans until you've achieved results you're satisfied with. There's no need for you to winnow out all the chaff. Just do the best you can. Any un-removed chaff will float in the cooking water if you cook it whole and can be scooped or poured off before you cook it or, if you're grinding cereal or flour, will be ground along with the seed and just provide some extra fiber to your diet!

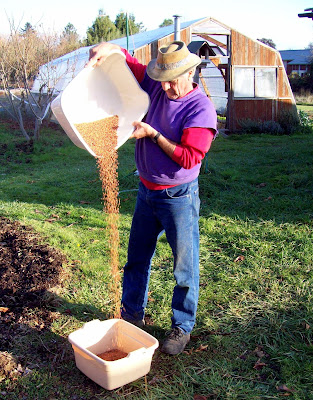
    We winnow the grain, separating the remainder of the chaff (or at least most of it) by pouring it from one container to the other multiple times on a mildly windy day (or in front of a fan). The heavier grain drops into the container below while the chaff blows away.
    Drying: As our sorghum seed progresses through these phases of threshing, sifting and winnowing, we put it back into a warm, dry place between each step to keep it from absorbing more moisture. At the end of all these steps we put it into cardboard flats, or shallow pans (to give the maximum surface area) and keep it on our drying shelves until we are absolutely certain it is completely dry. Grains that are stored moist, can end up molding in your pantry and be ruined.

    Here's a top view of sorghum heads drying in a basket.
    Grinding: Though we've seen recipes for cooking sorghum while still whole (How To Cook Wholegrain Sorghum) we've always used ours in a ground form: either coarsely ground for cereal, or finely ground for flour to use in baked goods. It adds a sweet, almost nutty taste to our hot cereal mix. We use a Diamant grain mill that Chris hooked up to an old motor with a clothes-dryer belt. This greatly speeds up the process of grinding - though if we ever lost electricity for an extended period, we can easily convert it back to being hand-ground.

    Chris hooked up our Diamant grain mill to an electric motor so we're able to efficiently grind enough grain for our own use as well as to share with our volunteers.

    Course ground sorghum for use in hot cereal.
    We hope this tutorial has been helpful and inspires you to begin growing sorghum yourself. Please post your questions and comments below so we can all benefit from them.
     
    Seed Saving: Save the ripest, driest grains/seeds for future plantings. One seed-head has enough seeds  for most small-scale grain growers, with enough to share with other growers in your area!

      Here is the post we wrote about growing and processing your own blue corn
      for drying and grinding. These methods also work for growing/processing 
     Golden Bantam and other varieties of corn. Grow Your Own 'Blue Corn' 
     
     And here's a recipe we've developed to make a Crumb-Free, Whole-Grain Cornbread  (just substitute sorghum flour in a 1:1 ratio with the corn flour in the recipe).
     
    If you'd like to try popping sorghum (like popcorn), Click here: How to Make Perfectly Popped Sorghum (3 Min Recipe) or, if you're more visually oriented, here's a video: How to Pop Grain Sorghum Seeds Like Popcorn with Oil
     
    Here is an excellent video about making sorghum syrup from the canes: Making Sorghum Syrup! Best Crop For A Self Sufficient Homestead!

    Growing grains as a community makes the task of processing it much less daunting. Here, Jessie and Llyn are husking the corn in preparation for shucking and further drying.